JSON, Jackson 및 클라이언트 프로그램을 사용한 Spring Restful 웹 서비스 예제

스프링 REST
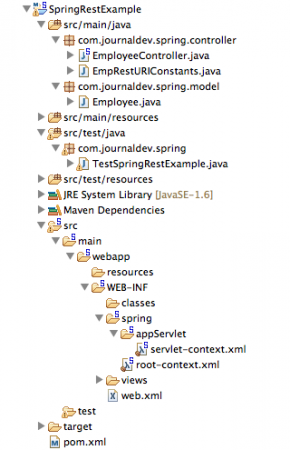
Spring REST 구성 XML 파일
pom.xml 파일은 아래와 같습니다.
<?xml version="1.0" encoding="UTF-8"?>
<project xmlns="https://maven.apache.org/POM/4.0.0" xmlns:xsi="https://www.w3.org/2001/XMLSchema-instance"
	xsi:schemaLocation="https://maven.apache.org/POM/4.0.0 https://maven.apache.org/maven-v4_0_0.xsd">
	<modelVersion>4.0.0</modelVersion>
	<groupId>com.journaldev</groupId>
	<artifactId>SpringRestExample</artifactId>
	<name>SpringRestExample</name>
	<packaging>war</packaging>
	<version>1.0.0-BUILD-SNAPSHOT</version>
	<properties>
		<java-version>1.6</java-version>
		<org.springframework-version>4.0.0.RELEASE</org.springframework-version>
		<org.aspectj-version>1.7.4</org.aspectj-version>
		<org.slf4j-version>1.7.5</org.slf4j-version>
		<jackson.databind-version>2.2.3</jackson.databind-version>
	</properties>
	<dependencies>
		<!-- Jackson -->
		<dependency>
			<groupId>com.fasterxml.jackson.core</groupId>
			<artifactId>jackson-databind</artifactId>
			<version>${jackson.databind-version}</version>
		</dependency>
		<!-- Spring -->
		<dependency>
			<groupId>org.springframework</groupId>
			<artifactId>spring-context</artifactId>
			<version>${org.springframework-version}</version>
			<exclusions>
				<!-- Exclude Commons Logging in favor of SLF4j -->
				<exclusion>
					<groupId>commons-logging</groupId>
					<artifactId>commons-logging</artifactId>
				</exclusion>
			</exclusions>
		</dependency>
		<dependency>
			<groupId>org.springframework</groupId>
			<artifactId>spring-webmvc</artifactId>
			<version>${org.springframework-version}</version>
		</dependency>

		<!-- AspectJ -->
		<dependency>
			<groupId>org.aspectj</groupId>
			<artifactId>aspectjrt</artifactId>
			<version>${org.aspectj-version}</version>
		</dependency>

		<!-- Logging -->
		<dependency>
			<groupId>org.slf4j</groupId>
			<artifactId>slf4j-api</artifactId>
			<version>${org.slf4j-version}</version>
		</dependency>
		<dependency>
			<groupId>org.slf4j</groupId>
			<artifactId>jcl-over-slf4j</artifactId>
			<version>${org.slf4j-version}</version>
			<scope>runtime</scope>
		</dependency>
		<dependency>
			<groupId>org.slf4j</groupId>
			<artifactId>slf4j-log4j12</artifactId>
			<version>${org.slf4j-version}</version>
			<scope>runtime</scope>
		</dependency>
		<dependency>
			<groupId>log4j</groupId>
			<artifactId>log4j</artifactId>
			<version>1.2.15</version>
			<exclusions>
				<exclusion>
					<groupId>javax.mail</groupId>
					<artifactId>mail</artifactId>
				</exclusion>
				<exclusion>
					<groupId>javax.jms</groupId>
					<artifactId>jms</artifactId>
				</exclusion>
				<exclusion>
					<groupId>com.sun.jdmk</groupId>
					<artifactId>jmxtools</artifactId>
				</exclusion>
				<exclusion>
					<groupId>com.sun.jmx</groupId>
					<artifactId>jmxri</artifactId>
				</exclusion>
			</exclusions>
			<scope>runtime</scope>
		</dependency>

		<!-- @Inject -->
		<dependency>
			<groupId>javax.inject</groupId>
			<artifactId>javax.inject</artifactId>
			<version>1</version>
		</dependency>

		<!-- Servlet -->
		<dependency>
			<groupId>javax.servlet</groupId>
			<artifactId>servlet-api</artifactId>
			<version>2.5</version>
			<scope>provided</scope>
		</dependency>
		<dependency>
			<groupId>javax.servlet.jsp</groupId>
			<artifactId>jsp-api</artifactId>
			<version>2.1</version>
			<scope>provided</scope>
		</dependency>
		<dependency>
			<groupId>javax.servlet</groupId>
			<artifactId>jstl</artifactId>
			<version>1.2</version>
		</dependency>

		<!-- Test -->
		<dependency>
			<groupId>junit</groupId>
			<artifactId>junit</artifactId>
			<version>4.7</version>
			<scope>test</scope>
		</dependency>
	</dependencies>
	<build>
		<plugins>
			<plugin>
				<artifactId>maven-eclipse-plugin</artifactId>
				<version>2.9</version>
				<configuration>
					<additionalProjectnatures>
						<projectnature>org.springframework.ide.eclipse.core.springnature</projectnature>
					</additionalProjectnatures>
					<additionalBuildcommands>
						<buildcommand>org.springframework.ide.eclipse.core.springbuilder</buildcommand>
					</additionalBuildcommands>
					<downloadSources>true</downloadSources>
					<downloadJavadocs>true</downloadJavadocs>
				</configuration>
			</plugin>
			<plugin>
				<groupId>org.apache.maven.plugins</groupId>
				<artifactId>maven-compiler-plugin</artifactId>
				<version>2.5.1</version>
				<configuration>
					<source>1.6</source>
					<target>1.6</target>
					<compilerArgument>-Xlint:all</compilerArgument>
					<showWarnings>true</showWarnings>
					<showDeprecation>true</showDeprecation>
				</configuration>
			</plugin>
			<plugin>
				<groupId>org.codehaus.mojo</groupId>
				<artifactId>exec-maven-plugin</artifactId>
				<version>1.2.1</version>
				<configuration>
					<mainClass>org.test.int1.Main</mainClass>
				</configuration>
			</plugin>
		</plugins>

	</build>
</project>
STS 도구는 우리를 위해 pom.xml 파일을 생성합니다. 그러나 Spring Framework, AspectJ, SLF4J 및 Jackson 버전을 오늘 현재 최신 버전으로 업데이트했습니다. 대부분의 부분은 일반적이며 자동으로 생성됩니다. 주목해야 할 중요한 점은 개체를 JSON으로 또는 그 반대로 변환하는 데 사용할 잭슨 JSON 라이브러리를 종속성에 추가했다는 것입니다.
<?xml version="1.0" encoding="UTF-8"?>
<web-app version="2.5" xmlns="https://java.sun.com/xml/ns/javaee"
	xmlns:xsi="https://www.w3.org/2001/XMLSchema-instance"
	xsi:schemaLocation="https://java.sun.com/xml/ns/javaee https://java.sun.com/xml/ns/javaee/web-app_2_5.xsd">

	<!-- The definition of the Root Spring Container shared by all Servlets and Filters -->
	<context-param>
		<param-name>contextConfigLocation</param-name>
		<param-value>/WEB-INF/spring/root-context.xml</param-value>
	</context-param>

	<!-- Creates the Spring Container shared by all Servlets and Filters -->
	<listener>
		<listener-class>org.springframework.web.context.ContextLoaderListener</listener-class>
	</listener>

	<!-- Processes application requests -->
	<servlet>
		<servlet-name>appServlet</servlet-name>
		<servlet-class>org.springframework.web.servlet.DispatcherServlet</servlet-class>
		<init-param>
			<param-name>contextConfigLocation</param-name>
			<param-value>/WEB-INF/spring/appServlet/servlet-context.xml</param-value>
		</init-param>
		<load-on-startup>1</load-on-startup>
	</servlet>

	<servlet-mapping>
		<servlet-name>appServlet</servlet-name>
		<url-pattern>/</url-pattern>
	</servlet-mapping>

</web-app>
이 파일은 자동으로 생성되며 아무 것도 변경하지 않았습니다. 그러나 컨텍스트 구성 파일과 해당 위치를 변경하려는 경우 web.xml 파일에서 변경할 수 있습니다.
<?xml version="1.0" encoding="UTF-8"?>
<beans xmlns="https://www.springframework.org/schema/beans"
	xmlns:xsi="https://www.w3.org/2001/XMLSchema-instance"
	xsi:schemaLocation="https://www.springframework.org/schema/beans https://www.springframework.org/schema/beans/spring-beans.xsd">

	<!-- Root Context: defines shared resources visible to all other web components -->

</beans>
이 파일에는 모든 웹 구성 요소에서 볼 수 있는 공유 리소스가 포함되어 있으며 간단한 휴식 서비스를 개발할 예정이므로 여기에서 아무 것도 변경하지 않았습니다.
<?xml version="1.0" encoding="UTF-8"?>
<beans:beans xmlns="https://www.springframework.org/schema/mvc"
	xmlns:xsi="https://www.w3.org/2001/XMLSchema-instance"
	xmlns:beans="https://www.springframework.org/schema/beans"
	xmlns:context="https://www.springframework.org/schema/context"
	xsi:schemaLocation="https://www.springframework.org/schema/mvc https://www.springframework.org/schema/mvc/spring-mvc.xsd
		https://www.springframework.org/schema/beans https://www.springframework.org/schema/beans/spring-beans.xsd
		https://www.springframework.org/schema/context https://www.springframework.org/schema/context/spring-context.xsd">

	<!-- DispatcherServlet Context: defines this servlet's request-processing infrastructure -->

	<!-- Enables the Spring MVC @Controller programming model -->
	<annotation-driven />

	<!-- Handles HTTP GET requests for /resources/** by efficiently serving up static resources in the ${webappRoot}/resources directory -->
	<resources mapping="/resources/**" location="/resources/" />

	<!-- Resolves views selected for rendering by @Controllers to .jsp resources in the /WEB-INF/views directory -->
	<beans:bean class="org.springframework.web.servlet.view.InternalResourceViewResolver">
		<beans:property name="prefix" value="/WEB-INF/views/" />
		<beans:property name="suffix" value=".jsp" />
	</beans:bean>

	<!-- Configure to plugin JSON as request and response in method handler -->
	<beans:bean class="org.springframework.web.servlet.mvc.method.annotation.RequestMappingHandlerAdapter">
		<beans:property name="messageConverters">
			<beans:list>
				<beans:ref bean="jsonMessageConverter"/>
			</beans:list>
		</beans:property>
	</beans:bean>

	<!-- Configure bean to convert JSON to POJO and vice versa -->
	<beans:bean id="jsonMessageConverter" class="org.springframework.http.converter.json.MappingJackson2HttpMessageConverter">
	</beans:bean>

	<context:component-scan base-package="com.journaldev.spring.controller" />

</beans:beans>
대부분의 부품은 자동 생성되며 상용구 구성을 포함합니다. 그러나 주목해야 할 중요한 점은 주석 기반 구성을 지원하고 Jackson API가 시작되도록 MappingJackson2HttpMessageConverter를 RequestMappingHandlerAdapter messageConverters에 연결하는 주석 기반 요소입니다. JSON을 Java Beans로 또는 그 반대로 변환합니다. 이 구성을 사용하면 요청 본문에 JSON을 사용하고 응답으로 JSON 데이터를 받게 됩니다.
Spring REST 모델 클래스
Restful 웹 서비스 메서드에 대한 입력 및 출력 역할을 할 간단한 POJO 클래스를 작성해 보겠습니다.
package com.journaldev.spring.model;

import java.io.Serializable;
import java.util.Date;

import com.fasterxml.jackson.databind.annotation.JsonSerialize;
import com.fasterxml.jackson.databind.ser.std.DateSerializer;

public class Employee implements Serializable{

	private static final long serialVersionUID = -7788619177798333712L;

	private int id;
	private String name;
	private Date createdDate;

	public int getId() {
		return id;
	}
	public void setId(int id) {
		this.id = id;
	}
	public String getName() {
		return name;
	}
	public void setName(String name) {
		this.name = name;
	}

	@JsonSerialize(using=DateSerializer.class)
	public Date getCreatedDate() {
		return createdDate;
	}
	public void setCreatedDate(Date createdDate) {
		this.createdDate = createdDate;
	}


}
주목해야 할 유일한 중요한 점은 @JsonSerialize 주석을 사용하여 DateSerializer 클래스를 Java 유형에서 JSON 형식으로 또는 그 반대로 날짜 변환에 사용한다는 점입니다.
Spring Restful 웹 서비스 끝점
다음과 같은 나머지 웹 서비스 엔드포인트가 있습니다.
| Sl. No | URI | HTTP Method | Details |
|---|---|---|---|
| 1 | /rest/emp/dummy | GET | Health Check service, to insert a dummy data in the Employees data storage |
| 2 | /rest/emp/{id} | GET | To get the Employee object based on the id |
| 3 | /rest/emps | GET | To get the list of all the Employees in the data store |
| 4 | /rest/emp/create | POST | To create the Employee object and store it |
| 5 | /rest/emp/delete/{id} | PUT | To delete the Employee object from the data storage based on the id |
이러한 모든 URI를 문자열 상수로 정의하는 클래스가 있습니다.
package com.journaldev.spring.controller;

public class EmpRestURIConstants {

	public static final String DUMMY_EMP = "/rest/emp/dummy";
	public static final String GET_EMP = "/rest/emp/{id}";
	public static final String GET_ALL_EMP = "/rest/emps";
	public static final String CREATE_EMP = "/rest/emp/create";
	public static final String DELETE_EMP = "/rest/emp/delete/{id}";
}
Spring Restful 웹 서비스 컨트롤러 클래스
EmployeeController 클래스는 위에서 언급한 모든 웹 서비스 끝점을 게시합니다. 클래스의 코드를 살펴보고 각 메서드에 대해 자세히 알아보겠습니다.
package com.journaldev.spring.controller;
import java.util.ArrayList;
import java.util.Date;
import java.util.HashMap;
import java.util.List;
import java.util.Map;
import java.util.Set;
import org.slf4j.Logger;
import org.slf4j.LoggerFactory;
import org.springframework.stereotype.Controller;
import org.springframework.web.bind.annotation.PathVariable;
import org.springframework.web.bind.annotation.RequestBody;
import org.springframework.web.bind.annotation.RequestMapping;
import org.springframework.web.bind.annotation.RequestMethod;
import org.springframework.web.bind.annotation.ResponseBody;
import com.journaldev.spring.model.Employee;
/**
* Handles requests for the Employee service.
*/
@Controller
public class EmployeeController {
private static final Logger logger = LoggerFactory.getLogger(EmployeeController.class);
//Map to store employees, ideally we should use database
Map<Integer, Employee> empData = new HashMap<Integer, Employee>();
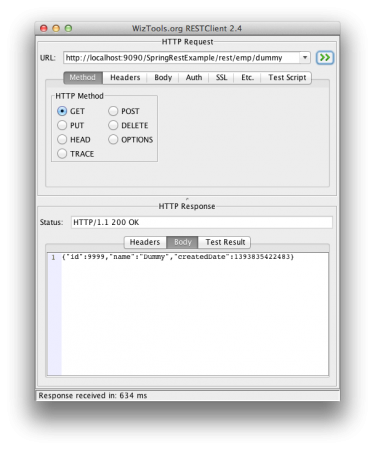
@RequestMapping(value = EmpRestURIConstants.DUMMY_EMP, method = RequestMethod.GET)
public @ResponseBody Employee getDummyEmployee() {
logger.info("Start getDummyEmployee");
Employee emp = new Employee();
emp.setId(9999);
emp.setName("Dummy");
emp.setCreatedDate(new Date());
empData.put(9999, emp);
return emp;
}
@RequestMapping(value = EmpRestURIConstants.GET_EMP, method = RequestMethod.GET)
public @ResponseBody Employee getEmployee(@PathVariable("id") int empId) {
logger.info("Start getEmployee. ID="+empId);
return empData.get(empId);
}
@RequestMapping(value = EmpRestURIConstants.GET_ALL_EMP, method = RequestMethod.GET)
public @ResponseBody List<Employee> getAllEmployees() {
logger.info("Start getAllEmployees.");
List<Employee> emps = new ArrayList<Employee>();
Set<Integer> empIdKeys = empData.keySet();
for(Integer i : empIdKeys){
emps.add(empData.get(i));
}
return emps;
}
@RequestMapping(value = EmpRestURIConstants.CREATE_EMP, method = RequestMethod.POST)
public @ResponseBody Employee createEmployee(@RequestBody Employee emp) {
logger.info("Start createEmployee.");
emp.setCreatedDate(new Date());
empData.put(emp.getId(), emp);
return emp;
}
@RequestMapping(value = EmpRestURIConstants.DELETE_EMP, method = RequestMethod.PUT)
public @ResponseBody Employee deleteEmployee(@PathVariable("id") int empId) {
logger.info("Start deleteEmployee.");
Employee emp = empData.get(empId);
empData.remove(empId);
return emp;
}
}
Spring Rest 클라이언트 프로그램
나머지 클라이언트는 나머지 웹 서비스를 테스트하는 데 적합하지만 대부분의 경우 프로그램을 통해 나머지 서비스를 호출해야 합니다. Spring RestTemplate을 사용하여 이러한 메소드를 쉽게 호출할 수 있습니다. 아래는 RestTemplate API를 사용하여 애플리케이션 나머지 메서드를 호출하는 간단한 프로그램입니다.
package com.journaldev.spring;

import java.util.LinkedHashMap;
import java.util.List;

import org.springframework.web.client.RestTemplate;

import com.journaldev.spring.controller.EmpRestURIConstants;
import com.journaldev.spring.model.Employee;

public class TestSpringRestExample {

	public static final String SERVER_URI = "https://localhost:9090/SpringRestExample";

	public static void main(String args[]){

		testGetDummyEmployee();
		System.out.println("*****");
		testCreateEmployee();
		System.out.println("*****");
		testGetEmployee();
		System.out.println("*****");
		testGetAllEmployee();
	}

	private static void testGetAllEmployee() {
		RestTemplate restTemplate = new RestTemplate();
		//we can't get List<Employee> because JSON convertor doesn't know the type of
		//object in the list and hence convert it to default JSON object type LinkedHashMap
		List<LinkedHashMap> emps = restTemplate.getForObject(SERVER_URI+EmpRestURIConstants.GET_ALL_EMP, List.class);
		System.out.println(emps.size());
		for(LinkedHashMap map : emps){
			System.out.println("ID="+map.get("id")+",Name="+map.get("name")+",CreatedDate="+map.get("createdDate"));;
		}
	}

	private static void testCreateEmployee() {
		RestTemplate restTemplate = new RestTemplate();
		Employee emp = new Employee();
		emp.setId(1);emp.setName("Pankaj Kumar");
		Employee response = restTemplate.postForObject(SERVER_URI+EmpRestURIConstants.CREATE_EMP, emp, Employee.class);
		printEmpData(response);
	}

	private static void testGetEmployee() {
		RestTemplate restTemplate = new RestTemplate();
		Employee emp = restTemplate.getForObject(SERVER_URI+"/rest/emp/1", Employee.class);
		printEmpData(emp);
	}

	private static void testGetDummyEmployee() {
		RestTemplate restTemplate = new RestTemplate();
		Employee emp = restTemplate.getForObject(SERVER_URI+EmpRestURIConstants.DUMMY_EMP, Employee.class);
		printEmpData(emp);
	}

	public static void printEmpData(Employee emp){
		System.out.println("ID="+emp.getId()+",Name="+emp.getName()+",CreatedDate="+emp.getCreatedDate());
	}
}
대부분의 프로그램은 이해하기 쉽지만 Collection을 반환하는 나머지 메서드를 호출할 때 LinkedHashMap을 사용해야 합니다. JSON에서 개체로의 변환은 Employee 개체에 대해 알지 못하고 이를 다음의 컬렉션으로 변환하기 때문입니다. LinkedHashMap. LinkedHashMap에서 Java Bean 개체로 변환하는 유틸리티 메서드를 작성할 수 있습니다. 위의 프로그램을 실행하면 콘솔에 다음과 같은 출력이 표시됩니다.
ID=9999,Name=Dummy,CreatedDate=Tue Mar 04 21:02:41 PST 2014
*****
ID=1,Name=Pankaj Kumar,CreatedDate=Tue Mar 04 21:02:41 PST 2014
*****
ID=1,Name=Pankaj Kumar,CreatedDate=Tue Mar 04 21:02:41 PST 2014
*****
2
ID=1,Name=Pankaj Kumar,CreatedDate=1393995761654
ID=9999,Name=Dummy,CreatedDate=1393995761381
또 다른 요점은 RestTemplate put 메소드에는 응답 객체를 설정하는 옵션이 없다는 것입니다. 왜냐하면 PUT 메소드는 서버에 무언가를 저장하는 데 사용되어야 하고 간단한 HTTP 200 상태 코드로 충분해야 하기 때문입니다.
Spring Restful Webservice 프로젝트 다운로드
이것이 Spring Restful 웹 애플리케이션 튜토리얼의 전부입니다. 위 링크에서 샘플 프로젝트를 다운로드하고 이를 가지고 놀면서 자세히 알아보세요. 업데이트: XML과 유사한 예제를 제공하고 XML과 JSON을 모두 지원하라는 요청이 너무 많기 때문에 XML 및 JSON 요청과 응답을 모두 지원하도록 Spring REST XML JSON 예제에서 이 애플리케이션을 확장했습니다. 나는 당신이 스프링 프레임워크의 아름다움과 이것을 달성하는 것이 얼마나 쉬운지 보기 위해 그것을 해볼 것을 강력히 제안합니다.
GitHub 리포지토리에서 전체 프로젝트를 다운로드할 수 있습니다.