Debian 11에서 Nginx 및 SSL을 사용하여 AbanteCart를 설치하는 방법
이 페이지에서
- 전제 조건
- 1단계 - 방화벽 구성\n
- 2단계 - PHP 설치
- 3단계 - MySQL 설치
- 4단계 - Nginx 설치
- 5단계 - AbanteCart용 MySQL 구성
- 6단계 - AbanteCart 설치
- 7단계 - SSL 설치
- 8단계 - Nginx 및 PHP 구성
- PHP-FPM 구성
- Nginx 구성
Abantecart는 기능이 풍부한 무료 오픈 소스 전자상거래 애플리케이션입니다. PHP로 작성되었으며 HTML5, Bootstrap, MVC 등과 같은 최신 기술로 구동됩니다. 디지털 및 물리적 제품, 여러 지불 게이트웨이 및 통화와의 통합, 여러 언어, 쿠폰, 상점 크레딧 및 고객 대시보드를 지원하는 단일 설치를 사용하여 여러 온라인 상점을 만들 수 있습니다. 이를 통해 이메일 마케팅 캠페인을 실행하거나 배너를 만들어 사용자 참여를 높일 수 있습니다. 또한 친숙한 URL 지원으로 최적화된 SEO이며 여러 분석 플랫폼과 통합되며 플러그인을 지원합니다.
이 튜토리얼에서는 Debian 11 기반 서버에 Abantecart를 설치하는 방법을 배웁니다.
전제 조건
-
A server running Debian 11.
-
A non-root user with sudo privileges.
-
Everything is updated.
$ sudo apt update && sudo apt upgrade
-
Few packages that your system needs.
$ sudo apt install wget curl nano ufw software-properties-common dirmngr apt-transport-https gnupg2 ca-certificates lsb-release unzip debian-archive-keyring -y
Some of these packages may already be installed on your system.
1단계 - 방화벽 구성
첫 번째 단계는 방화벽을 구성하는 것입니다. 데비안은 ufw(복잡하지 않은 방화벽)와 함께 제공됩니다.
방화벽이 실행 중인지 확인하십시오.
$ sudo ufw status
다음 출력을 얻어야 합니다.
Status: inactive
방화벽이 활성화 시 현재 연결을 끊지 않도록 SSH 포트를 허용합니다.
$ sudo ufw allow OpenSSH
HTTP 및 HTTPS 포트도 허용합니다.
$ sudo ufw allow 80/tcp
$ sudo ufw allow 443/tcp
방화벽 활성화
$ sudo ufw enable
Command may disrupt existing ssh connections. Proceed with operation (y|n)? y
Firewall is active and enabled on system startup
방화벽의 상태를 다시 확인하십시오.
$ sudo ufw status
비슷한 출력이 표시되어야 합니다.
Status: active

To                         Action      From
--                         ------      ----
OpenSSH                    ALLOW       Anywhere
80/tcp                     ALLOW       Anywhere
443/tcp                    ALLOW       Anywhere
OpenSSH (v6)               ALLOW       Anywhere (v6)
80/tcp (v6)                ALLOW       Anywhere (v6)
443/tcp (v6)               ALLOW       Anywhere (v6)
2단계 - PHP 설치
아반테카트는 PHP 8.0을 지원합니다. 설치하려면 Ondrejs PHP 저장소를 사용합니다. 다음 명령을 실행하여 리포지토리를 추가합니다.
$ echo "deb https://packages.sury.org/php/ $(lsb_release -sc) main" | sudo tee /etc/apt/sources.list.d/sury-php.list
리포지토리와 연결된 GPG 키를 추가합니다.
$ wget -qO - https://packages.sury.org/php/apt.gpg | sudo apt-key add -
Debian 리포지토리를 업데이트합니다.
$ sudo apt update
PHP 8.0 및 필요한 확장을 설치합니다.
$ sudo apt install php8.0-cli php8.0-fpm php8.0-mysql php8.0-gd php8.0-common php8.0-curl php8.0-xml php8.0-mbstring
3단계 - MySQL 설치
MySQL 서버를 설치하기 위한 첫 번째 단계는 패키지의 GPG 키를 추가하는 것입니다.
데비안에는
.gpg디렉토리를 설정하기 위해 별도로 GPG 명령을 실행해야 하는 버그가 있습니다.$ sudo gpg
Ctrl + C를 눌러 위의 명령을 종료합니다. GPG 키를 가져와
/usr/share/keyrings디렉터리에 저장합니다.$ sudo gpg --no-default-keyring --keyring /usr/share/keyrings/mysql8.0-archive-keyring.gpg --keyserver hkp://keyserver.ubuntu.com:80 --brecv-keys 3A79BD29
공식 MySQL 저장소를 추가합니다.
$ echo "deb [arch=amd64 signed-by=/usr/share/keyrings/mysql8.0-archive-keyring.gpg] http://repo.mysql.com/apt/debian/ `lsb_release -cs` mysql-8.0" \
    | sudo tee /etc/apt/sources.list.d/mysql-8.list
Debian 리포지토리를 업데이트합니다.
$ sudo apt update
MySQL을 설치합니다.
$ sudo apt install mysql-server
루트 암호를 설정하라는 구성 화면이 나타납니다. 강력한 암호를 선택하십시오.
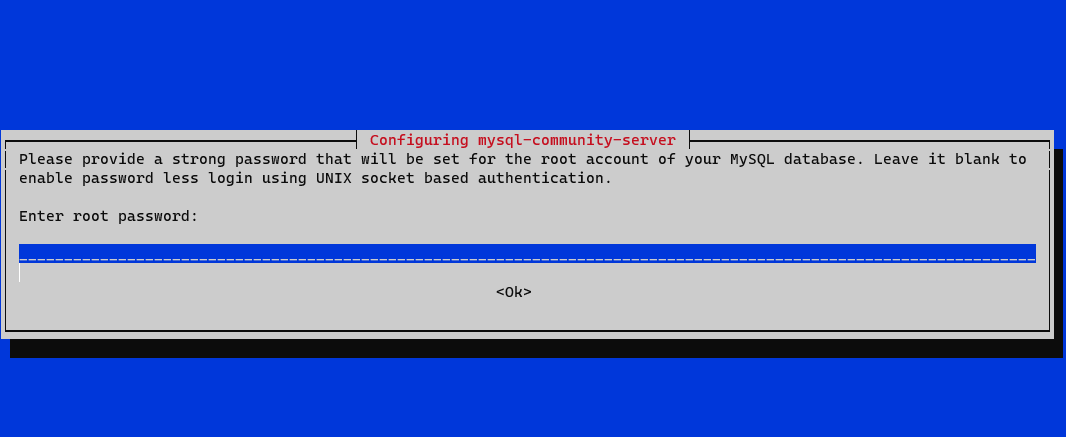
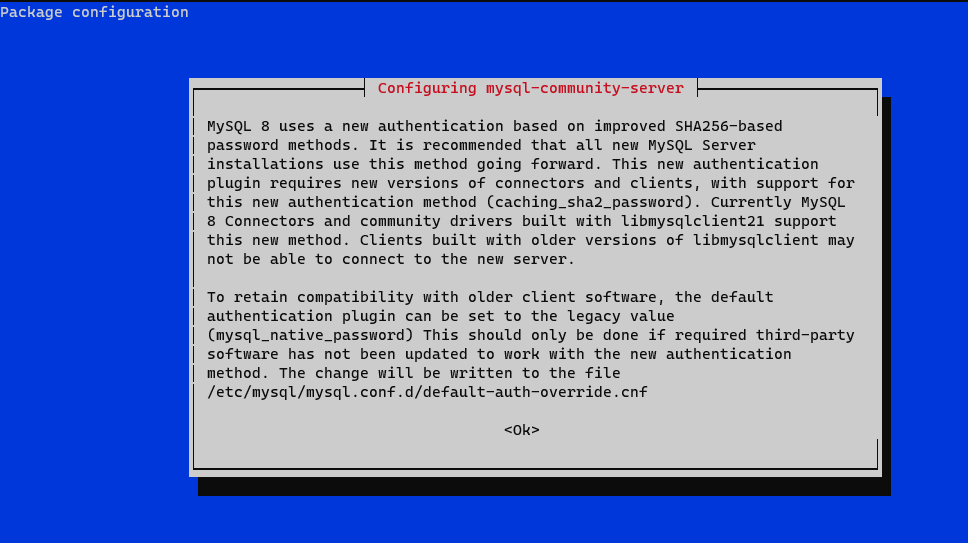
비밀번호를 확인하라는 메시지가 표시됩니다. 다음으로 새 인증 시스템을 설명하는 화면이 표시됩니다. 계속하려면 확인을 선택합니다.
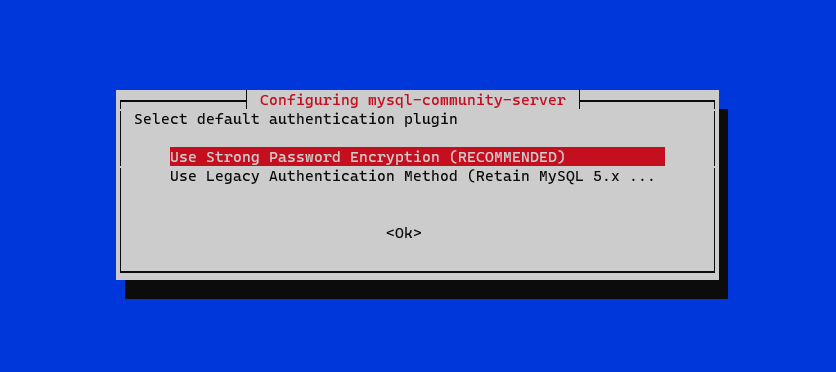
마지막으로 인증 방법을 선택하라는 메시지가 표시됩니다. 강력한 암호 암호화를 선택하고 확인을 선택하여 설정을 마칩니다.
4단계 - Nginx 설치
Debian은 이전 버전의 Nginx와 함께 제공됩니다. 최신 버전을 설치하려면 공식 Nginx 저장소를 다운로드해야 합니다.
공식 Nginx 서명 키를 가져옵니다.
$ curl https://nginx.org/keys/nginx_signing.key | gpg --dearmor \
	 | sudo tee /usr/share/keyrings/nginx-archive-keyring.gpg >/dev/null
Nginxs 안정 버전용 리포지토리를 추가합니다.
$ echo "deb [signed-by=/usr/share/keyrings/nginx-archive-keyring.gpg arch=amd64] \
    http://nginx.org/packages/debian `lsb_release -cs` nginx" \
    | sudo tee /etc/apt/sources.list.d/nginx.list
Debian 리포지토리를 업데이트합니다.
$ sudo apt update
Nginx를 설치합니다.
$ sudo apt install nginx
설치를 확인하십시오. Debian에서 Nginx 명령을 실행할 때마다
sudo를 사용해야 합니다. 그렇지 않으면 작동하지 않습니다.$ sudo nginx -v nginx version: nginx/1.20.2
Nginx 서비스를 활성화합니다.
$ sudo systemctl enable nginx
5단계 - AbanteCart용 MySQL 구성
안전한 MySQL 설치.
$ sudo mysql_secure_installation
첫 번째 단계에서는 루트 암호를 묻는 메시지가 표시됩니다. 다음으로 MySQL 암호의 강도를 테스트하는 데 사용할 수 있는 암호 유효성 검사 플러그인을 설정할지 묻는 메시지가 표시됩니다. 계속하려면
Y를 선택하십시오. 다음 단계에서 암호 유효성 검사 수준을 선택하라는 메시지가 표시됩니다. 가장 강력한 수준인2를 선택하고 비밀번호는 최소 8자 이상이어야 하며 대문자, 소문자, 숫자 및 특수 문자를 혼합해야 합니다.Securing the MySQL server deployment. Enter password for user root: VALIDATE PASSWORD COMPONENT can be used to test passwords and improve security. It checks the strength of password and allows the users to set only those passwords which are secure enough. Would you like to setup VALIDATE PASSWORD component? Press y|Y for Yes, any other key for No: Y There are three levels of password validation policy: LOW Length >= 8 MEDIUM Length >= 8, numeric, mixed case, and special characters STRONG Length >= 8, numeric, mixed case, special characters and dictionary file Please enter 0 = LOW, 1 = MEDIUM and 2 = STRONG: 2
다음 단계에서 루트 암호를 변경할지 여부를 묻는 메시지가 나타납니다. 계속하려면
N을 누르십시오.Using existing password for root. Estimated strength of the password: 100 Change the password for root ? ((Press y|Y for Yes, any other key for No) : N
Y를 누른 다음 다음 프롬프트에 대해ENTER키를 눌러 익명 사용자 및 테스트 데이터베이스를 제거하고 루트 로그인을 비활성화하고 새로 설정된 규칙을 로드합니다.... Remove anonymous users? (Press y|Y for Yes, any other key for No) : Y Success. ... Disallow root login remotely? (Press y|Y for Yes, any other key for No) : Y Success. ... Remove test database and access to it? (Press y|Y for Yes, any other key for No) : Y - Dropping test database... Success. - Removing privileges on test database... Success. Reloading the privilege tables will ensure that all changes made so far will take effect immediately. ... Reload privilege tables now? (Press y|Y for Yes, any other key for No) : Y Success. All done!
MySQL 쉘을 입력하십시오. 계속하려면 루트 암호를 입력하십시오.
$ mysql -u root -p
abcart사용자를 생성합니다. 암호가 이전에 설정된 요구 사항을 충족하는지 확인하십시오.mysql> CREATE USER 'abcart'@'localhost' IDENTIFIED BY 'Your_password2';
abantecart데이터베이스를 생성합니다.mysql> CREATE DATABASE abantecart;
abantecart데이터베이스에 대한 사용자 권한을 부여합니다.mysql> GRANT ALL PRIVILEGES ON abantecart.* TO 'abcart'@'localhost';
셸을 종료합니다.
mysql> exit
6단계 - AbanteCart 설치
Github에서 최신 버전의 AbanteCart를 다운로드합니다.
$ wget https://github.com/abantecart/abantecart-src/archive/master.zip
파일을 추출합니다.
$ unzip master.zip
Abantecart용 공개 웹 루트 디렉토리를 생성합니다.
$ sudo mkdir /var/www/html/abantecart -p
압축을 푼
abantecart-src-master/public_html디렉터리를 webroot 디렉터리에 복사합니다. 다음 명령 끝에 있는 슬래시(/)에 유의하십시오.$ sudo cp -r abantecart-src-master/public_html /var/www/html/abantecart/
webroot 디렉토리에 적절한 권한을 설정하십시오.
$ sudo chown -R nginx:nginx /var/www/html/abantecart
이제 기본 설치가 완료되었습니다. 다음으로 설치를 완료하기 전에 SSL 및 Nginx를 설정해야 합니다.
7단계 - SSL 설치
Lets Encrypt를 사용하여 SSL 인증서를 설치하려면 Certbot 도구를 설치해야 합니다.
이를 위해 Snapd 패키지 설치 프로그램을 사용합니다. 대부분의 Debian 서버는 Snap과 함께 제공되지 않으므로 Snap을 설치하십시오.
$ sudo apt install snapd
Snapd 버전이 최신인지 확인하세요.
$ sudo snap install core && sudo snap refresh core
Certbot을 설치합니다.
$ sudo snap install --classic certbot
다음 명령을 사용하여
/usr/bin디렉토리에 대한 심볼릭 링크를 생성하여 Certbot 명령을 실행할 수 있는지 확인하십시오.$ sudo ln -s /snap/bin/certbot /usr/bin/certbot
설치를 확인하십시오.
$ certbot --version
certbot 1.22.0
SSL 인증서를 생성합니다.
$ sudo certbot certonly --standalone --agree-tos --no-eff-email --staple-ocsp --preferred-challenges http -m -d abantecart.example.com
위의 명령은 서버의
/etc/letsencrypt/live/abantecart.example.com디렉토리에 인증서를 다운로드합니다.Diffie-Hellman 그룹 인증서를 생성합니다.
$ sudo openssl dhparam -out /etc/ssl/certs/dhparam.pem 2048
Lets Encrypt 자동 갱신을 위한 챌린지 웹루트 디렉터리를 만듭니다.
$ sudo mkdir -p /var/lib/letsencrypt
SSL을 갱신하기 위해 Cron 작업을 생성합니다. 인증서를 확인하고 필요한 경우 갱신하기 위해 매일 실행됩니다. 이를 위해 먼저
/etc/cron.daily/certbot-renew파일을 생성하고 편집을 위해 엽니다.$ sudo nano /etc/cron.daily/certbot-renew
다음 코드를 붙여넣습니다.
#!/bin/sh
certbot renew --cert-name abantecart.example.com --webroot -w /var/lib/letsencrypt/ --post-hook "systemctl reload nginx"
Ctrl + X를 누르고 메시지가 표시되면 Y를 입력하여 파일을 저장합니다.
실행 가능하도록 태스크 파일에 대한 권한을 변경하십시오.
$ sudo chmod +x /etc/cron.daily/certbot-renew
8단계 - Nginx 및 PHP 구성
PHP-FPM 구성
/etc/php/8.0/fpm/pool.d/www.conf파일을 엽니다.$ sudo nano /etc/php/8.0/fpm/pool.d/www.conf
PHP 프로세스의 Unix 사용자/그룹을 nginx로 설정해야 합니다. 파일에서
user=www-data및group=www-data줄을 찾아nginx로 변경합니다. 코드.... ; Unix user/group of processes ; Note: The user is mandatory. If the group is not set, the default user's group ; will be used. user = nginx group = nginx ...
또한 파일에서
listen.owner=www-data및listen.group=www-data줄을 찾아nginx.listen.owner = nginx listen.group = nginx
Ctrl + X를 누르고 메시지가 표시되면 Y를 입력하여 파일을 저장합니다.
다음 단계는 PHP opcache 확장을 비활성화하는 것입니다.
편집을 위해
/etc/php/8.0/fpm/conf.d/10-opcache.ini파일을 엽니다.$ sudo nano /etc/php/8.0/fpm/conf.d/10-opcache.ini
끝에 다음 줄을 붙여넣습니다.
opcache.enable=0
Ctrl + X를 누르고 메시지가 표시되면 Y를 입력하여 파일을 저장합니다.
PHP-fpm 프로세스를 다시 시작하십시오.
$ sudo systemctl restart php8.0-fpm
Nginx 구성
편집을 위해
/etc/nginx/conf.d/abantecart.conf파일을 만들고 엽니다.$ sudo nano /etc/nginx/conf.d/abantecart.conf
다음 코드를 붙여넣습니다.
server {
    listen       443 ssl http2;
    listen       [::]:443 ssl http2;
    server_name  abantecart.example.com;

    access_log  /var/log/nginx/abantecart.access.log;
    error_log   /var/log/nginx/abantecart.error.log;

    # SSL
    ssl_certificate      /etc/letsencrypt/live/abantecart.example.com/fullchain.pem;
    ssl_certificate_key  /etc/letsencrypt/live/abantecart.example.com/privkey.pem;
    ssl_trusted_certificate /etc/letsencrypt/live/abantecart.example.com/chain.pem;
    ssl_session_timeout  5m;
    ssl_session_cache shared:MozSSL:10m;
    ssl_session_tickets off;
    ssl_protocols TLSv1.2 TLSv1.3;
    ssl_prefer_server_ciphers on;
    ssl_ciphers ECDHE-ECDSA-AES128-GCM-SHA256:ECDHE-RSA-AES128-GCM-SHA256:ECDHE-ECDSA-AES256-GCM-SHA384:ECDHE-RSA-AES256-GCM-SHA384:ECDHE-ECDSA-CHACHA20-POLY1305:ECDHE-RSA-CHACHA20-POLY1305:DHE-RSA-AES128-GCM-SHA256:DHE-RSA-AES256-GCM-SHA384;
    ssl_ecdh_curve X25519:prime256v1:secp384r1:secp521r1;
    ssl_stapling on;
    ssl_stapling_verify on;
    ssl_dhparam /etc/ssl/certs/dhparam.pem;
    resolver 8.8.8.8;

    root /var/www/html/abantecart;
    index index.php;

    location / {
        try_files $uri $uri/ /index.php?$args;
    }

    # Pass PHP Scripts To FastCGI Server
    location ~ \.php$ {
        fastcgi_split_path_info ^(.+\.php)(.*)$;
        fastcgi_pass unix:/run/php/php8.0-fpm.sock; # Depends On The PHP Version
        fastcgi_index index.php;
        fastcgi_param SCRIPT_FILENAME $document_root$fastcgi_script_name;
        fastcgi_param PATH_INFO $fastcgi_path_info;
        include fastcgi_params;
        try_files $uri =404;
    }

    location = /favicon.ico {
        log_not_found off;
        access_log off;
    }

    location = /robots.txt {
        allow all;
        log_not_found off;
        access_log off;
    }

    # Make sure files with the following extensions do not get loaded by nginx because nginx would
    # display the source code, and these files can contain PASSWORDS!
    location ~* \.(engine|inc|info|install|make|module|profile|test|po|sh|.*sql|theme|tpl(\.php)?|xtmpl)$|^(\..*|Entries.*|Repository|Root|Tag|Template)$|\.php_ {
        deny all;
    }

    # Deny all attempts to access hidden files such as .htaccess, .htpasswd, .DS_Store (Mac).
    location ~ /\. {
        deny all;
        access_log off;
        log_not_found off;
    }

    ### Retina images handler. Check cookie and looking for file with @2x at the end of name
    location ~* ^(.*)\.(jpg|jpeg|png|gif|webp)$ {
        set $hidpi_uri $2;
        if ($http_cookie !~ 'HTTP_IS_RETINA=1') {
          break;
        }
        try_files $hidpi_uri $uri =404;
    }

    location ~*  \.(jpg|jpeg|png|gif|css|js|ico|webp)$ {
        expires max;
        log_not_found off;
    }

    location ~ /(system/logs|resources/download) {
      deny all;
      return 403;
    }

    location /admin/ {
        location ~ .*\.(php)?$ {
          deny all;
          return 403;
        }
    }

    #rewrite for images for retina-displays
    location ~ / {
        if (!-e $request_filename){
            rewrite ^/(.*)\?*$ /index.php?_route_=$1 last;
        }
    }
}
# enforce HTTPS
server {
    listen       80;
    listen       [::]:80;
    server_name  abantecart.example.com;
    return 301   https://$host$request_uri;
}
완료되면 Ctrl + X를 누르고 프롬프트가 표시되면 Y를 입력하여 파일을 저장합니다.
편집을 위해
/etc/nginx/nginx.conf파일을 엽니다.$ sudo nano /etc/nginx/nginx.conf
include /etc/nginx/conf.d/*.conf;줄 앞에 다음 줄을 추가합니다.server_names_hash_bucket_size 64;
Ctrl + X를 누르고 메시지가 표시되면 Y를 입력하여 파일을 저장합니다.
Nginx 구성 파일 구문을 확인합니다.
$ sudo nginx -t
nginx: the configuration file /etc/nginx/nginx.conf syntax is ok
nginx: configuration file /etc/nginx/nginx.conf test is successful
Nginx 서비스를 시작하여 새 구성을 활성화합니다.
$ sudo systemctl start nginx
9단계 - 설치 완료
브라우저에서
https://abantecart.example.com을 실행하면 다음 화면이 표시됩니다.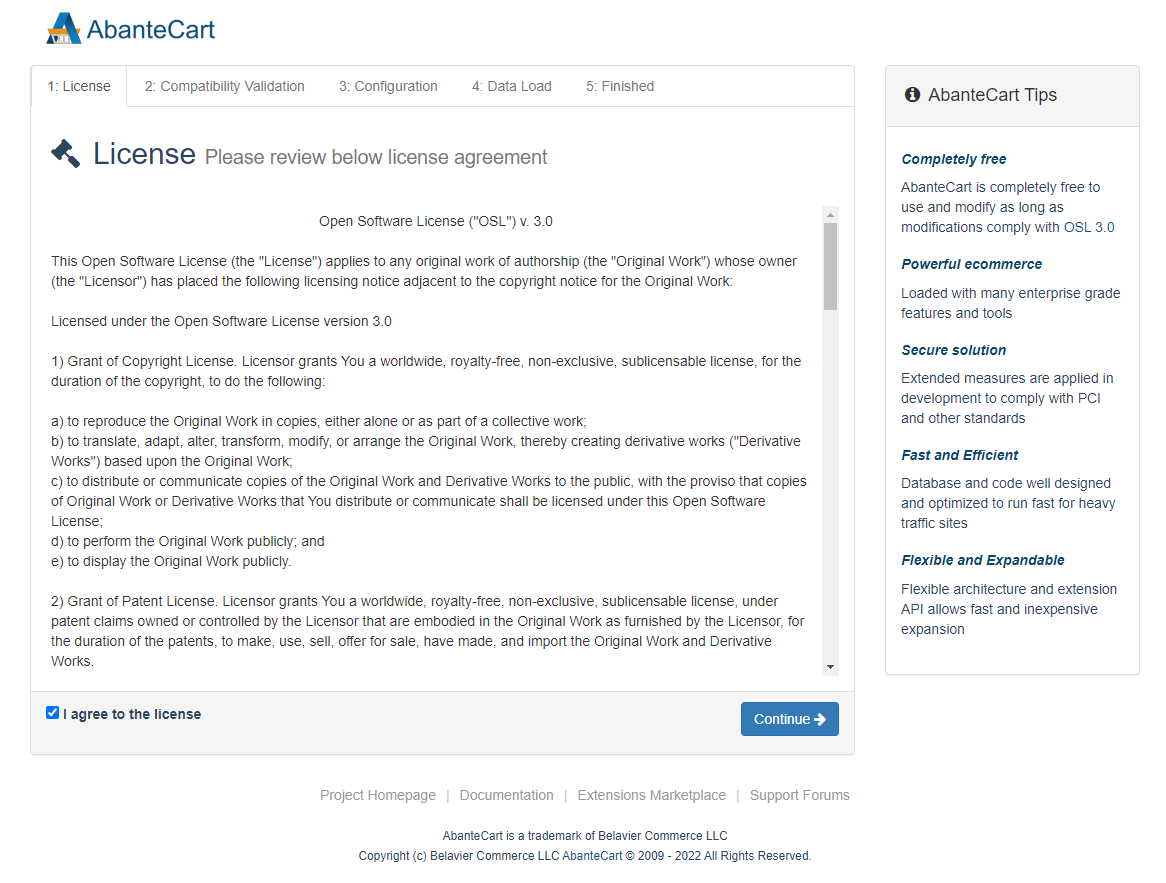
라이선스에 동의하는 확인란을 선택하고 계속하려면 계속을 누릅니다. 다음으로 설치 프로그램은 모든 요구 사항이 충족되는지 여부를 확인합니다.
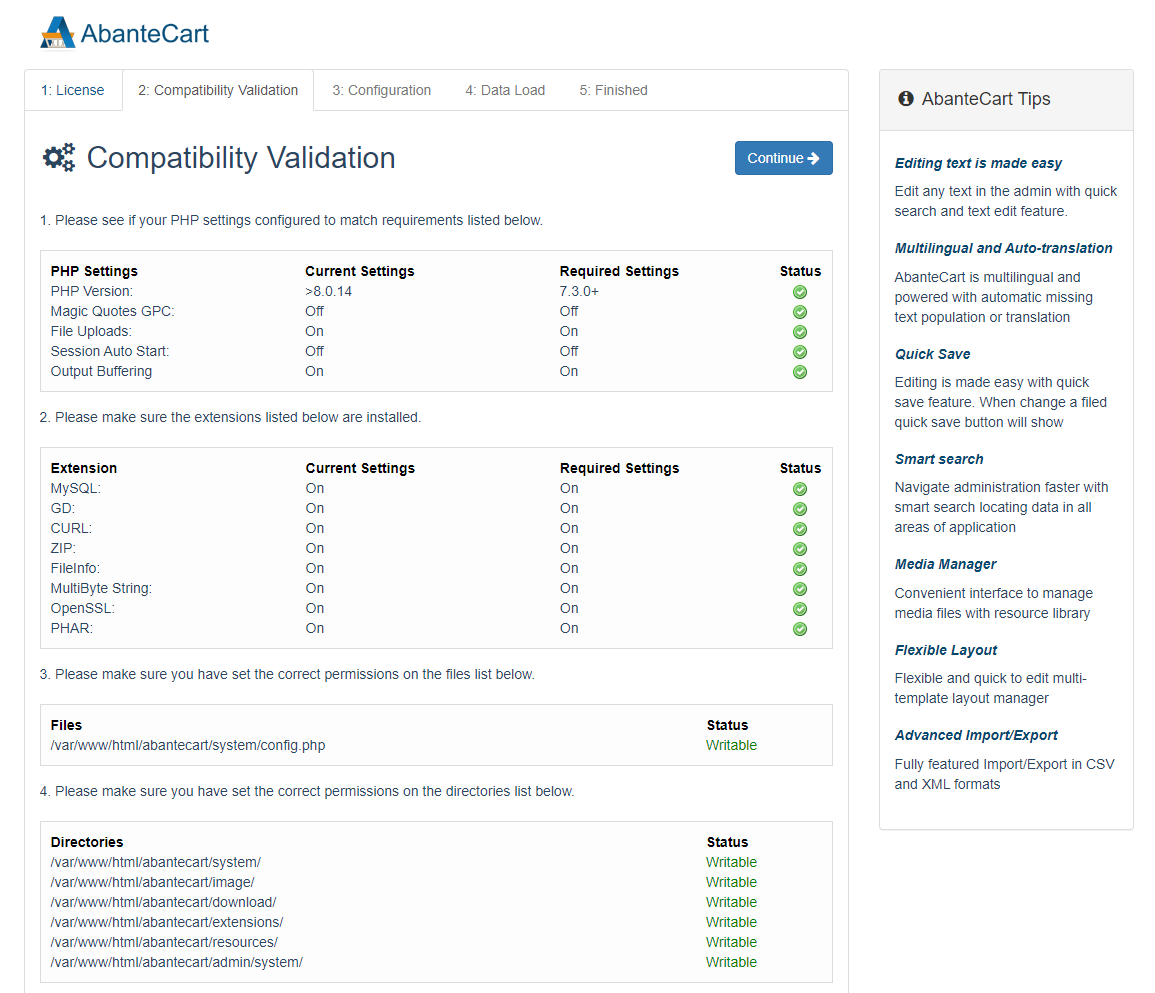
모든 것이 정상이면 계속을 눌러 다음 페이지로 진행하십시오.
데이터베이스 자격 증명을 입력하라는 메시지가 표시됩니다. 여기에서 관리자 계정과 보안 키를 만들어 제어판에 액세스할 수 있습니다. 데모 데이터를 원하면 확인란을 선택한 상태로 유지하고 처음부터 시작하려면 선택하지 않은 상태로 두십시오.
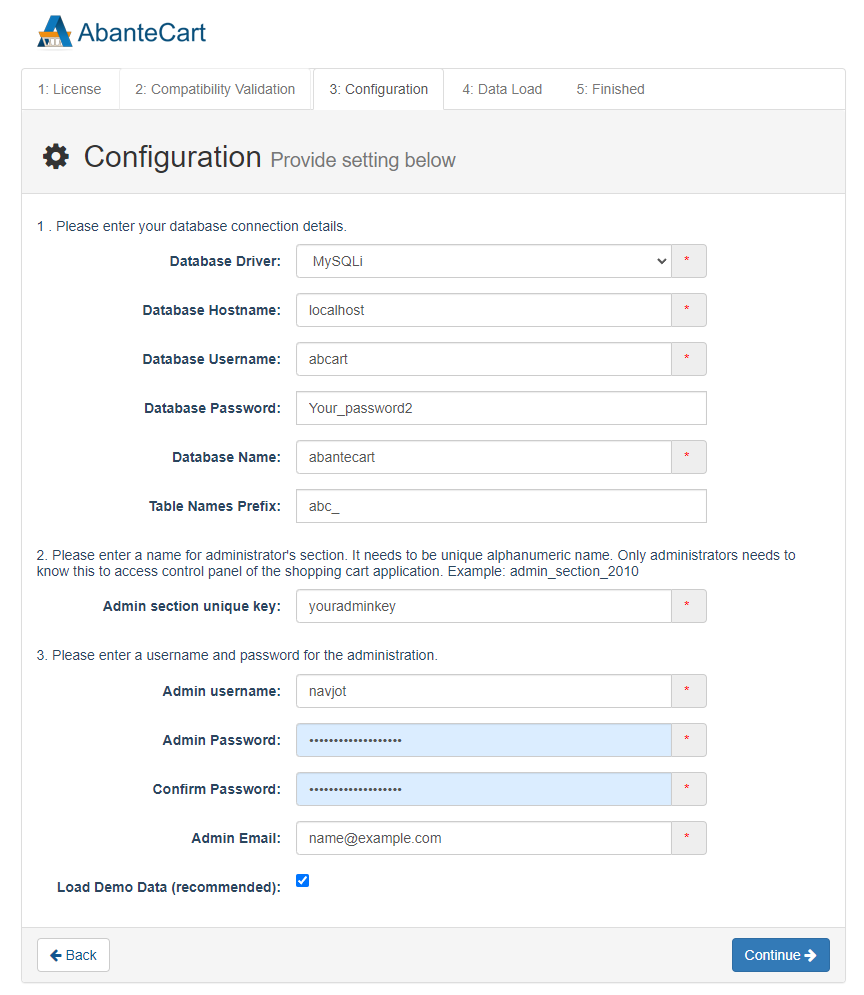
완료되면 계속하려면 계속을 누르십시오. 그러면 설치 프로그램이 모든 설정을 진행하고 완료되면 다음 화면이 표시됩니다.
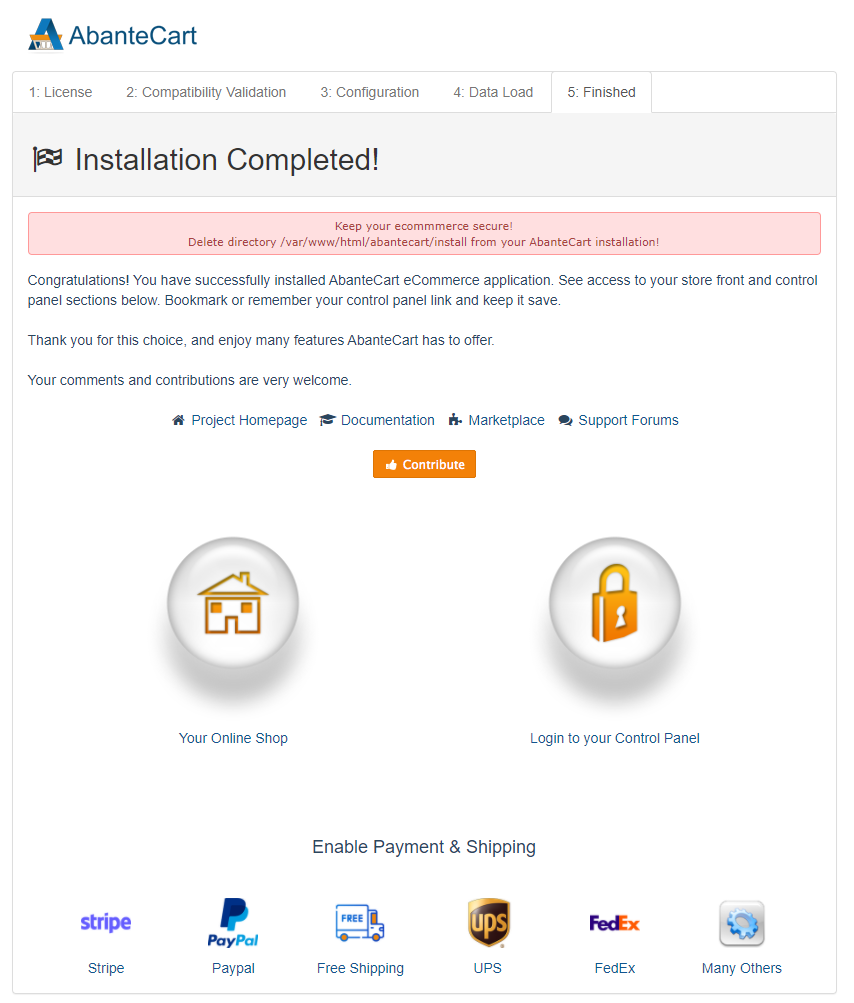
필요하므로 제어판에 대한 링크를 즐겨찾기에 추가하십시오. 다음 명령을 실행하여 필요하지 않고 보안 위험이 있는 설치 관리자 파일을 삭제합니다.
$ sudo rm -rf /var/www/html/abantecart/install
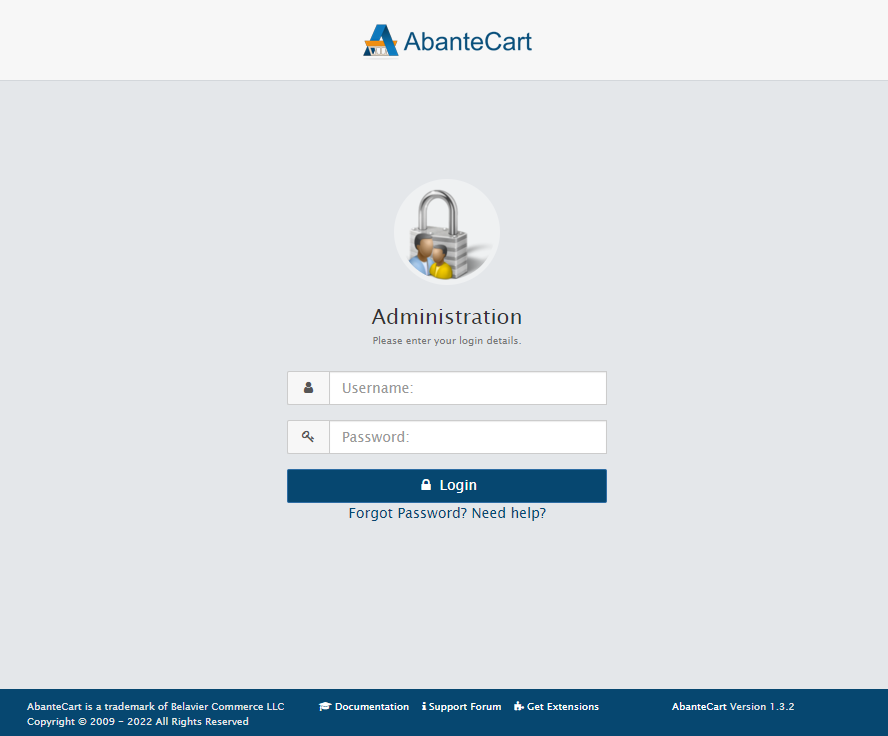
제어판에 로그인하면 상점 설정을 완료하라는 메시지가 표시됩니다.
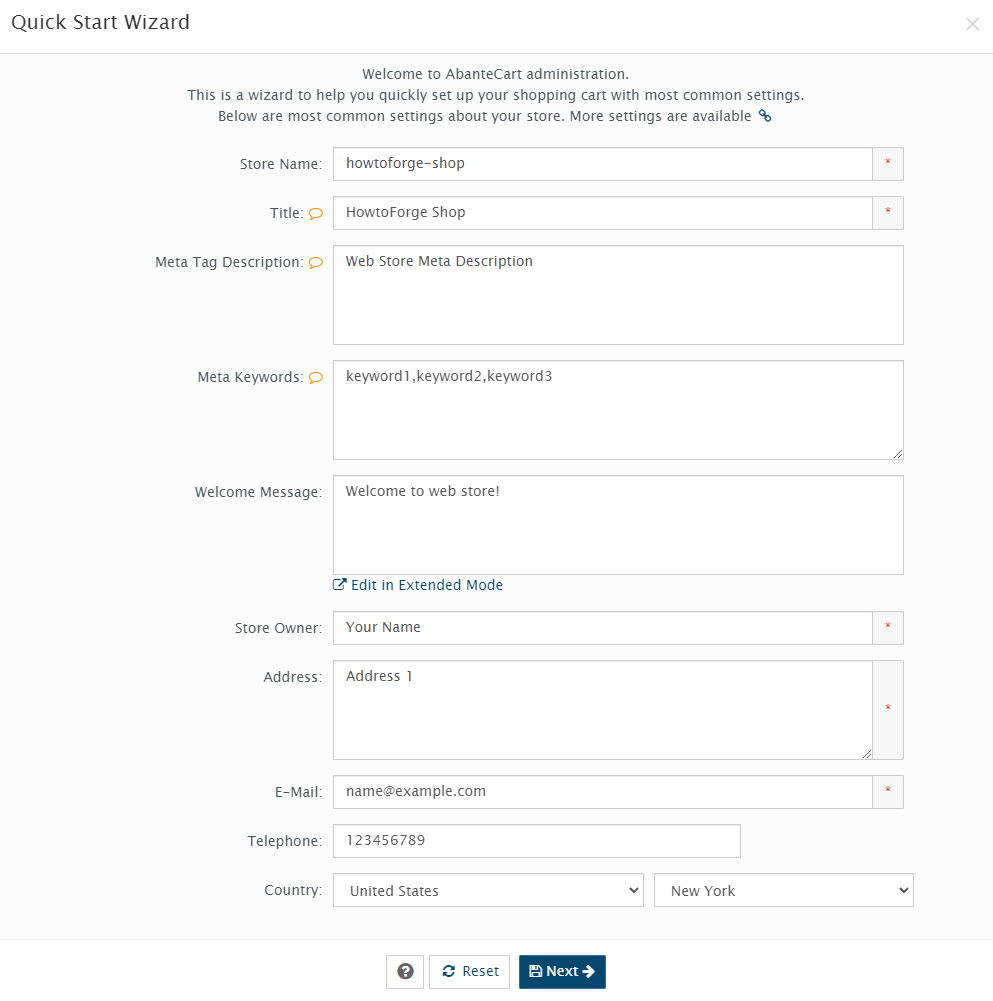
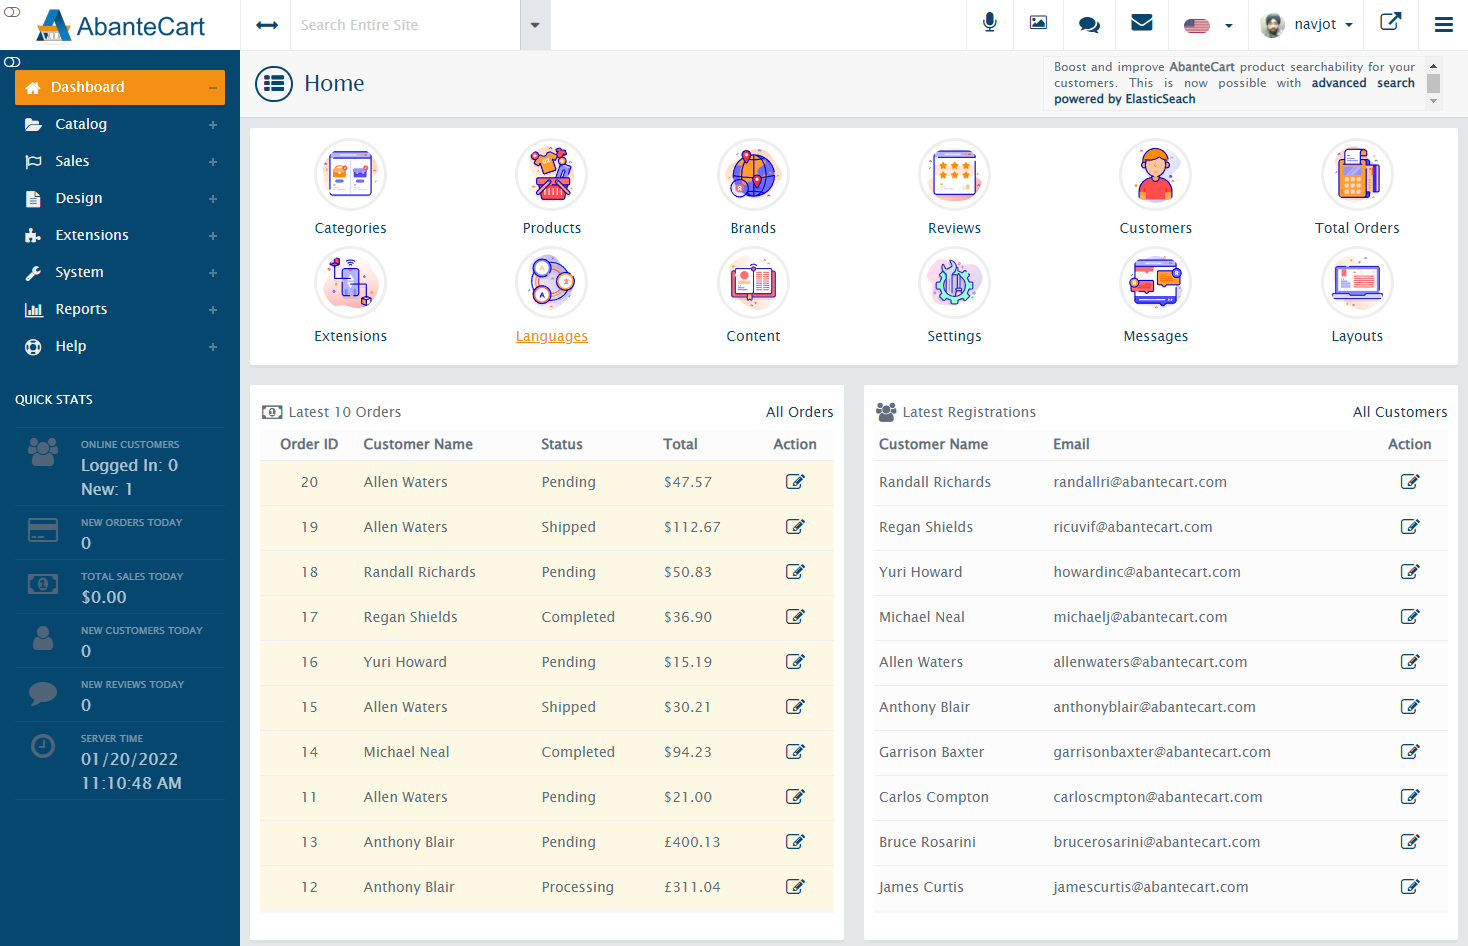
빠른 마법사를 닫고 아래 표시된 제어판에서 구성하거나 마법사를 계속 진행하여 기본 설정을 지정할 수 있습니다.
결론
이것으로 Debian 11 기반 서버에서 AbanteCart 설정에 대한 자습서를 마칩니다. 질문이 있으시면 아래 의견에 게시하십시오.