CentOS 7에서 Nginx 및 PHP7-FPM으로 Nextcloud를 설치하는 방법
Nextcloud는 무료(오픈 소스) Dropbox와 유사한 소프트웨어로 ownCloud 프로젝트의 포크입니다. Nextcloud는 PHP 및 JavaScript로 작성되었으며 MySQL/MariaDB, PostgreSQL, Oracle Database 및 SQLite와 같은 많은 데이터베이스 시스템을 지원합니다. 데스크톱과 자체 서버 간에 파일 동기화를 유지하기 위해 Nextcloud는 Windows, Linux 및 Mac 데스크톱용 애플리케이션과 Android 및 iOS용 모바일 앱을 제공합니다. Nextcloud는 단순한 드롭박스 클론이 아니라 일정, 연락처, 일정 작업, Ampache를 통한 스트리밍 미디어와 같은 추가 기능을 제공합니다.
이 튜토리얼에서는 CentOS 7 서버에서 최신 Nextcloud 10 릴리스를 설치하고 구성하는 방법을 보여줍니다. Nginx 웹 서버와 PHP7-FPM으로 Nextcloud를 실행하고 MariaDB를 데이터베이스 시스템으로 사용하겠습니다.
전제 조건
- 센트OS 7 64비트
- 서버의 루트 권한
1단계 - CentOS 7에 Nginx 및 PHP7-FPM 설치
Nginx 및 php7-fpm 설치를 시작하기 전에 EPEL 패키지 저장소를 추가해야 합니다. 이 yum 명령으로 설치하십시오.
yum -y install epel-release
이제 EPEL 저장소에서 Nginx를 설치합니다.
yum -y install nginx
그런 다음 php7-fpm에 대한 다른 저장소를 추가해야 합니다. 인터넷에는 PHP 7 패키지를 제공하는 여러 저장소가 있습니다. 여기서는 webtatic을 사용하겠습니다.
PHP7-FPM webtatic 저장소를 추가합니다.
rpm -Uvh https://mirror.webtatic.com/yum/el7/webtatic-release.rpm
다음으로 Nextcloud 설치를 위한 PHP7-FPM 및 일부 추가 패키지를 설치합니다.
yum -y install php70w-fpm php70w-cli php70w-gd php70w-mcrypt php70w-mysql php70w-pear php70w-xml php70w-mbstring php70w-pdo php70w-json php70w-pecl-apcu php70w-pecl-apcu-devel
마지막으로 서버 터미널에서 PHP 버전을 확인하여 PHP가 올바르게 설치되었는지 확인합니다.
php -v

2단계 - PHP7-FPM 구성
이 단계에서는 Nginx와 함께 실행되도록 php-fpm을 구성합니다. Php7-fpm은 사용자 nginx에서 실행되고 포트 9000에서 수신 대기합니다.
vim으로 기본 php7-fpm 구성 파일을 편집합니다.
vim /etc/php-fpm.d/www.conf
8행과 10행에서 사용자와 그룹을 nginx로 변경합니다.
user = nginx
group = nginx
22행에서 php-fpm이 서버 포트에서 실행 중인지 확인하십시오.
listen = 127.0.0.1:9000
php-fpm 시스템 환경 변수를 활성화하려면 366-370행의 주석을 제거하십시오.
env[HOSTNAME] = $HOSTNAME
env[PATH] = /usr/local/bin:/usr/bin:/bin
env[TMP] = /tmp
env[TMPDIR] = /tmp
env[TEMP] = /tmp
파일을 저장하고 vim 편집기를 종료합니다.
다음으로 /var/lib/ 디렉토리에 세션 경로에 대한 새 디렉토리를 생성하고 소유자를 nginx 사용자로 변경합니다.
mkdir -p /var/lib/php/session
chown nginx:nginx -R /var/lib/php/session/
이제 php-fpm 및 Nginx를 시작한 다음 서비스가 부팅 시 시작되도록 활성화합니다.
sudo systemctl start php-fpm
sudo systemctl start nginx

sudo systemctl enable php-fpm
sudo systemctl enable nginx

PHP7-FPM 구성이 완료되었습니다.
3단계 - MariaDB 설치 및 구성
Nextcloud 데이터베이스에 MariaDB를 사용하겠습니다. yum을 사용하여 CentOS 저장소에서 mariadb-server 패키지를 설치합니다.
yum -y install mariadb mariadb-server
MariaDB 서비스를 시작하고 부팅 시 실행되도록 추가합니다.
systemctl start mariadb
systemctl enable mariadb
이제 MariaDB 루트 비밀번호를 구성하십시오.
mysql_secure_installation
요청 시 루트 비밀번호를 입력하십시오.
Set root password? [Y/n] Y
New password:
Re-enter new password:

Remove anonymous users? [Y/n] Y
Disallow root login remotely? [Y/n] Y
Remove test database and access to it? [Y/n] Y
Reload privilege tables now? [Y/n] Y
MariaDB 루트 암호가 설정되었으므로 이제 mysql 셸에 로그인하여 Nextcloud에 대한 새 데이터베이스와 새 사용자를 만들 수 있습니다. nextcloud_db라는 이름의 새 데이터베이스와 비밀번호가 [email 인 nextclouduser 사용자를 생성하겠습니다. 설치를 위한 보안 암호를 선택하십시오!
mysql -u root -p
Type Password
아래에 mysql 쿼리를 입력하여 새 데이터베이스와 새 사용자를 만듭니다.
create database nextcloud_db;
create user ';
flush privileges;
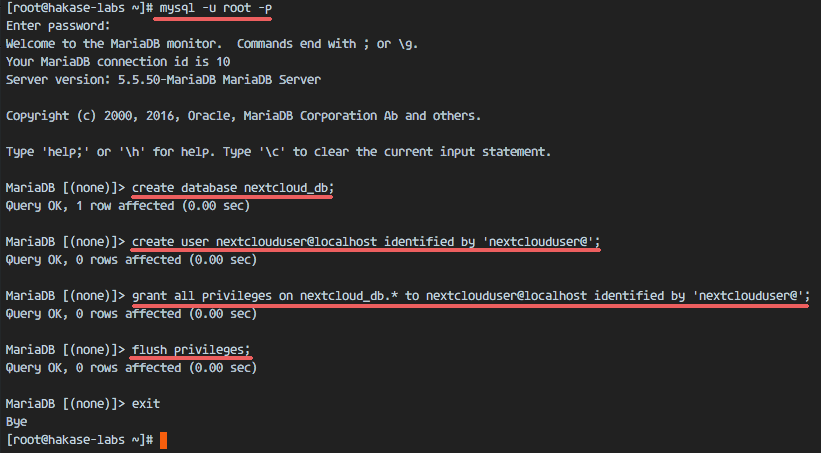
사용자가 nextclouduser인 nextcloud_db 데이터베이스가 생성되었습니다.
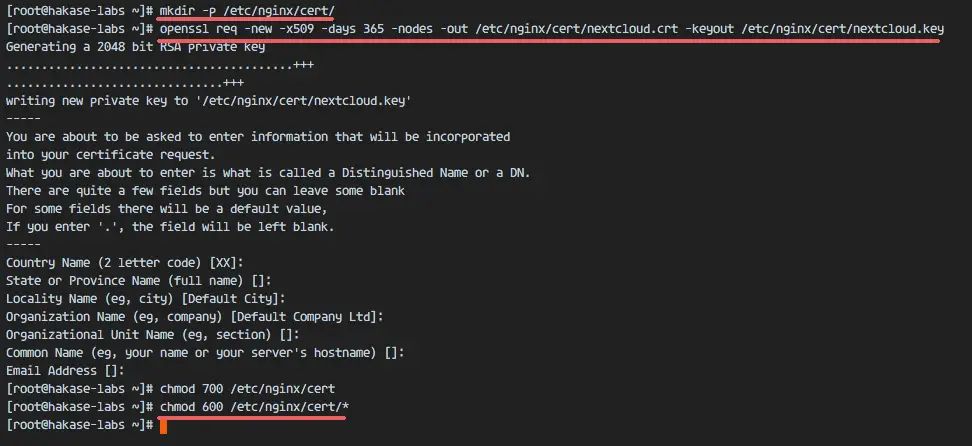
4단계 - Nextcloud용 자체 서명 SSL 인증서 생성
이 튜토리얼에서는 클라이언트에 대한 https 연결로 nextcloud를 실행합니다. 자체 서명 SSL 인증서를 암호화하거나 생성하는 등의 무료 SSL을 사용할 수 있습니다. OpenSSL 명령을 사용하여 자체 서명된 SSL 인증서 파일을 생성하겠습니다.
SSL 파일의 새 디렉터리를 만듭니다.
mkdir -p /etc/nginx/cert/
그리고 아래의 openssl 명령어로 새 SSL 인증서 파일을 생성합니다.
openssl req -new -x509 -days 365 -nodes -out /etc/nginx/cert/nextcloud.crt -keyout /etc/nginx/cert/nextcloud.key
마지막으로 chmod를 사용하여 모든 인증서 파일의 권한을 600으로 변경합니다.
chmod 700 /etc/nginx/cert
chmod 600 /etc/nginx/cert/*
5단계 - Nextcloud 다운로드 및 설치
서버에 직접 wget으로 Nextcloud를 다운로드할 예정이므로 먼저 wget을 설치해야 합니다. 또한 압축 해제 프로그램이 필요합니다. yum으로 두 응용 프로그램을 모두 설치합니다.
yum -y install wget unzip
/tmp 디렉토리로 이동하여 wget을 사용하여 Nextcloud 웹 사이트에서 안정적인 최신 Nextcloud 10 버전을 다운로드합니다.
cd /tmp
wget https://download.nextcloud.com/server/releases/nextcloud-10.0.2.zip
nextcloud zip 파일을 추출하고 해당 콘텐츠를 /usr/share/nginx/html/ 디렉터리로 이동합니다.
unzip nextcloud-10.0.2.zip
mv nextcloud/ /usr/share/nginx/html/
다음으로 Nginx 웹 루트 디렉터리로 이동하여 Nextcloud에 대한 새 데이터 디렉터리를 만듭니다.
cd /usr/share/nginx/html/
mkdir -p nextcloud/data/
nextcloud 디렉터리의 소유자를 nginx 사용자 및 그룹으로 변경합니다.
chown nginx:nginx -R nextcloud/
6단계 - Nginx에서 Nextcloud 가상 호스트 구성
5단계에서 Nextcloud 소스 코드를 다운로드하고 Nginx 웹 서버에서 실행되도록 구성했습니다. 그러나 여전히 Nextcloud에 대한 가상 호스트를 구성해야 합니다. Nginx conf.d 디렉터리에 새 가상 호스트 구성 파일 nextcloud.conf를 만듭니다.
cd /etc/nginx/conf.d/
vim nextcloud.conf
아래에 Nextcloud 가상 호스트 구성을 붙여넣습니다.
upstream php-handler {
    server 127.0.0.1:9000;
    #server unix:/var/run/php5-fpm.sock;
}

server {
    listen 80;
    server_name cloud.nextcloud.co;
    # enforce https
    return 301 https://$server_name$request_uri;
}

server {
    listen 443 ssl;
    server_name cloud.nextcloud.co;

    ssl_certificate /etc/nginx/cert/nextcloud.crt;
    ssl_certificate_key /etc/nginx/cert/nextcloud.key;

    # Add headers to serve security related headers
    # Before enabling Strict-Transport-Security headers please read into this
    # topic first.
    add_header Strict-Transport-Security "max-age=15768000;
    includeSubDomains; preload;";
    add_header X-Content-Type-Options nosniff;
    add_header X-Frame-Options "SAMEORIGIN";
    add_header X-XSS-Protection "1; mode=block";
    add_header X-Robots-Tag none;
    add_header X-Download-Options noopen;
    add_header X-Permitted-Cross-Domain-Policies none;

    # Path to the root of your installation
    root /usr/share/nginx/html/nextcloud/;

    location = /robots.txt {
        allow all;
        log_not_found off;
        access_log off;
    }

    # The following 2 rules are only needed for the user_webfinger app.
    # Uncomment it if you're planning to use this app.
    #rewrite ^/.well-known/host-meta /public.php?service=host-meta last;
    #rewrite ^/.well-known/host-meta.json /public.php?service=host-meta-json
    # last;

    location = /.well-known/carddav {
      return 301 $scheme://$host/remote.php/dav;
    }
    location = /.well-known/caldav {
      return 301 $scheme://$host/remote.php/dav;
    }

    # set max upload size
    client_max_body_size 512M;
    fastcgi_buffers 64 4K;

    # Disable gzip to avoid the removal of the ETag header
    gzip off;

    # Uncomment if your server is build with the ngx_pagespeed module
    # This module is currently not supported.
    #pagespeed off;

    error_page 403 /core/templates/403.php;
    error_page 404 /core/templates/404.php;

    location / {
        rewrite ^ /index.php$uri;
    }

    location ~ ^/(?:build|tests|config|lib|3rdparty|templates|data)/ {
        deny all;
    }
    location ~ ^/(?:\.|autotest|occ|issue|indie|db_|console) {
        deny all;
    }

    location ~ ^/(?:index|remote|public|cron|core/ajax/update|status|ocs/v[12]|updater/.+|ocs-provider/.+|core/templates/40[34])\.php(?:$|/) {
        include fastcgi_params;
        fastcgi_split_path_info ^(.+\.php)(/.*)$;
        fastcgi_param SCRIPT_FILENAME $document_root$fastcgi_script_name;
        fastcgi_param PATH_INFO $fastcgi_path_info;
        fastcgi_param HTTPS on;
        #Avoid sending the security headers twice
        fastcgi_param modHeadersAvailable true;
        fastcgi_param front_controller_active true;
        fastcgi_pass php-handler;
        fastcgi_intercept_errors on;
        fastcgi_request_buffering off;
    }

    location ~ ^/(?:updater|ocs-provider)(?:$|/) {
        try_files $uri/ =404;
        index index.php;
    }

    # Adding the cache control header for js and css files
    # Make sure it is BELOW the PHP block
    location ~* \.(?:css|js)$ {
        try_files $uri /index.php$uri$is_args$args;
        add_header Cache-Control "public, max-age=7200";
        # Add headers to serve security related headers (It is intended to
        # have those duplicated to the ones above)
        # Before enabling Strict-Transport-Security headers please read into
        # this topic first.
        add_header Strict-Transport-Security "max-age=15768000;
        includeSubDomains; preload;";
        add_header X-Content-Type-Options nosniff;
        add_header X-Frame-Options "SAMEORIGIN";
        add_header X-XSS-Protection "1; mode=block";
        add_header X-Robots-Tag none;
        add_header X-Download-Options noopen;
        add_header X-Permitted-Cross-Domain-Policies none;
        # Optional: Don't log access to assets
        access_log off;
    }

    location ~* \.(?:svg|gif|png|html|ttf|woff|ico|jpg|jpeg)$ {
        try_files $uri /index.php$uri$is_args$args;
        # Optional: Don't log access to other assets
        access_log off;
    }
}
파일을 저장하고 vim을 종료합니다.
이제 Nginx 구성을 테스트하여 오류가 없는지 확인합니다. 그런 다음 서비스를 다시 시작합니다.
nginx -t
systemctl restart nginx

7단계 - Nextcloud용 SELinux 및 FirewallD 구성
이 튜토리얼에서는 SELinux를 시행 모드로 두므로 Nextcloud용 SELinux를 구성하려면 새로운 패키지 SELinux 관리 도구가 필요합니다.
이 명령으로 SELinux 관리 도구를 설치하십시오.
yum -y install policycoreutils-python-utils
그런 다음 루트 사용자로 아래 명령을 실행하여 Nextcloud가 SELinux에서 실행될 수 있도록 합니다. 다른 디렉터리를 사용하는 경우 Nextcloud 디렉터리를 변경해야 합니다.
semanage fcontext -a -t httpd_sys_rw_content_t '/usr/share/nginx/html/nextcloud/data(/.*)?'
semanage fcontext -a -t httpd_sys_rw_content_t '/usr/share/nginx/html/nextcloud/config(/.*)?'
semanage fcontext -a -t httpd_sys_rw_content_t '/usr/share/nginx/html/nextcloud/apps(/.*)?'
semanage fcontext -a -t httpd_sys_rw_content_t '/usr/share/nginx/html/nextcloud/assets(/.*)?'
semanage fcontext -a -t httpd_sys_rw_content_t '/usr/share/nginx/html/nextcloud/.htaccess'
semanage fcontext -a -t httpd_sys_rw_content_t '/usr/share/nginx/html/nextcloud/.user.ini'

restorecon -Rv '/usr/share/nginx/html/nextcloud/'
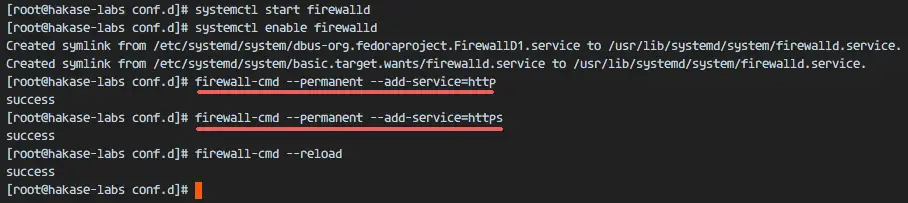
다음으로 방화벽 서비스를 활성화하고 Nextcloud에 대한 HTTP 및 HTTPS 포트를 엽니다.
firewalld를 시작하고 부팅 시 시작되도록 활성화합니다.
systemctl start firewalld
systemctl enable firewalld
이제 firewall-cmd 명령으로 HTTP 및 HTTPS 포트를 연 다음 방화벽을 다시 로드합니다.
firewall-cmd --permanent --add-service=http
firewall-cmd --permanent --add-service=https
firewall-cmd --reload
모든 서버 구성이 완료되었습니다.
8단계 - Nextcloud 설치 마법사
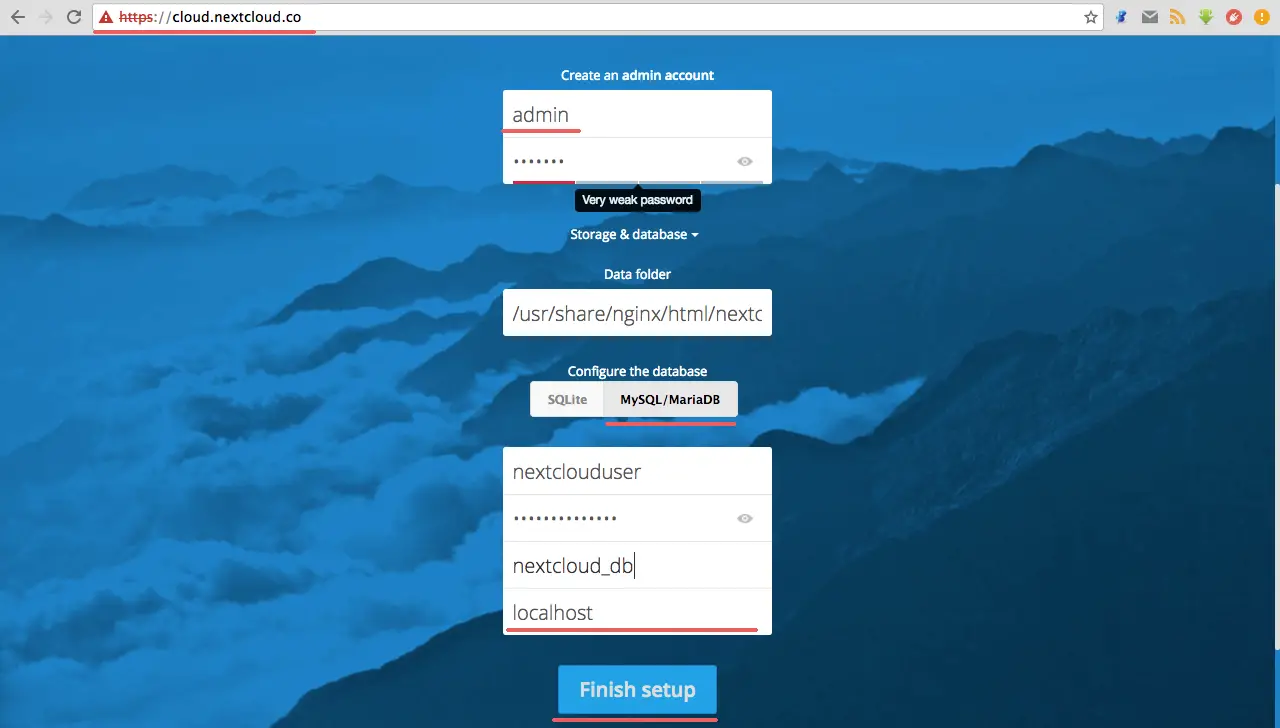
웹 브라우저를 열고 Nextcloud 도메인 이름을 입력하세요. 제 이름은 cloud.nextcloud.co입니다. 보안 https 연결로 리디렉션됩니다.
원하는 관리 사용자 이름과 암호를 입력한 다음 데이터베이스 자격 증명을 입력합니다. 설정 완료를 클릭합니다.
Nextcloud 관리 대시보드(파일 관리자)가 나타납니다.

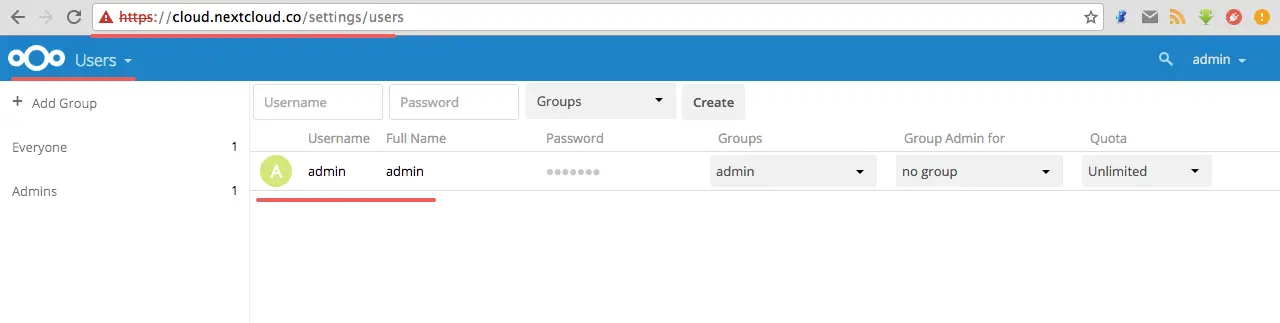
넥스트클라우드 사용자 설정.
관리자 설정.

Nextcloud는 Nginx, PHP7-FPM 및 MariaDB와 함께 CentOS 7 서버에 설치되었습니다.
참조
- https://docs.nextcloud.com/