Ubuntu 16.04에서 Apache용 리버스 프록시로 nginx를 설치하는 방법
이 튜토리얼은 다음 OS 버전에 대해 존재합니다.
- Ubuntu 16.04(Xenial Xerus)
- Ubuntu 12.04 LTS(Precise Pangolin)
이 페이지에서
- 1 서문
- 2 Apache 구성
- 3 nginx 구성
- 4개의 링크
이 튜토리얼은 Ubuntu 16.04의 Apache2 웹 서버 앞에서 nginx를 리버스 프록시로 설정하는 방법을 보여줍니다. nginx("엔진 x"로 발음)는 무료 오픈 소스 고성능 HTTP 서버입니다. nginx는 안정성, 풍부한 기능 세트, 간단한 구성 및 낮은 리소스 소비로 유명합니다.
1 서문
이 자습서에서는 호스트 이름 server1.example.com을 IP 주소 192.168.1.100과 함께 사용합니다. 이러한 설정은 사용자에 따라 다를 수 있으므로 적절하게 교체해야 합니다.
nginx를 통해 프록시하려는 IP 주소 192.168.1.100의 포트 80에서 수신하는 기존 Apache 가상 호스트(이 튜토리얼에서는 Apache 기본 가상 호스트를 사용함)가 있다고 가정합니다. Ubuntu LAMP 튜토리얼을 기본으로 사용하겠습니다. 이 자습서는 https(SSL)가 아닌 http만 다룹니다.
2 아파치 구성
가장 먼저 해야 할 일은 80(예: 8000) 이외의 사용되지 않는 포트에서 localhost(127.0.0.1)를 수신하도록 Apache 가상 호스트를 구성하는 것입니다. /etc/apache2/ports.conf 열기...
nano /etc/apache2/ports.conf
... 포트 8000을 사용하도록 포트 80의 NameVirtualHost 및 Listen 라인을 수정합니다.
# If you just change the port or add more ports here, you will likely also
# have to change the VirtualHost statement in
# /etc/apache2/sites-enabled/000-default.conf

Listen 8000

<IfModule ssl_module>
 Listen 443
</IfModule>

<IfModule mod_gnutls.c>
 Listen 443
</IfModule>
다음으로 vhost 구성 파일(예: /etc/apache2/sites-available/000-default.conf)을 엽니다...
nano /etc/apache2/sites-available/000-default.conf
... IP 주소 127.0.0.1과 포트 8000을 사용하도록
<VirtualHost 127.0.0.1:8000>
[...]
nginx를 투명한 프록시로 구성합니다. 즉, X-Forwarded-For라는 필드의 원래 사용자 IP 주소를 백엔드 Apache에 전달합니다. 물론 백엔드 Apache는 nginx(127.0.0.1)의 IP 주소 대신 액세스 로그에 원래 사용자 IP 주소를 기록해야 합니다. 이를 달성하는 방법에는 두 가지가 있습니다.
1) /etc/apache2/apache2.conf에서 LogFormat 줄을 수정하고 %h를 %{X-Forwarded-For}i로 바꿀 수 있습니다.
nano /etc/apache2/apache2.conf
[...]
#LogFormat "%h %l %u %t \"%r\" %>s %O \"%{Referer}i\" \"%{User-Agent}i\"" combined
LogFormat "%{X-Forwarded-For}i %l %u %t \"%r\" %>s %b \"%{Referer}i\" \"%{User-Agent}i\"" combined
[...]
2) Debian/Ubuntu에서 올바른 IP 주소를 기록하는 Apache 모듈 libapache2-mod-rpaf를 설치할 수 있습니다.
apt-get -y install libapache2-mod-rpaf
이러한 모든 변경 후에 Apache를 다시 시작하십시오.
service apache2 restart
3 nginx 구성
nginx가 아직 설치되어 있지 않은 경우 다음과 같이 설치합니다.
apt-get -y install nginx
시스템 시작 링크를 생성하고 시작되었는지 확인합니다.
systemctl enable nginx.service
service nginx restart
이제 포트 80에서 수신해야 합니다.
일부 표준 프록시 매개변수는 /etc/nginx/proxy_params 파일에 있습니다.
nano /etc/nginx/proxy_params
proxy_set_header Host $http_host;
proxy_set_header X-Real-IP $remote_addr;
proxy_set_header X-Forwarded-For $proxy_add_x_forwarded_for;
proxy_set_header X-Forwarded-Proto $scheme;
나중에 example.com에 대한 nginx 가상 호스트의 프록시 부분에 해당 파일을 포함할 것이므로 원하는 경우 해당 파일에 추가 프록시 지시문을 추가할 수 있습니다. 다음과 같이:
proxy_set_header Host $http_host;
proxy_set_header X-Real-IP $remote_addr;
proxy_set_header X-Forwarded-For $proxy_add_x_forwarded_for;
proxy_set_header X-Forwarded-Proto $scheme;

client_max_body_size 100M;
client_body_buffer_size 1m;
proxy_intercept_errors on;
proxy_buffering on;
proxy_buffer_size 128k;
proxy_buffers 256 16k;
proxy_busy_buffers_size 256k;
proxy_temp_file_write_size 256k;
proxy_max_temp_file_size 0;
proxy_read_timeout 300;
이제 nginx의 기본 가상 호스트를 수정합니다. nginx가 Apache에 요청을 전달하지 않고 직접 정적 파일을 전달할 수 있도록 example.com(예: /var/www/html)의 Apache 가상 호스트와 동일한 문서 루트를 사용하는지 확인합니다.
nano /etc/nginx/sites-available/default
server {
     listen 80 default_server;
     listen [::]:80 default_server;

     root /var/www/html;

     # Add index.php to the list if you are using PHP
     index index.html index.htm index.nginx-debian.html;

     server_name _;

     location / {
       proxy_pass http://localhost:8000;
       include /etc/nginx/proxy_params;
     }
}
이것은 모든 요청을 Apache에 프록시하는 매우 간단한 구성입니다.
변경 사항을 적용하려면 nginx를 다시 로드하십시오.
service nginx reload
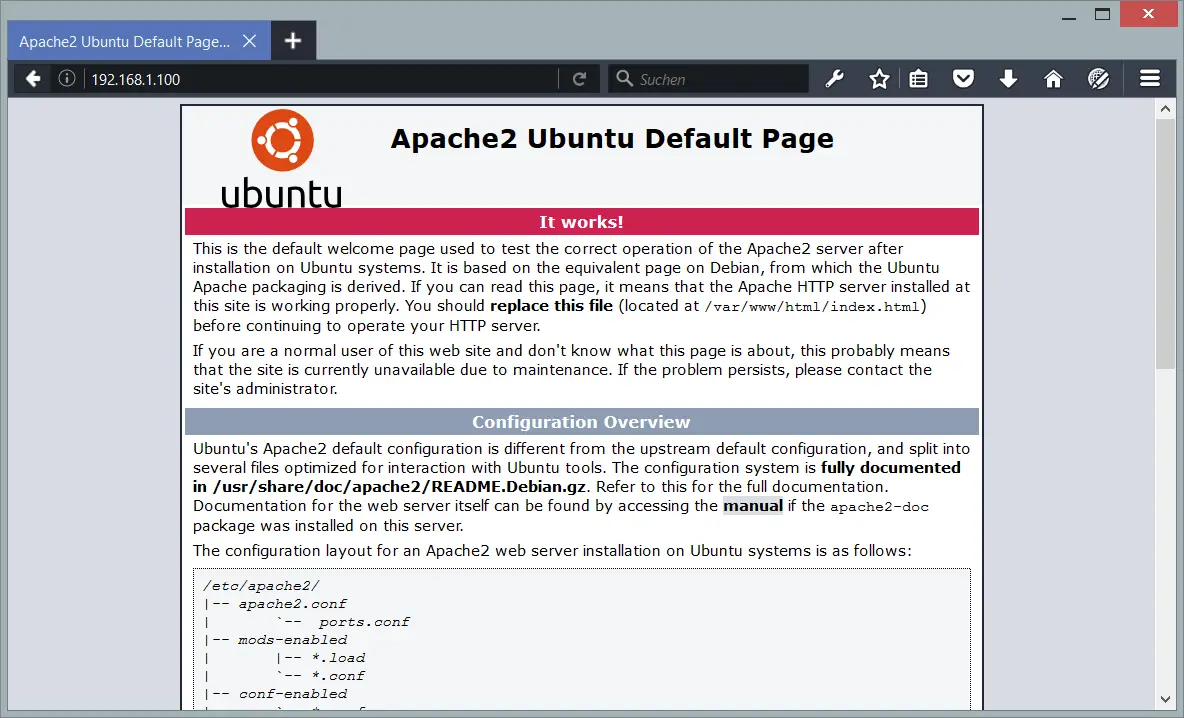
이제 브라우저에 서버 호스트 이름 또는 IP 192.168.1.100을 입력하면 apache 기본 웹사이트가 표시되지만 이번에는 nginx를 통해 제공됩니다.
전에 말했듯이 이것은 Apache에 대한 모든 요청을 프록시하는 매우 간단한 구성입니다. 그러나 nginx는 Apache보다 정적 파일(JavaScript, CSS, 이미지, PDF 파일, 정적 HTML 파일 등)을 전달하는 속도가 훨씬 빠르기 때문에 nginx가 이러한 파일을 직접 제공하도록 하는 것이 좋습니다. 이는 이러한 파일의 새 위치를 추가하여 수행할 수 있습니다. 다음과 같이:
server {
       listen 80 default_server;
       listen [::]:80 default_server;

       root /var/www/html;

       # Add index.php to the list if you are using PHP
       index index.html index.htm index.nginx-debian.html;

       server_name _;

       location / {
         proxy_pass http://localhost:8000;
         include /etc/nginx/proxy_params;
       }
       location ~* \.(js|css|jpg|jpeg|gif|png|svg|ico|pdf|html|htm)$ {
       }
}
nginx를 다시 로드합니다.
service nginx reload
브라우저가 이러한 파일을 캐시하도록 이러한 파일에 대해 Expires HTTP 헤더를 설정할 수도 있습니다(자세한 내용은 Make Browsers Cache Static Files On nginx 참조).
server {
       listen 80 default_server;
       listen [::]:80 default_server;

       root /var/www/html;

       # Add index.php to the list if you are using PHP
       index index.html index.htm index.nginx-debian.html;

       server_name _;

       location / {
       proxy_pass http://localhost:8000;
       include /etc/nginx/proxy_params;
       }
       location ~* \.(js|css|jpg|jpeg|gif|png|svg|ico|pdf|html|htm)$ {
                expires      30d;
       }
}
이제 nginx가 처리할 수 있는 만큼의 요청을 처리하고 나머지 요청과 PHP 파일만 Apache에 전달하도록 하여 이 설정을 한 단계 더 발전시킬 수 있습니다.
server {
       listen 80 default_server;
       listen [::]:80 default_server;

       root /var/www/html;

       # Add index.php to the list if you are using PHP
       index index.html index.htm index.nginx-debian.html;

       server_name _;

       location / {
                proxy_pass http://localhost:8000;
                include /etc/nginx/proxy_params;
       }
       location ~* \.(js|css|jpg|jpeg|gif|png|svg|ico|pdf|html|htm)$ {
                expires      30d;
       }
       location @proxy {
                proxy_pass http://127.0.0.1:8000;
                include /etc/nginx/proxy_params;
       }
       location ~* \.php$ {
                proxy_pass http://127.0.0.1:8000;
                include /etc/nginx/proxy_params;
       }
}
nginx를 다시 로드합니다.
service nginx reload
물론 예를 들어 nginx proxy_cache를 사용하여 이 설정을 더 세밀하게 조정할 수 있습니다(응용 프로그램에서 허용하는 경우 - 예를 들어 캡차 또는 쇼핑 카트가 캐시되지 않도록 하고 로그인한 사용자가 항상 페이지의 새 사본) 또는 애플리케이션에 전체 페이지 캐시가 있는 경우 - nginx는 이러한 경우 전체 페이지 캐시에 직접 액세스할 수 있습니다(이 자습서에서 예를 찾을 수 있습니다. How To Speed Up Drupal 7.7 With Boost And nginx( 데비안 스퀴즈)).
4 링크
- nginx: http://nginx.net/
- 아파치: http://httpd.apache.org/
- 우분투: http://www.ubuntu.com/