데비안에서 Munin 및 Monit로 서버 모니터링
이 튜토리얼은 다음 OS 버전에 대해 존재합니다.
- 데비안 7(Wheezy)
이 페이지에서
- 1 서문
- 2 Munin 설치 및 구성
- 3 Munin 출력 디렉토리를 암호로 보호(선택 사항이지만 적극 권장)\n
- 4 Munin에서 추가 모듈 활성화\n
이 기사에서는 Munin 및 Monit을 사용하여 Debian 8(Jessie) 서버를 모니터링하는 방법을 설명합니다. munin은 많은 구성 없이 서버의 거의 모든 측면(로드 평균, 메모리 사용량, CPU 사용량, MySQL 처리량, eth0 트래픽 등)에 대한 멋진 작은 그래픽을 생성하는 반면 Monit은 Apache, MySQL, Postfix와 같은 서비스의 가용성을 확인하고 서비스가 예상대로 작동하지 않는 경우 재시작과 같은 적절한 조치. 이 둘의 조합은 완전한 모니터링을 제공합니다. 즉, 현재 또는 향후 문제를 인식할 수 있는 그래픽(예: "곧 더 큰 서버가 필요합니다. 평균 부하가 빠르게 증가하고 있습니다.") 및 모니터링 서비스.
Munin을 사용하면 둘 이상의 서버를 모니터링할 수 있지만 여기서는 Munin이 설치된 시스템의 모니터링에 대해서만 설명합니다.
이 튜토리얼은 Debian 8(Jessie)용으로 작성되었지만 구성은 거의 변경하지 않고 Ubuntu와 같은 다른 배포판에도 적용되어야 합니다.
이것이 그러한 시스템을 설정하는 유일한 방법이 아니라는 것을 먼저 말하고 싶습니다. 이 목표를 달성하는 방법에는 여러 가지가 있지만 이것이 제가 취하는 방법입니다. 나는 이것이 당신에게 효과가 있을 것이라는 어떠한 보증도 하지 않습니다!
1 서문
시스템 호스트 이름은 server1.example.com이고 문서 루트가 /var/www/www.example.com/web인 웹사이트 www.example.com이 있습니다.
Munin 설치를 시작하기 전에 시스템이 최신 상태인지 확인하고 다음을 실행하십시오.
apt-get update
apt-get upgrade
Apache는 Munin 페이지를 표시하는 데 사용되며 Munin 그래프 줌 기능에는 apache fcgid 모듈이 필요합니다. apt를 사용하여 apache 및 fcgid 모듈을 설치합니다.
apt-get install apache2 libcgi-fast-perl libapache2-mod-fcgid
Apache에서 fcgid 모듈을 활성화합니다.
a2enmod fcgid
2 Munin 설치 및 구성
Debian Jessie에 Munin을 설치하려면 다음을 수행합니다.
apt-get install munin munin-node munin-plugins-extra
서버가 MySQL 또는 MariaDB를 실행 중인 경우 몇 가지 추가 Munin 플러그인을 활성화하여 MySQL을 모니터링합니다.
cd /etc/munin/plugins
ln -s /usr/share/munin/plugins/mysql_ mysql_
ln -s /usr/share/munin/plugins/mysql_bytes mysql_bytes
ln -s /usr/share/munin/plugins/mysql_innodb mysql_innodb
ln -s /usr/share/munin/plugins/mysql_isam_space_ mysql_isam_space_
ln -s /usr/share/munin/plugins/mysql_queries mysql_queries
ln -s /usr/share/munin/plugins/mysql_slowqueries mysql_slowqueries
ln -s /usr/share/munin/plugins/mysql_threads mysql_threads
다음으로 Munin 구성 파일 /etc/munin/munin.conf를 편집해야 합니다. dbdir, htmldir, logdir, rundir 및 tmpldir 행의 주석을 제거하십시오(기본값이 좋습니다). Munin이 HTML 출력에서 localhost.localdomain 대신 server1.example.com이라는 이름을 사용하기를 원하므로 간단한 호스트 트리 섹션에서 localhost.localdomain을 server1.example.com으로 바꿉니다. 주석이 없으면 변경된 파일은 다음과 같습니다.
nano /etc/munin/munin.conf
# Example configuration file for Munin, generated by 'make build'

# The next three variables specifies where the location of the RRD
# databases, the HTML output, logs and the lock/pid files. They all
# must be writable by the user running munin-cron. They are all
# defaulted to the values you see here.
#
dbdir /var/lib/munin
htmldir /var/cache/munin/www
logdir /var/log/munin
rundir /var/run/munin

# Where to look for the HTML templates
#
tmpldir /etc/munin/templates

# Where to look for the static www files
#
#staticdir /etc/munin/static

# temporary cgi files are here. note that it has to be writable by
# the cgi user (usually nobody or httpd).
#
# cgitmpdir /var/lib/munin/cgi-tmp

# (Exactly one) directory to include all files from.
includedir /etc/munin/munin-conf.d
[...]
# a simple host tree
[server1.example.com]
 address 127.0.0.1
 use_node_name yes
[...]
Munin /etc/munin/apache24.conf에 대한 Apache 2.4 구성 파일을 찾아야 합니다. 이 파일은 munin이라는 별칭을 munins HTML 출력 디렉토리 /var/cache/munin/www에 정의합니다. 이는 이 서버의 모든 웹사이트에서 munin에 액세스할 수 있음을 의미합니다. 상대 경로 /munin(예: http://www.example.com/munin)을 사용합니다.
Apache Munin 구성은 기본적으로 활성화되어 있지 않으며 DebianWheezy에서 Jessie로 변경되었습니다. 새 구성 디렉토리는 Wheezy 및 Squeeze와 같은 이전 버전에서 사용되었던 /etc/apache2/conf.d 대신 /etc/apache2/conf-enabled입니다.
이 명령을 실행하여 구성을 활성화하고 apache에 로드합니다.
cd /etc/apache2/conf-enabled/
ln -s /etc/munin/apache24.conf munin.conf
service apache2 restart
Require local 줄을 주석 처리하고 Require all registered 및 Options FollowSymLinks SymLinksIfOwnerMatch를 대신 추가해야 합니다(그렇지 않으면 localhost에서만 Munin 출력에 액세스할 수 있음).
nano /etc/munin/apache24.conf
Alias /munin /var/cache/munin/www
<Directory /var/cache/munin/www>
 # Require local
 Require all granted
 Options FollowSymLinks SymLinksIfOwnerMatch
 Options None
</Directory>

ScriptAlias /munin-cgi/munin-cgi-graph /usr/lib/munin/cgi/munin-cgi-graph
<Location /munin-cgi/munin-cgi-graph>
 # Require local
 Require all granted
 Options FollowSymLinks SymLinksIfOwnerMatch
 <IfModule mod_fcgid.c>
 SetHandler fcgid-script
 </IfModule>
 <IfModule !mod_fcgid.c>
 SetHandler cgi-script
 </IfModule>
</Location>
아파치를 다시 시작합니다.
service apache2 restart
그런 다음 Munin을 다시 시작하십시오.
service munin-node restart
이제 Munin이 첫 번째 출력을 생성할 수 있도록 몇 분 정도 기다린 다음 브라우저에서 http://www.example.com/munin/으로 이동하면 첫 번째 통계가 표시됩니다.
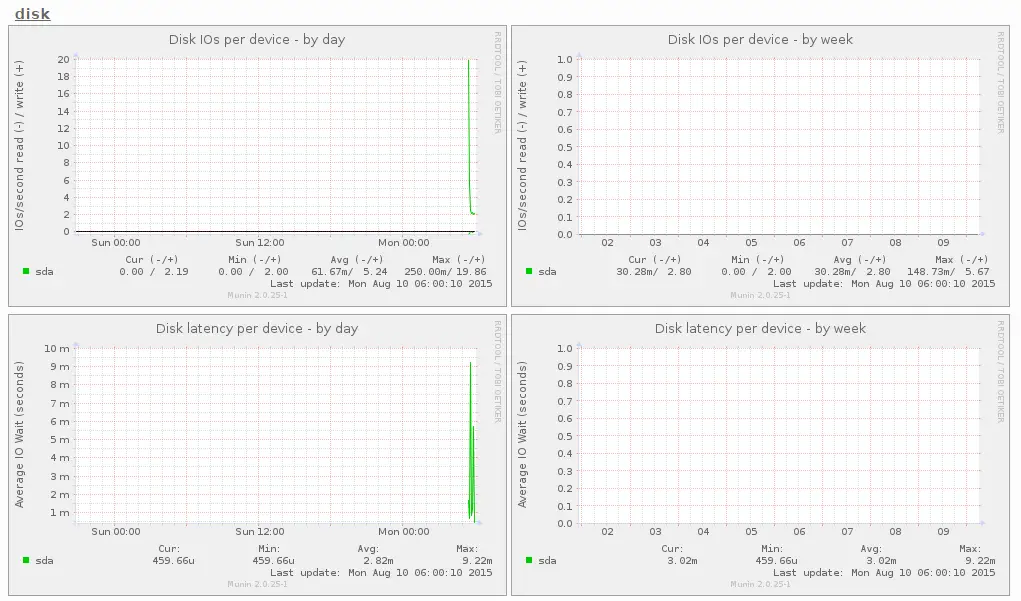
(이것은 munin이 생성하는 많은 그래픽의 일부일 뿐입니다...)
3 Munin 출력 디렉터리를 암호로 보호(선택 사항이지만 적극 권장)
모든 사람이 서버에 대한 모든 작은 통계를 볼 수 있기를 원하지 않는 한 이제 munin 출력 디렉토리를 암호로 보호하는 것이 좋습니다.
이렇게 하려면 암호 파일 /etc/munin/munin-htpasswd를 만들어야 합니다. 사용자 이름 admin으로 로그인하고 싶으므로 다음을 수행합니다.
htpasswd -c /etc/munin/munin-htpasswd admin
관리자의 비밀번호를 입력하세요. 그런 다음 /etc/munin/apache24.conf를 다시 엽니다...
nano /etc/munin/apache24.conf
... "모두 승인해야 함을 주석 처리하고 내가 빨간색으로 표시한 줄을 추가합니다.
Alias /munin /var/cache/munin/www
<Directory /var/cache/munin/www>
 # Require local
 # Require all granted
 AuthUserFile /etc/munin/munin-htpasswd
 AuthName "Munin"
 AuthType Basic
 Require valid-user
 Options None
</Directory>

ScriptAlias /munin-cgi/munin-cgi-graph /usr/lib/munin/cgi/munin-cgi-graph
<Location /munin-cgi/munin-cgi-graph>
 # Require local
 # Require all granted
 AuthUserFile /etc/munin/munin-htpasswd
 AuthName "Munin"
 AuthType Basic
 Require valid-user
 <IfModule mod_fcgid.c>
 SetHandler fcgid-script
 </IfModule>
 <IfModule !mod_fcgid.c>
 SetHandler cgi-script
 </IfModule>
</Location>
그런 다음 Apache를 다시 시작합니다.
service apache2 restart
4 Munin에서 추가 모듈 활성화
Munin 명령 "munin-node-configure --suggest"를 사용하여 서버에서 활성화할 수 있는 추가 Munin 모듈에 대한 권장 사항을 얻을 수 있습니다. 달리다:
munin-node-configure --suggest
출력은 다음과 유사해야 합니다.

"used" 열은 모듈이 활성화되었는지 여부를 표시하고 "Suggestions" 열은 서버가 이 모듈에서 모니터링할 수 있는 서비스를 실행하는지 여부를 표시합니다. 모듈을 활성화하려면 /etc/munin/plugins에서 모듈에 대한 심볼릭 링크를 만드십시오.
여기서는 예를 들어 apache_* 모듈을 활성화합니다.
cd /etc/munin/plugins
ln -s /usr/share/munin/plugins/apache_accesses
ln -s /usr/share/munin/plugins/apache_processes
ln -s /usr/share/munin/plugins/apache_volume
새 구성을 로드하려면 Munin을 다시 시작하십시오.
service munin-node restart