CentOS 7에서 Nginx 및 MariaDB와 함께 OwnCloud 8을 설치하는 방법
이 튜토리얼은 다음 OS 버전에 대해 존재합니다.
- 센트OS 7.3
- 센트OS 7
이 페이지에서
- 전제 조건
- 할 일\n
- SELinux 비활성화 및 방화벽 구성\n
- LEMP 설치 및 구성
- 1단계 - epel-repository 활성화\n
- 1단계 - 데이터베이스 및 사용자 생성
- 2단계 - SSL 인증서 만들기
- OwnCloud용 가상 호스트 구성\n
OwnCloud는 오픈 소스 라이선스로 제공되는 사용하기 쉬운 웹 기반 프런트엔드를 통해 데이터 동기화 및 파일 공유를 위한 서버 소프트웨어입니다. Owncloud는 Linux 또는 Windows 웹 서버에 설치할 수 있고 구성하기 쉬우며 포괄적인 온라인 설명서가 있습니다. 기본 클라이언트는 Windows, MacOS 및 Linux(데스크탑 애플리케이션)에서 사용할 수 있습니다. Android 및 iOS용 모바일 앱도 있습니다.
이 튜토리얼에서는 nginx 웹 서버 및 MariaDB 데이터베이스를 사용하여 CentOS 7에 Owncloud 8을 설치하는 방법을 설명합니다.
현재 최신 버전은 OwnCloud 8.0입니다.
전제 조건
- 센트OS 7
할 것
이 가이드에서 수행할 단계는 다음과 같습니다.
- SELinux를 비활성화하고 방화벽을 구성합니다.\n
- Nginx, MariaDB, php-fpm을 설치하고 구성합니다.\n
- 데이터베이스를 생성하고 SSL을 구성합니다.\n
- OwnCloud를 설치합니다.\n
- OwnCloud용 가상 호스트를 구성합니다.\n
- 브라우저에서 OwnCloud를 테스트합니다.\n
SELinux 비활성화 및 방화벽 구성
SELinux를 비활성화하려면 /etc/sysconfig/selinux 파일을 편집하고 강제 적용을 비활성화로 변경합니다.
vim /etc/sysconfig/selinux

이 명령을 실행하여 방화벽에서 포트 80/http 및 443/https를 열면 나중에 http 및 https로 OwnCloud 인터페이스에 연결할 수 있습니다.
firewall-cmd --permanent --add-service=http
 firewall-cmd --permanent --add-service=https
 firewall-cmd --reload
LEMP 설치 및 구성
다음은 OwnCloud를 실행할 기본 LEMP(Linux - Nginx - MariaDB - PHP) 서버를 설정하는 단계입니다.
1단계 - epel-repository 활성화
LEMP(Linux, Nginx, MariaDB 및 PHP)를 설치하려면 epel-repository를 활성화해야 합니다.
yum -y install epel-release
2단계 - Nginx, MariaDB 및 php-fpm 설치
sudo rpm -Uvh http://nginx.org/packages/centos/7/noarch/RPMS/nginx-release-centos-7-0.el7.ngx.noarch.rpm
 yum -y install nginx mariadb mariadb-server php-fpm php-cli php-gd php-mcrypt php-mysql php-pear php-xml bzip2 vim
3단계 - MariaDB 시작 및 구성
systemctl start mariadb
 mysql_secure_installation
처음으로 Enter를 누르십시오.
Change the root password? [Y/n] Y
Remove anonymous users? [Y/n] Y
Disallow root login remotely? [Y/n] Y
Remove test database and access to it? [Y/n] Y
Reload privilege tables now? [Y/n] Y
4단계 - php-fpm 구성
/etc/php-fpm.d/www.conf 파일을 편집합니다.
vim /etc/php-fpm.d/www.conf
라인 수신이 다음인지 확인하십시오.
listen = 127.0.0.1:9000
그리고 user - group 라인을 편집합니다.
user = nginx
group = nginx
세션 경로에 대한 디렉터리를 만듭니다.
mkdir -p /var/lib/php/session
 chown nginx:nginx -R /var/lib/php/session/
php-fpm을 시작합니다.
systemctl start php-fpm
5단계 - nginx 시작
systemctl start nginx
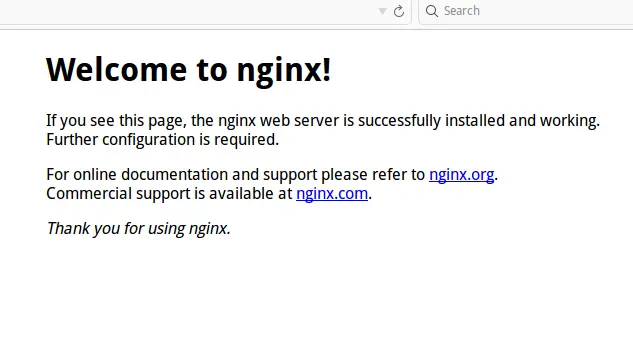
이 단계에서 웹 서버 http://192.168.1.101/을 방문할 수 있습니다.
데이터베이스 생성 및 SSL 구성
1단계 - 데이터베이스 및 사용자 생성
mysql 명령줄 클라이언트로 MariaDB에 로그인합니다.
mysql -u root -p
데이터베이스를 생성합니다:
create database owncloud_db;
사용자 추가:
create user identified by 'ownclouduser';
사용자에게 데이터베이스에 대한 권한 부여
grant all privileges on owncloud_db.* to  identified by 'ownclouduser';
 flush privileges;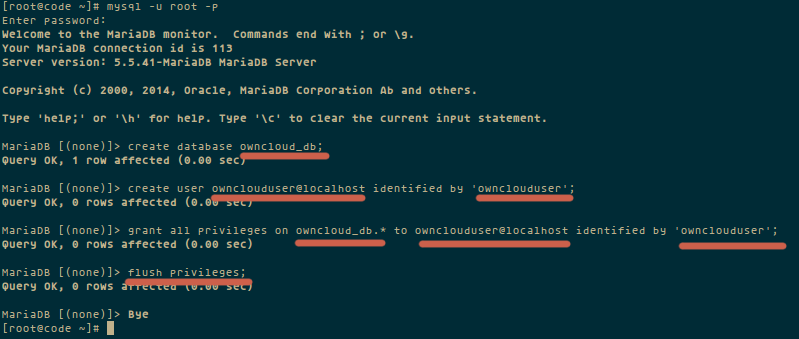
2단계 - SSL 인증서 생성
mkdir -p /etc/nginx/cert/
 cd /etc/nginx/cert/
 openssl req -new -x509 -days 365 -nodes -out /etc/nginx/cert/owncloud.crt -keyout /etc/nginx/cert/owncloud.key
이 명령은 /etc/nginx/cert/ 디렉토리에 owncloud.crt 및 owncloud.key를 생성합니다.
권한 인증서 파일을 변경합니다.
chmod 600 owncloud.crt
 chmod 600 owncloud.key
오운클라우드 설치
wget으로 애플리케이션 소스를 다운로드합니다.
yum -y install wget
 cd /tmp/
 wget https://download.owncloud.org/community/owncloud-8.0.0.tar.bz2
owncloud 디렉토리를 추출하여 /usr/share/nginx/html로 이동합니다.
tar -xjvf owncloud-8.0.0.tar.bz2
 mv owncloud/ /usr/share/nginx/html/
owncloud 디렉터리의 소유자를 nginx로 변경합니다.
cd /usr/share/nginx/html/
 chown nginx:nginx -R owncloud/
owncloud 디렉토리에 data라는 디렉토리를 생성하고 소유자를 nginx로 변경합니다.
mkdir -p owncloud/data/
 chown nginx:nginx -R owncloud/data/
OwnCloud용 가상 호스트 구성
마지막 단계는 owncloud에 대한 가상 호스트를 구성하는 것입니다.
cd /etc/nginx/conf.d/
 mv default.conf default
/etc/nginx/conf.d/에 owncloud 구성 추가
vim owncloud.conf
아래에 구성 붙여넣기:
upstream php-handler {
    server 127.0.0.1:9000;
    #server unix:/var/run/php5-fpm.sock;
}

server {
        listen 80;
        server_name 192.168.1.101; #YourIP or domain
        return 301 https://$server_name$request_uri;  # redirect all to use ssl
}


server {
        listen 443 ssl;
        server_name 192.168.1.101; #YourIP or domain

        #SSL Certificate you created
        ssl_certificate /etc/nginx/cert/owncloud.crt;
        ssl_certificate_key /etc/nginx/cert/owncloud.key;

        # owncloud path
        root /usr/share/nginx/html/owncloud/;

        client_max_body_size 10G; # set max upload size
        fastcgi_buffers 64 4K;

        rewrite ^/caldav(.*)$ /remote.php/caldav$1 redirect;
        rewrite ^/carddav(.*)$ /remote.php/carddav$1 redirect;
        rewrite ^/webdav(.*)$ /remote.php/webdav$1 redirect;

        index index.php;
        error_page 403 /core/templates/403.php;
        error_page 404 /core/templates/404.php;

        location = /robots.txt {
            allow all;
            log_not_found off;
            access_log off;
        }

        location ~ ^/(data|config|\.ht|db_structure\.xml|README) {
                deny all;
        }

        location / {
                # The following 2 rules are only needed with webfinger
                rewrite ^/.well-known/host-meta /public.php?service=host-meta last;
                rewrite ^/.well-known/host-meta.json /public.php?service=host-meta-json last;

                rewrite ^/.well-known/carddav /remote.php/carddav/ redirect;
                rewrite ^/.well-known/caldav /remote.php/caldav/ redirect;

                rewrite ^(/core/doc/[^\/]+/)$ $1/index.html;

                try_files $uri $uri/ index.php;
        }

        location ~ ^(.+?\.php)(/.*)?$ {
                try_files $1 = 404;

                include fastcgi_params;
                fastcgi_param SCRIPT_FILENAME $document_root$1;
                fastcgi_param PATH_INFO $2;
                fastcgi_param HTTPS on;
                fastcgi_pass php-handler;
        }

        # Optional: set long EXPIRES header on static assets
        location ~* ^.+\.(jpg|jpeg|gif|bmp|ico|png|css|js|swf)$ {
                expires 30d;
                # Optional: Don't log access to assets
                access_log off;
        }

}
그런 다음 LEMP 스택을 다시 시작합니다.
systemctl restart nginx mariadb php-fpm
이제 부팅 시 시작되도록 LEMP 서비스를 구성합니다.
systemctl enable nginx
 systemctl enable php-fpm
 systemctl enable mariadb
그런 다음 서버를 재부팅합니다.
reboot
OwnCloud 테스트
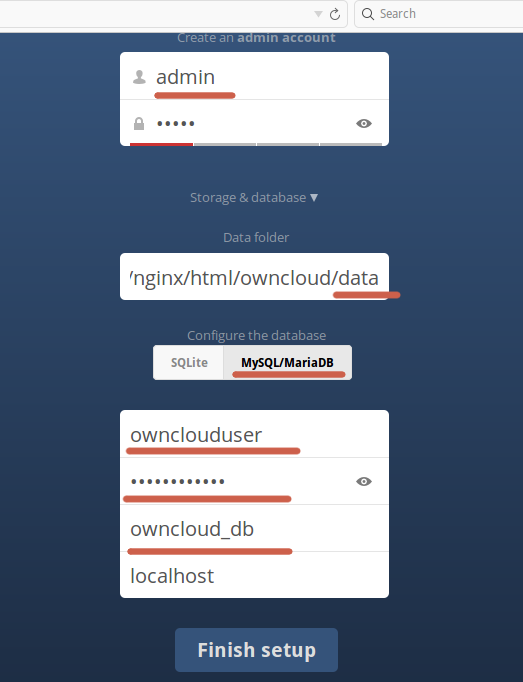
관리자 계정을 생성하고 모든 데이터베이스(사용자 이름, 비밀번호, DB 이름)를 입력한 다음 설치 완료를 클릭합니다.
결론
OwnCloud는 오늘날 사설 클라우드에 적합한 솔루션입니다. 사용 및 구성이 간편하고 사용자 친화적인 인터페이스로 사용 및 설치가 간편합니다. Owncloud는 빠르고 안정적이며 많은 기능을 가지고 있습니다.
연결
- Owncloud
- 센트OS
- 엔진엑스
- 마리아DB
- PHP