초보자를 위한 Linux tcpdump 명령 자습서(예제 8개)
이 페이지에서
- Linux tcpdump 명령
- Q1. tcpdump를 사용하는 방법?\n
- Q2. 설정된 패킷 수를 수신한 후 tcpdump를 종료하는 방법은 무엇입니까?\n
- Q3. 출력에 tcpdump 표시 링크 수준 헤더를 만드는 방법은 무엇입니까?\n
- Q4. tcpdump가 외부 IP 주소를 숫자로 표시하게 하려면 어떻게 해야 하나요?\n
- Q5. tcpdump가 출력에서 패킷 번호를 생성하는 방법은 무엇입니까?\n
- Q6. tcpdump가 더 짧은 출력을 인쇄하는 방법은 무엇입니까?\n
- Q7. tcpdump 출력에서 타임스탬프 정보를 생략하는 방법은 무엇입니까?\n
- Q8. tcpdump가 자세한 출력을 생성하는 방법은 무엇입니까?\n
- 결론
컴퓨터에서 웹 페이지를 열 때마다 데이터 패킷이 네트워크 인터페이스에서 송수신됩니다. 때로는 이러한 패킷 분석이 여러 가지 이유로 중요해집니다. 고맙게도 Linux는 이러한 데이터 패킷과 관련된 정보를 출력으로 덤프하는 명령줄 유틸리티를 제공합니다.
이 기사에서는 해당 도구인 tcpdump의 기본 사항에 대해 설명합니다. 그러나 그 전에 여기에 있는 모든 예제는 Ubuntu 18.04 LTS 시스템과 Debian 10에서 테스트되었지만 CentOS, Fedora, Gentoo 및 Arch Linux와 같은 다른 Linux 배포판에서도 작동한다는 점을 언급할 가치가 있습니다.
리눅스 tcpdump 명령어
Linux의 tcpdump 명령을 사용하면 네트워크에서 트래픽을 덤프할 수 있습니다. 다음은 짧은 구문입니다.
tcpdump [OPTIONS]
자세한 구문은 다음과 같습니다.
tcpdump [ -AbdDefhHIJKlLnNOpqStuUvxX# ] [ -B buffer_size ]
               [ -c count ]
               [ -C file_size ] [ -G rotate_seconds ] [ -F file ]
               [ -i interface ] [ -j tstamp_type ] [ -m module ] [ -M secret ]
               [ --number ] [ -Q in|out|inout ]
               [ -r file ] [ -V file ] [ -s snaplen ] [ -T type ] [ -w file ]
               [ -W filecount ]
               [ -E  algo:secret,...  ]
               [ -y datalinktype ] [ -z postrotate-command ] [ -Z user ]
               [ --time-stamp-precision=tstamp_precision ]
               [ --immediate-mode ] [ --version ]
               [ expression ]
도구 매뉴얼 페이지에서 설명하는 방법은 다음과 같습니다.
Tcpdump prints out a description of the contents of packets on a network interface that match the
boolean expression; the description is preceded by a time stamp, printed, by default, as hours,
minutes, seconds, and fractions of a second  since  midnight.

It can  also  be  run with the -w flag, which causes it to save the packet data to a file for
later analysis, and/or with the -r flag, which causes it to read from a saved packet file rather
than to read packets from a network interface.  It can also be run with the -V  flag,  which causes
it to read a list of saved packet files.

In all cases, only packets that match expression will be processed by tcpdump.
다음은 tcpdump 명령의 작동 방식에 대한 더 나은 아이디어를 제공하는 몇 가지 Q&A 스타일 예제입니다.
Q1. tcpdump를 사용하는 방법?
tcpdump를 사용하여 데이터 패킷을 스니핑하기 전에 도구가 작동할 네트워크 인터페이스를 이상적으로 알아야 합니다. 시스템에서 사용 가능한 네트워크 인터페이스 목록을 보려면 tcpdump와 함께 -D 명령줄 옵션을 사용하십시오.
tcpdump -D
매뉴얼 페이지에서 이 옵션을 설명하는 방법은 다음과 같습니다.
Print the list of the network interfaces available on the system and on which tcpdump can capture
packets. For each network interface, a number and an interface name, possibly followed by a text
description of the interface, is printed. The interface name or the number can be supplied to the
-i flag to specify an interface on which to capture.

This can be useful on systems that don't have a command to list them (e.g., Windows systems, or
UNIX systems lacking  ifconfig -a); the number can be useful on Windows 2000 and later systems,
where the interface name is a somewhat complex string.

The  -D  flag  will not be supported if tcpdump was built with an older version of libpcap that
lacks the pcap_findalldevs() function.
예를 들어 제 경우에는 다음과 같은 출력이 생성되었습니다.
1.wlx18a6f713679b [Up, Running]
2.any (Pseudo-device that captures on all interfaces) [Up, Running]
3.lo [Up, Running, Loopback]
4.enp3s0 [Up]
5.nflog (Linux netfilter log (NFLOG) interface)
6.nfqueue (Linux netfilter queue (NFQUEUE) interface)
7.usbmon1 (USB bus number 1)
8.usbmon2 (USB bus number 2)
9.usbmon3 (USB bus number 3)
10.usbmon4 (USB bus number 4)
이제 인터페이스 목록이 있으므로 하나를 선택하고 해당 이름을 tcpdump의 -i 명령줄 옵션에 대한 입력으로 전달할 수 있습니다. 예를 들어:
tcpdump -i wlx18a6f713679b
다음은 필자의 경우 이 명령으로 생성된 출력의 일부입니다.
tcpdump: verbose output suppressed, use -v or -vv for full protocol decode
listening on wlx18a6f713679b, link-type EN10MB (Ethernet), capture size 262144 bytes
11:53:11.408964 IP 192.168.2.132.52898 > 239.255.255.250.3702: UDP, length 656
11:53:11.409492 IP himanshu.57383 > one.one.one.one.domain: 8572+ [1au] PTR? 250.255.255.239.in-addr.arpa. (57)
11:53:11.409588 IP 192.168.2.140.49690 > 239.255.255.250.1900: UDP, length 174
11:53:11.409954 IP 192.168.2.147.mdns > 224.0.0.251.mdns: 1 [2q] PTR (QU)? _%9E5E7C8F47989526C9BCD95D24084F6F0B27C5ED._sub._googlecast._tcp.local. PTR (QU)? _googlecast._tcp.local. (94)
11:53:11.499220 IP one.one.one.one.domain > himanshu.57383: 8572 NXDomain 0/1/1 (114)
11:53:11.499950 IP himanshu.34201 > one.one.one.one.domain: 12068+ [1au] PTR? 132.2.168.192.in-addr.arpa. (55)
11:53:11.591291 IP one.one.one.one.domain > himanshu.34201: 12068 NXDomain* 0/1/2 (278)
11:53:11.592195 IP himanshu.55501 > one.one.one.one.domain: 31630+ [1au] PTR? 1.1.1.1.in-addr.arpa. (49)
11:53:11.842603 IP himanshu.57253 > one.one.one.one.domain: 16905+ [1au] PTR? 140.2.168.192.in-addr.arpa. (55)
11:53:11.951226 IP himanshu.52662 > one.one.one.one.domain: 52377+ [1au] PTR? 251.0.0.224.in-addr.arpa. (53)
11:53:12.428931 IP 192.168.2.140.49690 > 239.255.255.250.1900: UDP, length 174
11:53:12.437905 IP 192.168.2.147.mdns > 224.0.0.251.mdns: 2 [2q] PTR (QM)? _%9E5E7C8F47989526C9BCD95D24084F6F0B27C5ED._sub._googlecast._tcp.local. PTR (QM)? _googlecast._tcp.local. (94)
11:53:12.438730 IP6 fe80::eccc:59f2:fc78:9e07.52899 > ff02::c.3702: UDP, length 656
11:53:12.439017 IP himanshu.33194 > one.one.one.one.domain: 15679+ [1au] PTR? c.0.0.0.0.0.0.0.0.0.0.0.0.0.0.0.0.0.0.0.0.0.0.0.0.0.0.0.2.0.f.f.ip6.arpa. (101)
11:53:12.572386 IP one.one.one.one.domain > himanshu.33194: 15679 NXDomain 0/1/1 (165)
11:53:12.642129 IP 192.168.2.11.mdns > 224.0.0.251.mdns: 0*- [0q] 1/0/3 PTR Google-Home-Mini-e3a3ae72a03e3d1c60d24653d4666ca6._googlecast._tcp.local. (356)
...
...
Q2. 설정된 패킷 수를 수신한 후 tcpdump를 종료하는 방법은 무엇입니까?
이는 -c 명령줄 옵션을 사용하여 수행할 수 있습니다. 예를 들어 tcpdump가 10개의 패킷과 관련된 정보만 표시하도록 하려면 다음과 같은 방법으로 수행할 수 있습니다.
tcpdump -c 10
예를 들어 제 경우에는 다음 명령을 실행했습니다.
tcpdump -c 10 -i wlx18a6f713679b
다음은 생성된 출력입니다.
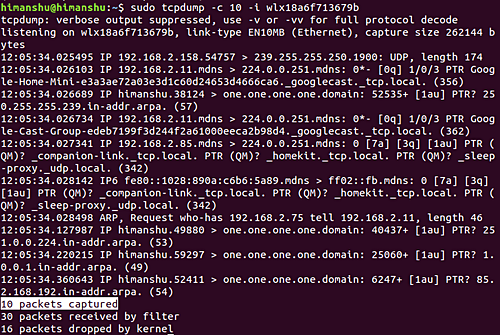
따라서 10개의 패킷이 캡처된 것을 볼 수 있습니다.
Q3. 출력에 tcpdump 표시 링크 수준 헤더를 만드는 방법은 무엇입니까?
이것은 -e 명령줄 옵션을 사용하여 수행할 수 있습니다. 예를 들어:
tcpdump -e -i wlx18a6f713679b
다음은 생성된 출력입니다.
listening on wlx18a6f713679b, link-type EN10MB (Ethernet), capture size 262144 bytes
12:14:07.951396 3c:a8:2a:a7:7b:c1 (oui Unknown) > Broadcast, ethertype IPv4 (0x0800), length 197: 192.168.2.55.17500 > 255.255.255.255.17500: UDP, length 155
12:14:07.952111 3c:a8:2a:a7:7b:c1 (oui Unknown) > Broadcast, ethertype IPv4 (0x0800), length 197: 192.168.2.55.17500 > 192.168.2.255.17500: UDP, length 155
...
...
따라서 출력에서 링크 수준 헤더가 생성된 것을 볼 수 있습니다.
Q4. tcpdump가 외부 IP 주소를 숫자로 표시하게 하려면 어떻게 해야 하나요?
이는 -f 명령줄 옵션을 사용하여 수행할 수 있습니다.
tcpdump -f -i [INTERFACE]
tcpdump가 "외부 IPv4 주소를 기호가 아닌 숫자로 표시하도록 하면 특정 상황에서 이점이 있습니다. 이러한 예 중 하나는 도구 매뉴얼 페이지에 언급되어 있습니다.
this option is intended to get around serious brain damage in Sun's NIS server — usually it hangs
forever translating non-local internet numbers
Q5. tcpdump가 출력에서 패킷 번호를 생성하는 방법은 무엇입니까?
tcpdump가 출력에서 패킷 번호를 생성하도록 하려면 --number 명령줄 옵션을 사용하십시오.
예를 들어 다음 명령을 실행했습니다.
tcpdump --number -i wlx18a6f713679b
그리고 생성된 출력의 일부는 다음과 같습니다.
listening on wlx18a6f713679b, link-type EN10MB (Ethernet), capture size 262144 bytes
    1  12:38:35.522944 ARP, Request who-has 192.168.2.196 tell _gateway, length 46
    2  12:38:35.523265 IP6 fe80::8ab4:a6ff:fe9d:a6bb > ff02::16: HBH ICMP6, multicast listener report v2, 1 group record(s), length 28
    3  12:38:35.523578 IP6 fe80::8ab4:a6ff:fe9d:a6bb > ip6-allrouters: ICMP6, router solicitation, length 16
    4  12:38:35.523861 ARP, Request who-has 192.168.2.15 tell 192.168.2.170, length 28
...
...
...
이제 각 줄이 숫자로 시작하는 것을 볼 수 있습니다.
Q6. tcpdump가 더 짧은 출력을 인쇄하는 방법은 무엇입니까?
이것은 -q 명령줄 옵션을 사용하여 수행할 수 있습니다. 도구 매뉴얼 페이지에서 설명하는 방법은 다음과 같습니다.
Quick (quiet?) output. Print less protocol information so output lines are shorter.
다음은 이 옵션의 예입니다.
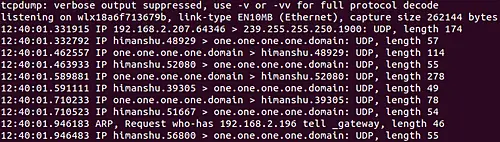
따라서 이번에는 출력에서 더 적은 정보가 생성된 것을 볼 수 있습니다.
Q7. tcpdump 출력에서 타임스탬프 정보를 생략하는 방법은 무엇입니까?
이를 위해 -t 명령줄 옵션을 사용합니다. 다음은 예제 명령입니다.
tcpdump -t -i wlx18a6f713679b
다음은 출력입니다.
listening on wlx18a6f713679b, link-type EN10MB (Ethernet), capture size 262144 bytes
IP himanshu.56992 > mails11.telegram.org.https: Flags [.], ack 3090054317, win 965, options [nop,nop,TS val 226976758 ecr 3781653930], length 0
IP himanshu.41122 > one.one.one.one.domain: 12755+ [1au] PTR? 22.171.154.149.in-addr.arpa. (56)
IP mails11.telegram.org.https > himanshu.56824: Flags [.], ack 273652159, win 1001, options [nop,nop,TS val 3781656472 ecr 226966324], length 0
ARP, Request who-has 192.168.2.48 tell _gateway, length 46
ARP, Request who-has 192.168.2.135 tell _gateway, length 46
...
...
따라서 타임스탬프 정보(일반적으로 각 라인의 시작 부분에 있음)가 현재 출력에 표시되지 않는 것을 볼 수 있습니다.
Q8. tcpdump가 자세한 출력을 생성하는 방법은 무엇입니까?
이 경우 -v 명령줄 옵션을 사용할 수 있습니다. 다음은 도구 매뉴얼 페이지에서 이 옵션을 설명하는 방법입니다.
tcpdump -v -i [INTERFACE]
When parsing and printing, produce (slightly more) verbose output. For example, the time to live,
identification, total length and options in an IP packet are printed. Also enables additional
packet integrity checks such as verifying the IP and ICMP header checksum.

When writing to a file with the -w option, report, every 10 seconds, the number of packets captured
결론
tcpdump 명령이 많은 명령줄 옵션을 제공하므로 여기에서 표면을 긁었습니다. 이러한 연습을 마치면 도구 설명서 페이지로 이동하여 이에 대해 자세히 알아볼 수 있습니다.