Rocky Linux/Alma Linux 9에서 Squid 프록시 서버를 설치 및 구성하는 방법
이 페이지에서
- 전제 조건
- 1단계 - Squid 설치
- 2단계 - Squid 프록시 구성\n
- 1. Squid 액세스 정책 구성
- 2. 웹사이트 차단
- 3. 특정 파일의 다운로드 차단
- 4. 키워드를 사용하여 웹사이트 차단\n
- 5. 클라이언트 IP 주소 마스크
- 6. Squid 프록시 포트 변경\n
- 7. 방화벽/SELinux 구성\n
- 1. 시스템 전체 프록시 구성\n
- 2. 브라우저에서 프록시 설정\n
- 3. 오징어 프록시를 사용하도록 DNF 구성\n
- 4. Squidclient 사용
프록시 서버는 두 네트워크 사이에 있으며 최종 사용자와 인터넷 리소스 간의 게이트웨이 역할을 합니다. 프록시 서버를 통해 최종 사용자는 액세스를 필터링할 수 있습니다. 개인 정보 보호, 보안 및 캐싱을 비롯한 다양한 목적을 위해 웹 트래픽을 제어하고 모니터링할 수 있습니다.
Squid는 서로 다른 요청에서 얻은 데이터를 저장하고 유사한 요청이 수행될 때 트래픽 속도를 높이는 분산 캐싱 메커니즘으로 사용됩니다. 캐싱 서버에 캐시된 데이터가 없으면 데이터가 저장된 웹 서버로 요청을 전달합니다.
이 튜토리얼에서는 Rocky/Alma Linux 9 서버에 Squid Proxy를 설치하고 구성하는 방법을 배웁니다.
전제 조건
-
A server running Rocky Linux 9 or Alma Linux 9.
-
A non-root user with sudo privileges.
-
Make sure everything is updated.
$ sudo dnf update
-
Install basic utility packages. Some of them may already be installed.
$ sudo dnf install wget curl nano unzip yum-utils -y
1단계 - 오징어 설치
Squid를 설치하려면 Epel 저장소가 필요합니다. Epel 저장소를 설치합니다.
$ sudo dnf install epel-release
Squid 프록시를 설치합니다.
$ sudo dnf install squid
설치를 확인하십시오.
$ squid --version
Squid Cache: Version 5.2
Service Name: squid

This binary uses OpenSSL 3.0.1 14 Dec 2021..........
Squid 서비스를 활성화하고 시작합니다.
$ sudo systemctl enable squid --now
서비스 상태를 확인합니다.
$ sudo systemctl status squid
? squid.service - Squid caching proxy
     Loaded: loaded (/usr/lib/systemd/system/squid.service; enabled; vendor preset: disabled)
     Active: active (running) since Wed 2022-09-28 11:52:24 UTC; 2min ago
       Docs: man:squid(8)
    Process: 94622 ExecStartPre=/usr/libexec/squid/cache_swap.sh (code=exited, status=0/SUCCESS)
   Main PID: 94624 (squid)
      Tasks: 3 (limit: 5915)
     Memory: 16.3M
        CPU: 4.207s
     CGroup: /system.slice/squid.service
             ??94624 /usr/sbin/squid --foreground -f /etc/squid/squid.conf
             ??94626 "(squid-1)" --kid squid-1 --foreground -f /etc/squid/squid.conf
             ??94627 "(logfile-daemon)" /var/log/squid/access.log

Sep 28 11:52:24 squidproxy systemd[1]: Starting Squid caching proxy...
Sep 28 11:52:24 squidproxy squid[94624]: Squid Parent: will start 1 kids
Sep 28 11:52:24 squidproxy squid[94624]: Squid Parent: (squid-1) process 94626 started
Sep 28 11:52:24 squidproxy systemd[1]: Started Squid caching proxy.
2단계 - Squid 프록시 구성
Squid는
/etc/squid/squid.conf파일에 구성을 저장합니다. 주석이 없는 파일의 내용을 확인하십시오.$ sudo grep -vE "^#|^$" /etc/squid/squid.conf
위의 명령은 주석을 나타내는
#로 시작하는 모든 명령문을 필터링합니다. 다음과 같은 결과가 표시됩니다.acl localnet src 0.0.0.1-0.255.255.255 # RFC 1122 "this" network (LAN) acl localnet src 10.0.0.0/8 # RFC 1918 local private network (LAN) acl localnet src 100.64.0.0/10 # RFC 6598 shared address space (CGN) acl localnet src 169.254.0.0/16 # RFC 3927 link-local (directly plugged) machines acl localnet src 172.16.0.0/12 # RFC 1918 local private network (LAN) acl localnet src 192.168.0.0/16 # RFC 1918 local private network (LAN) acl localnet src fc00::/7 # RFC 4193 local private network range acl localnet src fe80::/10 # RFC 4291 link-local (directly plugged) machines acl SSL_ports port 443 acl Safe_ports port 80 # http acl Safe_ports port 21 # ftp acl Safe_ports port 443 # https acl Safe_ports port 70 # gopher acl Safe_ports port 210 # wais acl Safe_ports port 1025-65535 # unregistered ports acl Safe_ports port 280 # http-mgmt acl Safe_ports port 488 # gss-http acl Safe_ports port 591 # filemaker acl Safe_ports port 777 # multiling http http_access deny !Safe_ports http_access deny CONNECT !SSL_ports http_access allow localhost manager http_access deny manager http_access allow localnet http_access allow localhost http_access deny all http_port 3128 coredump_dir /var/spool/squid refresh_pattern ^ftp: 1440 20% 10080 refresh_pattern ^gopher: 1440 0% 1440 refresh_pattern -i (/cgi-bin/|\?) 0 0% 0 refresh_pattern . 0 20% 4320
구성 편집의 첫 번째 단계는 기존 구성을 백업하는 것입니다.
$ sudo cp /etc/squid/squid.conf{,.bak}편집할 파일을 엽니다.
$ sudo nano /etc/squid/squid.conf
1. Squid 액세스 정책 구성
액세스 제어 목록(ACL)은 Squid를 로컬 네트워크의 프록시로 사용할 수 있는 사용자를 정의합니다.
다음과 같이 규칙을 정의하여 서브넷
192.168.204.0/24에 호스트를 추가해 보겠습니다.acl newlocalnet src 192.168.205.0/24
이렇게 하면 서브넷의 호스트와 함께
newlocalnet이라는 새 ACL이 생성됩니다.이 ACL에 대한 액세스를 허용하려면
http_access deny all줄 아래에 다음 줄을 추가합니다.http_access allow newlocalnet
Squid는 구성 파일을 위에서 아래로 읽습니다.
2. 웹사이트 차단
차단할 도메인을 저장할 파일을 만듭니다.
$ sudo nano /etc/squid/blocked-sites
차단할 웹사이트를 추가합니다. 예를 들어,
example.com
example.net
example.org
Ctrl + X를 누르고 메시지가 표시되면 Y를 입력하여 파일을 저장합니다.
squid 구성 파일을 엽니다.
$ sudo nano /etc/squid/squid.conf
다음 줄을 추가합니다.
acl blocked_sites dstdomain "/etc/squid/blocked-sites"
http_access deny blocked_sites
3. 특정 파일 다운로드 차단
특정 확장자를 가진 파일이 다운로드되지 않도록 차단할 수도 있습니다. 차단하려는 확장 프로그램을 저장할 파일을 만듭니다.
$ sudo nano /etc/squid/blocked-filextensions
다음 파일 확장자를 지정된 형식으로 붙여넣습니다.
\.exe(\?.*)?$
\.bat(\?.*)?$
\.tar(\?.*)?$
\.mp3(\?.*)?$
\.mp4(\?.*)?$
Ctrl + X를 누르고 메시지가 표시되면 Y를 입력하여 파일을 저장합니다.
squid 구성 파일에 다음 코드를 붙여넣습니다.
acl blockfiles urlpath_regex -i "/etc/squid/blocked-filextensions"
http_access deny blockfiles
4. 키워드를 사용하여 웹사이트 차단
차단할 키워드에 대한 구성 파일을 만듭니다.
$ sudo nano /etc/squid/banned-keywords
다음 키워드를 붙여넣습니다.
porn
gamble
ads
movie
Ctrl + X를 누르고 메시지가 표시되면 Y를 입력하여 파일을 저장합니다.
Squid 구성 파일에서 다음과 같이 변경합니다.
acl keyword-ban url_regex "/etc/squid/banned-keywords"
http_access deny keyword-ban
5. 클라이언트 IP 주소 마스크
Squid 구성 파일에 다음 줄을 추가하여 클라이언트 IP 주소를 노출하지 않음으로써 트래픽을 익명화할 수 있습니다.
# Anonymize Traffic
via off
forwarded_for off
request_header_access Allow allow all
request_header_access Authorization allow all
request_header_access WWW-Authenticate allow all
request_header_access Proxy-Authorization allow all
request_header_access Proxy-Authenticate allow all
request_header_access Cache-Control allow all
request_header_access Content-Encoding allow all
request_header_access Content-Length allow all
request_header_access Content-Type allow all
request_header_access Date allow all
request_header_access Expires allow all
request_header_access Host allow all
request_header_access If-Modified-Since allow all
request_header_access Last-Modified allow all
request_header_access Location allow all
request_header_access Pragma allow all
request_header_access Accept allow all
request_header_access Accept-Charset allow all
request_header_access Accept-Encoding allow all
request_header_access Accept-Language allow all
request_header_access Content-Language allow all
request_header_access Mime-Version allow all
request_header_access Retry-After allow all
request_header_access Title allow all
request_header_access Connection allow all
request_header_access Proxy-Connection allow all
request_header_access User-Agent allow all
request_header_access Cookie allow all
request_header_access All deny all
6. 오징어 프록시 포트 변경
기본적으로 Squid 프록시 서버는 포트 3128에서 수신 대기합니다. 이를 변경하려면 squid 구성 파일에서
http_port 3128행을 주석 처리하고 다음과 같이 변경해야 합니다.# Squid normally listens to port 3128 # http_port 3128 http_port 7035
Ctrl + X를 누르고 메시지가 표시되면 Y를 입력하여 파일을 저장합니다.
구성을 검증하십시오.
$ sudo squid -k parse
다음과 같은 결과가 표시됩니다.
2022/10/04 12:29:25| Startup: Initializing Authentication Schemes ...
2022/10/04 12:29:25| Startup: Initialized Authentication Scheme 'basic'
2022/10/04 12:29:25| Startup: Initialized Authentication Scheme 'digest'
2022/10/04 12:29:25| Startup: Initialized Authentication Scheme 'negotiate'
2022/10/04 12:29:25| Startup: Initialized Authentication Scheme 'ntlm'
2022/10/04 12:29:25| Startup: Initialized Authentication.
2022/10/04 12:29:25| Processing Configuration File: /etc/squid/squid.conf (depth 0)
2022/10/04 12:29:25| Processing: acl localnet src 0.0.0.1-0.255.255.255 # RFC 1122 "this" network (LAN)
2022/10/04 12:29:25| Processing: acl localnet src 10.0.0.0/8            # RFC 1918 local private network (LAN)
................
2022/10/04 12:29:25| Processing: acl Safe_ports port 777                # multiling http
2022/10/04 12:29:25| Processing: http_access deny !Safe_ports
2022/10/04 12:29:25| Processing: http_access deny CONNECT !SSL_ports
2022/10/04 12:29:25| Processing: http_access allow localhost manager
2022/10/04 12:29:25| Processing: http_access deny manager
2022/10/04 12:29:25| Processing: http_access allow localnet
2022/10/04 12:29:25| Processing: http_access allow localhost
2022/10/04 12:29:25| Processing: http_access deny all
2022/10/04 12:29:25| Processing: http_port 3128
2022/10/04 12:29:25| Processing: coredump_dir /var/spool/squid
2022/10/04 12:29:25| Processing: refresh_pattern ^ftp:          1440    20%     10080
2022/10/04 12:29:25| Processing: refresh_pattern ^gopher:       1440    0%      1440
2022/10/04 12:29:25| Processing: refresh_pattern -i (/cgi-bin/|\?) 0    0%      0
2022/10/04 12:29:25| Processing: refresh_pattern .              0       20%     4320
2022/10/04 12:29:25| Initializing https:// proxy context
2022/10/04 12:29:25| Requiring client certificates.
Squid 서버를 다시 시작합니다.
$ sudo systemctl restart squid
Squid가 설정된 포트에서 수신하는지 확인합니다.
$ sudo ss -altnp | grep 8085
LISTEN 0      4096               *:7035            *:*    users:(("squid",pid=94626,fd=11))
7. 방화벽/SELinux 구성
기본 포트를 사용하는 경우 다음 명령을 사용하여 방화벽을 통해 허용하십시오.
$ sudo firewall-cmd --add-service=squid --permanent
$ sudo firewall-cmd --reload
사용자 지정 포트를 활성화한 경우 대신 다음 명령을 사용하십시오.
[port_number]를 사용자 지정 포트 번호로 바꿉니다.sudo firewall-cmd --permanent --add-port=[port_number]/tcp sudo firewall-cmd --reload
또한 SELinux를 사용하여 사용자 지정 포트를 활성화해야 합니다.
sudo semanage port -a -t squid_port_t -p tcp [port_number]
3단계 - Squid에 대한 기본 인증 설정
인증을 수락하도록 Squid를 구성하려면
htpasswd유틸리티를 사용해야 합니다. Apache 도구 패키지를 설치합니다.$ sudo dnf install httpd-tools
다음 명령을 사용하여 사용자 이름 암호 쌍을 만듭니다.
$ sudo htpasswd -c /etc/squid/squid_passwd username
사용자의 암호를 생성하라는 메시지가 표시됩니다.
파일 소유권을 Squid 사용자로 변경합니다.
$ sudo chown squid /etc/squid/squid_passwd
Squid는 인증 도우미를 사용하여 인증합니다.
ncsa_auth도우미를 사용합니다.ncsa_auth파일의 위치를 확인하십시오.$ sudo rpm -ql squid | grep ncsa_auth /usr/lib64/squid/basic_ncsa_auth /usr/share/man/man8/basic_ncsa_auth.8.gz
첫 번째 결과는 파일의 위치입니다.
Squid 구성에 다음 줄을 붙여넣습니다.
auth_param basic program /usr/lib64/squid/basic_ncsa_auth /etc/squid/squid_passwd
acl ncsa_users proxy_auth REQUIRED
http_access allow ncsa_users
Squid를 다시 시작하여 인증을 활성화하십시오.
$ sudo systemctl restart squid
4단계 - Squid 프록시 클라이언트 구성
Squid 프록시 서버에 연결하려면 클라이언트가 필요합니다. 서버에 연결하는 방법에는 세 가지가 있습니다.
<시작>
- 시스템 전체 프록시 구성\n
- Squid 서버를 게이트웨이로 사용
- 웹 브라우저를 클라이언트로 사용
1. 시스템 전체 프록시 구성
프록시 구성을 정의하는 /etc/profile.d/squid.sh 파일을 만들어 시스템 전체에서 작동하도록 Squid 프록시를 구성할 수 있습니다.
$ sudo nano /etc/profile.d/squid.sh
다음 줄을 붙여넣습니다.
PROXY_URL="192.168.205.10:7035"
HTTP_PROXY=$PROXY_URL
HTTPS_PROXY=$PROXY_URL
FTP_PROXY=$PROXY_URL
http_proxy=$PROXY_URL
https_proxy=$PROXY_URL
ftp_proxy=$PROXY_URL
export HTTP_PROXY HTTPS_PROXY FTP_PROXY http_proxy https_proxy ftp_proxy
Ctrl + X를 누르고 메시지가 표시되면 Y를 입력하여 파일을 저장합니다. 파일을 소싱합니다.
$ source /etc/profile.d/squid.sh
wget 명령을 실행하여 구성을 확인하십시오.
$ wget google.com
--2022-10-04 12:15:59--  http://google.com/
Connecting to 192.168.205.10:7035... connected.
Proxy request sent, awaiting response... 301 Moved Permanently
Location: http://www.google.com/ [following]
--2022-10-04 12:15:59--  http://www.google.com/
Reusing existing connection to 192.168.205.10:7035.
Proxy request sent, awaiting response... 200 OK
Length: unspecified [text/html]
Saving to: ‘index.html.1’

index.html.1       [ <=>             ]  14.14K  --.-KB/s    in 0s

2022-10-04 12:15:59 (68.1 MB/s) - ‘index.html.1’ saved [14479]
사용자 이름 및 비밀번호와 함께 사용하려면 다음 명령을 사용하십시오.
$ wget google.com --proxy-user=YOUR-USERNAME-HERE --proxy-password=YOUR-PASSWORD-HERE
Squid 서버 로그를 확인할 수 있습니다.
1664885759.296      0 192.168.205.10 TCP_MEM_HIT/301 750 GET http://google.com/ - HIER_NONE/- text/html
1664885759.351     54 192.168.205.10 TCP_MISS/200 15113 GET http://www.google.com/ - HIER_DIRECT/216.58.208.100 text/html
2. 브라우저에서 프록시 설정
Firefox 또는 Chrome 브라우저에서 쉽게 작동하도록 Squid 프록시를 구성할 수 있습니다. 그러나 기본 방법은 사용자 이름과 비밀번호를 지원하지 않습니다. 인증과 함께 Squid 프록시를 사용하려면 브라우저에서 타사 확장 프로그램을 사용해야 합니다. Chrome 및 Chrome 기반 브라우저에 Proxy SwitchOmega를 사용하십시오.
Chrome에서 FoxyProxy Standard 확장 프로그램을 사용하여 테스트해 보겠습니다. 위에 제공된 URL을 사용하여 확장 프로그램을 설치하십시오. 확장 옵션을 열면 다음 화면이 나타납니다.
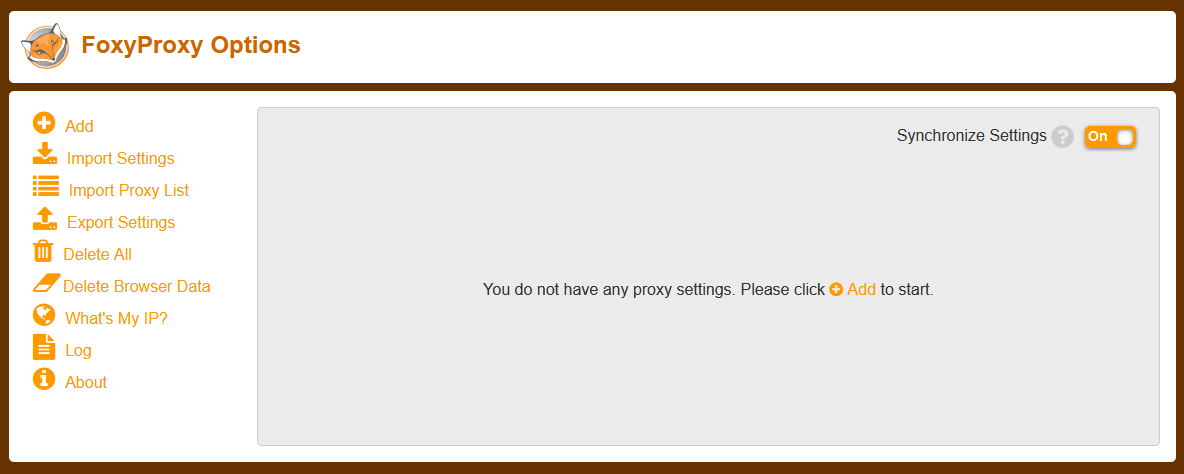
추가 버튼을 클릭하여 프록시 URL을 추가합니다.
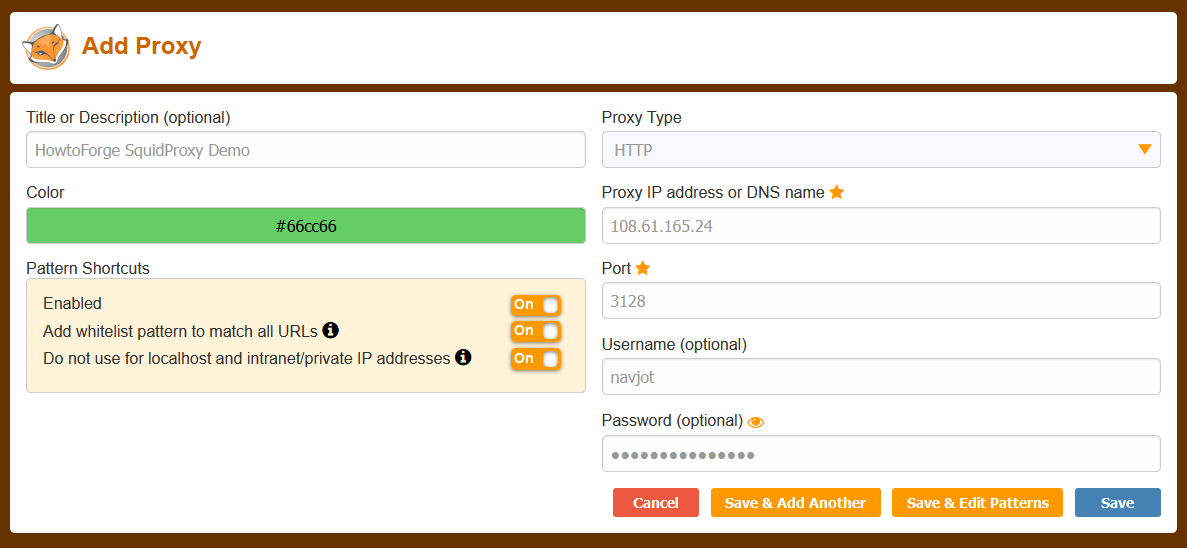
서비스 이름, IP 주소, 포트 번호, 사용자 이름 및 암호를 포함한 프록시 매개변수를 입력합니다. localhost 및 인트라넷/개인 IP 주소에 사용하지 않음 옵션을 활성화합니다.
계속하려면 저장 버튼을 클릭하십시오. 다음 페이지의 드롭다운에서 프록시 이름을 선택하여 활성화합니다.
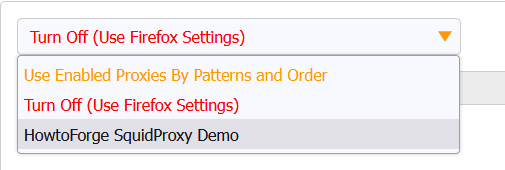
화면은 다음과 같아야 합니다.

프록시가 작동하는지 확인하려면 https://whatismyip.com URL을 방문하세요.

클라이언트 IP를 마스킹했기 때문에 Squid 프록시가 호스팅되는 서버의 IP 주소가 표시됩니다.
Squid 로그를 통해서도 확인할 수 있습니다.
$ sudo tail -f /var/log/squid/access.log
다음과 같은 결과가 표시됩니다.
1664909025.814    251 127.0.0.1 TCP_TUNNEL/200 8662 CONNECT mirrors.rockylinux.org:443 - HIER_DIRECT/2a04:4e42:9::644 -
1664909025.819      3 127.0.0.1 TCP_MISS/200 3347 GET http://mirror.nl.stackscale.com/rocky/9.0/extras/x86_64/os/repodata/repomd.xml - HIER_DIRECT/5.57.230.252 text/xml
1664909026.218    395 127.0.0.1 TCP_TUNNEL/200 8446 CONNECT apprepo.vultr.com:443 - HIER_DIRECT/45.63.19.147 -
1664909027.084      0 223.190.89.32 TCP_DENIED/403 3974 CONNECT www.whatismyip.com:443 - HIER_NONE/- text/html
1664909442.461     73 223.190.89.32 TCP_MISS/200 2362 POST http://ocsp.godaddy.com/ - HIER_DIRECT/192.124.249.41 application/ocsp-response
1664909612.229 171207 223.190.89.32 TCP_TUNNEL/200 6174 CONNECT api.whatismyip.com:443 - HIER_DIRECT/34.98.116.180 -
1664909612.245 172627 223.190.89.32 TCP_TUNNEL/200 67818 CONNECT www.whatismyip.com:443 - HIER_DIRECT/104.21.89.158 -
1664909613.231 171384 223.190.89.32 TCP_TUNNEL/200 3712 CONNECT apiv6.whatismyip.com:443 - HIER_DIRECT/2600:1901:0:e01d:: -
1664910098.088   3098 223.190.89.32 TCP_TUNNEL/200 10403 CONNECT profile.accounts.firefox.com:443 - HIER_DIRECT/52.40.171.113 -
1664910103.232    545 223.190.89.32 TCP_TUNNEL/200 6165 CONNECT safebrowsing.googleapis.com:443 - HIER_DIRECT/172.217.168.234 -
3. 오징어 프록시를 사용하도록 DNF 구성
Squid 프록시를 사용하도록 DNF 저장소를 구성할 수 있습니다. DNF 구성 파일을 엽니다.
$ sudo nano /etc/dnf/dnf.conf
파일 끝에 다음 줄을 붙여넣습니다.
proxy=http://192.168.205.12:8085/
proxy_username=username
proxy_password=password
Ctrl + X를 누르고 메시지가 표시되면 Y를 입력하여 파일을 저장합니다.
시스템을 업데이트하거나 패키지를 설치하여 변경 사항을 확인하십시오.
$ sudo dnf update
로그를 확인하십시오.
http://mirror.nl.stackscale.com/rocky/9.0/AppStream/x86_64/os/Packages/t/telnet-0.17-85.el9.x86_64.rpm - HIER_DIRECT/5.57.230.252 application/x-redhat-package-manager
1664896976.909      3 192.168.205.12 TCP_MISS/200 24764 GET http://mirror.nl.stackscale.com/rocky/9.0/AppStream/x86_64/os/Packages/p/perl-HTTP-Date-6.05-7.el9.noarch.rpm - HIER_DIRECT/5.57.230.252 application/x-redhat-package-manager
1664896976.920      8 192.168.205.12 TCP_MISS/200 98591 GET http://mirror.nl.stackscale.com/rocky/9.0/AppStream/x86_64/os/Packages/p/perl-HTTP-Message-6.29-3.el9.noarch.rpm - HIER_DIRECT/5.57.230.252 application/x-redhat-package-manager
1664896976.932      9 192.168.205.12 TCP_MISS/200 32361 GET http://mirror.nl.stackscale.com/rocky/9.0/AppStream/x86_64/os/Packages/p/perl-I18N-Langinfo-0.19-479.el9.x86_64.rpm - HIER_DIRECT/5.57.230.252 application/x-redhat-package-manager
1664896977.024    340 192.168.205.12 TCP_MISS/200 44730 GET http://epel.mirror.constant.com/9/Everything/x86_64/Packages/h/hiredis-1.0.2-1.el9.x86_64.rpm - HIER_DIRECT/108.61.5.85 application/x-redhat-package-manager
1664896977.237    555 192.168.205.12 TCP_MISS/200 272291 GET http://epel.mirror.constant.com/9/Everything/x86_64/Packages/c/coturn-4.6.0-1.el9.x86_64.rpm - HIER_DIRECT/108.61.5.85 application/x-redhat-package-manager
4. Squidclient 사용
또는 번들 squidclient 명령을 사용하여 테스트할 수 있습니다. wget 또는 curl과 유사한 웹 요청에 대한 응답을 출력합니다. 그러나 wget 및 curl과 달리 squidclient는 자동으로 Squid의 기본 프록시 설정인 로컬호스트:3128.
다음 명령을 실행하여 테스트하십시오.
$ squidclient https://google.com
다음과 같은 결과가 표시됩니다.
HTTP/1.1 301 Moved Permanently
Location: https://www.google.com/
Content-Type: text/html; charset=UTF-8
Date: Tue, 04 Oct 2022 16:35:35 GMT
Expires: Tue, 04 Oct 2022 16:35:35 GMT
Cache-Control: private, max-age=2592000
Server: gws
Content-Length: 220
X-XSS-Protection: 0
X-Frame-Options: SAMEORIGIN
Set-Cookie: CONSENT=PENDING+669; expires=Thu, 03-Oct-2024 16:35:35 GMT; path=/; domain=.google.com; Secure
P3P: CP="This is not a P3P policy! See g.co/p3phelp for more info."
Alt-Svc: h3=":443"; ma=2592000,h3-29=":443"; ma=2592000,h3-Q050=":443"; ma=2592000,h3-Q046=":443"; ma=2592000,h3-Q043=":443"; ma=2592000,quic=":443"; ma=2592000; v="46,43"
X-Cache: MISS from squidproxy
X-Cache-Lookup: MISS from squidproxy:3128
Via: 1.1 squidproxy (squid/5.2)
Connection: close
IP 주소 및 인증 매개변수를 사용하여 명령을 실행하려면 다음 명령을 실행하십시오.
$ squidclient -l 192.168.205.12 -p 7035 -u username -w password https://google.com
결론
이것으로 Rocky Linux/Alma Linux 9 서버에 Squid 프록시 서버를 설치하고 구성하는 방법에 대한 자습서를 마칩니다. 질문이 있으시면 아래 의견에 게시하십시오.