Rocky Linux 8에 Moodle eLearning 플랫폼을 설치하는 방법
이 페이지에서
- 전제 조건
- 1단계 - 방화벽 구성\n
- 2단계 - Git 설치
- 3단계 - PHP 설치 및 구성
- 4단계 - MySQL 설치 및 구성
- 5단계 - Nginx 설치
- 6단계 - Moodle 설치
- 7단계 - Moodle 구성
- 8단계 - SSL 설치
- 9단계 - Nginx 구성
- 10단계 - SELinux 구성
- 11단계 - Moodle 설치 완료
- 결론
Moodle은 무료 오픈 소스 온라인 학습 관리 시스템(LMS)입니다. 이를 통해 교육자는 온라인 강의실 경험을 갖춘 교육 과정을 위한 완전한 기능의 웹 사이트를 만들 수 있습니다. 그것은 PHP로 작성되었습니다. 위키, 채점, 과제 제출, 온라인 퀴즈, 토론 게시판 등을 포함한 다양한 기능을 제공합니다.
이 가이드에서는 Rocky Linux 8 서버에 Moodle을 설치하는 방법을 설명합니다.
전제 조건
-
A server running Rocky Linux 8.
-
A domain name pointing to the server. For our tutorial, we will use the
moodle.example.comdomain. -
A non-root user with sudo privileges.
-
Make sure everything is updated.
$ sudo dnf update
-
Install basic utility packages. Some of them may already be installed.
$ sudo dnf install wget curl nano unzip yum-utils -y
1단계 - 방화벽 구성
첫 번째 단계는 방화벽을 구성하는 것입니다. Rocky Linux는 Firewalld Firewall을 사용합니다. 방화벽 상태를 확인하십시오.
$ sudo firewall-cmd --state
running
방화벽은 다른 영역에서 작동하며 공개 영역은 우리가 사용할 기본 영역입니다. 방화벽에서 활성화된 모든 서비스와 포트를 나열합니다.
$ sudo firewall-cmd --permanent --list-services
다음 출력이 표시되어야 합니다.
cockpit dhcpv6-client ssh
Moodle이 작동하려면 HTTP 및 HTTPS 포트가 필요합니다. 열어보세요.
$ sudo firewall-cmd --add-service=http --permanent
$ sudo firewall-cmd --add-service=https --permanent
변경 사항을 적용하려면 방화벽을 다시 로드하십시오.
$ sudo firewall-cmd --reload
2단계 - Git 설치
Git은 애플리케이션 파일을 가져오기 위해 Moodle에 필요합니다. 힘내를 설치하십시오.
$ sudo dnf install git
3단계 - PHP 설치 및 구성
Moodle이 튜토리얼에서 작동하려면 PHP 8.0을 설치해야 합니다. 첫 번째 단계는 Epel 저장소를 가져오는 것입니다.
$ sudo dnf install epel-release
다음으로 Remi 저장소를 설치합니다.
$ sudo dnf install https://rpms.remirepo.net/enterprise/remi-release-8.rpm
사용 가능한 PHP 스트림을 확인하십시오.
$ dnf module list php -y
Rocky Linux 8 - AppStream
Name                Stream                 Profiles                                 Summary
php                 7.2 [d]                common [d], devel, minimal               PHP scripting language
php                 7.3                    common [d], devel, minimal               PHP scripting language
php                 7.4                    common [d], devel, minimal               PHP scripting language
php                 8.0                    common [d], devel, minimal               PHP scripting language

Remi's Modular repository for Enterprise Linux 8 - x86_64
Name                Stream                 Profiles                                 Summary
php                 remi-7.2               common [d], devel, minimal               PHP scripting language
php                 remi-7.3               common [d], devel, minimal               PHP scripting language
php                 remi-7.4               common [d], devel, minimal               PHP scripting language
php                 remi-8.0               common [d], devel, minimal               PHP scripting language
php                 remi-8.1               common [d], devel, minimal               PHP scripting language

Hint: [d]efault, [e]nabled, [x]disabled, [i]nstalled
기본 버전은 7.2입니다. Remis PHP 8.0 저장소를 활성화합니다.
$ sudo dnf module reset php -y
$ sudo dnf module enable php:remi-8.0
Moodle에 필요한 PHP 및 필수 확장을 설치합니다.
$ sudo dnf install graphviz aspell ghostscript clamav php-fpm php-iconv php-curl php-mysqlnd php-cli php-mbstring php-xmlrpc php-soap php-zip php-gd php-xml php-intl php-json php-sodium php-opcache
설치를 확인하십시오.
$ php --version
PHP 8.0.21 (cli) (built: Jul  6 2022 10:13:53) ( NTS gcc x86_64 )
Copyright (c) The PHP Group
Zend Engine v4.0.21, Copyright (c) Zend Technologies
    with Zend OPcache v8.0.21, Copyright (c), by Zend Technologies
편집을 위해 php.ini 파일을 엽니다.
$ sudo nano /etc/php.ini
다음 변수의 값을 변경하여 메일 첨부 파일 크기를 25MB로 설정합니다.
upload_max_filesize = 25M
post_max_size = 25M
다음으로 변수 max_input_vars 앞의 세미콜론을 제거하고 해당 값을 5000으로 변경하여 주석 처리를 해제합니다.
max_input_vars = 5000
Ctrl + X를 누르고 메시지가 표시되면 Y를 입력하여 파일을 저장합니다.
/etc/php-fpm.d/www.conf 파일을 엽니다.
$ sudo nano /etc/php-fpm.d/www.conf
파일에서 user=apache 및 group=apache 줄을 찾아 다음과 같이 변경합니다.
...
; Unix user/group of processes
; Note: The user is mandatory. If the group is not set, the default user's group
;       will be used.
; RPM: apache user chosen to provide access to the same directories as httpd
user = nginx
; RPM: Keep a group allowed to write in log dir.
group = nginx
...
다음으로 소켓 파일 소유자, 그룹 및 기본 권한 줄의 주석을 해제하고 아래와 같이 변경합니다.
; Set permissions for unix socket, if one is used. In Linux, read/write
; permissions must be set in order to allow connections from a web server.
; Default Values: user and group are set as the running user
;                 mode is set to 0660
listen.owner = nginx
listen.group = nginx
listen.mode = 0660
다음으로 세미콜론을 그 앞에 넣어 표시된 대로 다음 줄을 주석 처리합니다.
;listen.acl_users = apache,nginx
Ctrl + X를 누르고 메시지가 표시되면 Y를 입력하여 파일을 저장합니다.
PHP 세션 디렉토리에 적절한 권한을 부여하십시오.
$ chown -R nginx:nginx /var/lib/php/session/
PHP-FPM 서비스를 활성화하고 시작합니다.
$ sudo systemctl enable php-fpm --now
4단계 - MySQL 설치 및 구성
MySQL 서버를 설치합니다.
$ sudo dnf install mysql-server
버전을 확인하여 설치를 확인합니다.
$ mysql --version
mysql  Ver 8.0.26 for Linux on x86_64 (Source distribution)
MySQL 서비스를 활성화하고 시작합니다.
$ sudo systemctl enable mysqld --now
보안 설치 스크립트를 실행하십시오.
$ sudo mysql_secure_installation
몇 가지 프롬프트가 표시됩니다. 첫 번째 프롬프트는 Validate Password Plugin을 설치할 것인지 묻습니다. Y를 눌러 플러그인을 설치합니다. 비밀번호가 최소 8자 이상이어야 하고 대문자, 소문자, 숫자 및 특수 문자가 혼합되어 있어야 하는 보안 수준으로 2를 선택하십시오.
VALIDATE PASSWORD COMPONENT can be used to test passwords
and improve security. It checks the strength of password
and allows the users to set only those passwords which are
secure enough. Would you like to setup VALIDATE PASSWORD component?

Press y|Y for Yes, any other key for No: (Press Y)

There are three levels of password validation policy:

LOW    Length >= 8
MEDIUM Length >= 8, numeric, mixed case, and special characters
STRONG Length >= 8, numeric, mixed case, special characters and dictionary                  file

Please enter 0 = LOW, 1 = MEDIUM and 2 = STRONG: (Type 2)
다음으로 강력한 루트 암호를 생성하라는 메시지가 표시됩니다. 암호가 Validate 플러그인의 요구 사항과 일치하는지 확인하십시오.
Please set the password for root here.

New password:

Re-enter new password:
다음으로 데이터베이스 보안 강화와 관련된 몇 가지 프롬프트가 표시됩니다. 각 프롬프트에서 Y를 누릅니다.
Do you wish to continue with the password provided?(Press y|Y for Yes, any other key for No) : (Press Y)
Remove anonymous users? (Press y|Y for Yes, any other key for No) : (Press Y)
Disallow root login remotely? (Press y|Y for Yes, any other key for No) : (Press Y)
Remove test database and access to it? (Press y|Y for Yes, any other key for No) : (Press Y)
Reload privilege tables now? (Press y|Y for Yes, any other key for No) : (Press Y)
Success.

All done!
MariaDB 셸에 로그인합니다.
$ sudo mysql
Moodle용 데이터베이스를 생성합니다.
mysql > CREATE DATABASE moodledb DEFAULT CHARACTER SET utf8mb4 COLLATE utf8mb4_unicode_ci;
데이터베이스에 액세스할 SQL 사용자를 생성합니다. YourPassword23!를 원하는 암호로 바꾸십시오.
mysql > create user 'moodleuser'@'localhost' IDENTIFIED BY 'YourPassword23!';
데이터베이스에 대한 moodleuser 액세스 권한을 부여합니다.
mysql > GRANT SELECT,INSERT,UPDATE,DELETE,CREATE,CREATE TEMPORARY TABLES,DROP,INDEX,ALTER ON moodledb.* TO 'moodleuser'@'localhost';
권한 테이블을 다시 로드하십시오.
mysql > FLUSH PRIVILEGES;
쉘을 종료합니다.
mysql > exit
5단계 - Nginx 설치
Rocky Linux는 이전 버전의 Nginx와 함께 제공됩니다. 최신 버전을 설치하려면 공식 Nginx 저장소를 다운로드해야 합니다.
공식 Nginx 리포지토리를 만들기 위한 /etc/yum.repos.d/nginx.repo 파일을 만들고 엽니다.
$ sudo nano /etc/yum.repos.d/nginx.repo
다음 코드를 붙여넣습니다.
[nginx-stable]
name=nginx stable repo
baseurl=http://nginx.org/packages/centos/$releasever/$basearch/
gpgcheck=1
enabled=1
gpgkey=https://nginx.org/keys/nginx_signing.key
module_hotfixes=true

[nginx-mainline]
name=nginx mainline repo
baseurl=http://nginx.org/packages/mainline/centos/$releasever/$basearch/
gpgcheck=1
enabled=0
gpgkey=https://nginx.org/keys/nginx_signing.key
module_hotfixes=true
Ctrl + X를 누르고 메시지가 표시되면 Y를 입력하여 파일을 저장합니다.
Nginx 서버를 설치합니다.
$ sudo dnf install nginx
설치를 확인하십시오.
$ nginx -v
nginx version: nginx/1.22.0
6단계 - 무들 설치
Moodle용 공개 디렉토리를 생성합니다.
$ sudo mkdir /var/www/html/moodle
로그인한 사용자에게 디렉토리에 액세스할 수 있는 권한을 부여하십시오.
$ sudo chown -R $USER:$USER /var/www/html/moodle
공용 디렉터리로 전환합니다.
$ cd /var/www/html/moodle
Moodle Github 리포지토리를 복제합니다.
$ git clone https://github.com/moodle/moodle.git .
사용 가능한 지점 목록을 확인하십시오.
$ git branch -a
현재로서는 MOODLE_400_STABLE이 사용 가능한 최신 버전입니다. MOODLE_400_STABLE이라는 로컬 분기를 만들고 원격 분기를 추적하도록 설정합니다.
$ git branch --track MOODLE_400_STABLE origin/MOODLE_400_STABLE
새로 생성된 로컬 분기로 전환합니다.
$ git checkout MOODLE_400_STABLE
Moodle용 데이터 디렉토리를 생성합니다.
$ sudo mkdir /var/moodledata
Moodle 데이터 디렉토리에 적절한 권한을 부여하십시오.
$ sudo chown -R nginx /var/moodledata
$ sudo chmod -R 775 /var/moodledata
Moodle 디렉토리에 대한 쓰기 권한을 부여하십시오.
$ sudo chmod -R 755 /var/www/html/moodle
7단계 - 무들 구성
Moodle 디렉토리로 전환합니다.
$ cd /var/www/html/moodle
샘플 구성 파일을 복사하여 Moodle 구성 파일을 만듭니다.
$ cp config-dist.php config.php
편집을 위해 구성 파일을 엽니다.
$ nano config.php
데이터베이스 구성 섹션을 찾은 다음 아래와 같이 모든 Moodle 데이터가 저장될 데이터베이스를 구성합니다.
$CFG->dbtype    = 'mysqli';      // 'pgsql', 'mariadb', 'mysqli', 'auroramysql', 'sqlsrv' or 'oci'
$CFG->dblibrary = 'native';     // 'native' only at the moment
$CFG->dbhost    = 'localhost';  // eg 'localhost' or 'db.isp.com' or IP
$CFG->dbname    = 'moodledb';     // database name, eg moodle
$CFG->dbuser    = 'moodleuser';   // your database username
$CFG->dbpass    = 'YourPassword23!';   // your database password
$CFG->prefix    = 'mdl_';       // prefix to use for all table names
또한 Moodle 도메인 이름과 데이터 디렉터리의 위치를 구성합니다.
$CFG->wwwroot   = 'https://moodle.example.com';
$CFG->dataroot  = '/var/moodledata';
Ctrl + X를 누르고 메시지가 표시되면 Y를 입력하여 파일을 저장합니다.
8단계 - SSL 설치
Certbot 도구는 Lets Encrypt API를 사용하여 SSL 인증서를 생성합니다. EPEL 저장소가 필요하지만 이미 설치되어 있으므로 바로 진행할 수 있습니다. 다음 명령을 실행하여 설치하십시오.
$ sudo dnf install certbot
SSL 인증서를 생성합니다.
$ sudo certbot certonly --standalone --agree-tos --no-eff-email --staple-ocsp --preferred-challenges http -m -d moodle.example.com
위의 명령은 서버의 /etc/letsencrypt/live/moodle.example.com 디렉토리에 인증서를 다운로드합니다.
Diffie-Hellman 그룹 인증서를 생성합니다.
$ sudo openssl dhparam -out /etc/ssl/certs/dhparam.pem 4096
Lets Encrypt 자동 갱신을 위한 챌린지 웹 루트 디렉터리를 만듭니다.
$ sudo mkdir -p /var/lib/letsencrypt
SSL을 갱신하기 위해 Cron 작업을 생성합니다. 인증서를 확인하고 필요한 경우 갱신하기 위해 매일 실행됩니다. 이를 위해 먼저 /etc/cron.daily/certbot-renew 파일을 생성하고 편집을 위해 엽니다.
$ sudo nano /etc/cron.daily/certbot-renew
다음 코드를 붙여넣습니다.
#!/bin/sh
certbot renew --cert-name moodle.example.com --webroot -w /var/lib/letsencrypt/ --post-hook "systemctl reload nginx"
Ctrl + X를 누르고 메시지가 표시되면 Y를 입력하여 파일을 저장합니다.
실행 가능하도록 태스크 파일에 대한 권한을 변경하십시오.
$ sudo chmod +x /etc/cron.daily/certbot-renew
9단계 - Nginx 구성
편집을 위해 /etc/nginx/conf.d/moodle.conf 파일을 만들고 엽니다.
$ sudo nano /etc/nginx/conf.d/moodle.conf
다음 코드를 붙여넣습니다.
# Redirect all non-encrypted to encrypted
server {
    listen 80;
    listen [::]:80;
    server_name moodle.example.com;
    return 301 https://$host$request_uri;
}

server {
    listen 443 ssl http2;
    listen [::]:443 ssl http2;

    server_name moodle.example.com;
    root   /var/www/html/moodle;
    index  index.php;

    ssl_certificate     /etc/letsencrypt/live/moodle.example.com/fullchain.pem;
    ssl_certificate_key /etc/letsencrypt/live/moodle.example.com/privkey.pem;
    ssl_trusted_certificate /etc/letsencrypt/live/moodle.example.com/chain.pem;
    ssl_session_timeout 1d;
    ssl_session_cache shared:MozSSL:10m;
    ssl_session_tickets off;
    ssl_stapling on;
    ssl_stapling_verify on;
    ssl_dhparam /etc/ssl/certs/dhparam.pem;

    ssl_protocols TLSv1.2 TLSv1.3;
    ssl_ciphers ECDHE-ECDSA-AES128-GCM-SHA256:ECDHE-RSA-AES128-GCM-SHA256:ECDHE-ECDSA-AES256-GCM-SHA384:ECDHE-RSA-AES256-GCM-SHA384:ECDHE-ECDSA-CHACHA20-POLY1305:ECDHE-RSA-CHACHA20-POLY1305:DHE-RSA-AES128-GCM-SHA256:DHE-RSA-AES256-GCM-SHA384;

    access_log /var/log/nginx/moodle.access.log main;
    error_log  /var/log/nginx/moodle.error.log;

    client_max_body_size 25M;

    location / {
        try_files $uri $uri/ /index.php?$query_string;
    }

    location ~ ^(.+\.php)(.*)$ {
        fastcgi_split_path_info ^(.+\.php)(.*)$;
        fastcgi_index index.php;
        fastcgi_pass unix:/run/php-fpm/www.sock;
        include /etc/nginx/mime.types;
        include fastcgi_params;
        fastcgi_param  PATH_INFO  $fastcgi_path_info;
        fastcgi_param  SCRIPT_FILENAME $document_root$fastcgi_script_name;
    }

    # Hide all dot files but allow "Well-Known URIs" as per RFC 5785
	location ~ /\.(?!well-known).* {
    	return 404;
	}

	# This should be after the php fpm rule and very close to the last nginx ruleset.
	# Don't allow direct access to various internal files. See MDL-69333
	location ~ (/vendor/|/node_modules/|composer\.json|/readme|/README|readme\.txt|/upgrade\.txt|db/install\.xml|/fixtures/|/behat/|phpunit\.xml|\.lock|environment\.xml) {
     	deny all;
	    return 404;
	}
}
완료되면 Ctrl + X를 누르고 메시지가 표시되면 Y를 입력하여 파일을 저장합니다.
편집을 위해 /etc/nginx/nginx.conf 파일을 엽니다.
$ sudo nano /etc/nginx/nginx.conf
include /etc/nginx/conf.d/*.conf; 줄 앞에 다음 줄을 추가합니다.
server_names_hash_bucket_size 64;
Ctrl + X를 누르고 메시지가 표시되면 Y를 입력하여 파일을 저장합니다.
Nginx 구성 파일 구문을 확인합니다.
$ sudo nginx -t
nginx: the configuration file /etc/nginx/nginx.conf syntax is ok
nginx: configuration file /etc/nginx/nginx.conf test is successful
Nginx 서비스를 활성화하고 시작하여 새 구성을 활성화합니다.
$ sudo systemctl enable nginx --now
다음 오류가 발생하면 SELinux 제한 때문일 가능성이 큽니다.
nginx: [emerg] open() "/var/run/nginx.pid" failed (13: Permission denied)
오류를 수정하려면 다음 명령을 실행하십시오.
$ sudo ausearch -c 'nginx' --raw | audit2allow -M my-nginx
$ sudo semodule -X 300 -i my-nginx.pp
Nginx 서비스를 다시 시작하십시오.
$ sudo systemctl start nginx
10단계 - SELinux 구성
Moodles 웹 및 데이터 디렉터리에 대한 파일 보안 컨텍스트를 변경합니다.
$ sudo semanage fcontext -a -t httpd_sys_rw_content_t '/var/www/html/moodle'
$ sudo semanage fcontext -a -t httpd_sys_rw_content_t '/var/moodledata'
$ sudo restorecon -Rv '/var/www/html/moodle'
$ sudo restorecon -Rv '/var/moodledata'
Moodle에서 네트워크 연결을 허용하도록 SELinux를 구성합니다.
$ sudo setsebool -P httpd_can_network_connect on
11단계 - 무들 설치 완료
브라우저에서 URL https://moodle.example.com을 열면 다음 시작 화면이 표시됩니다.
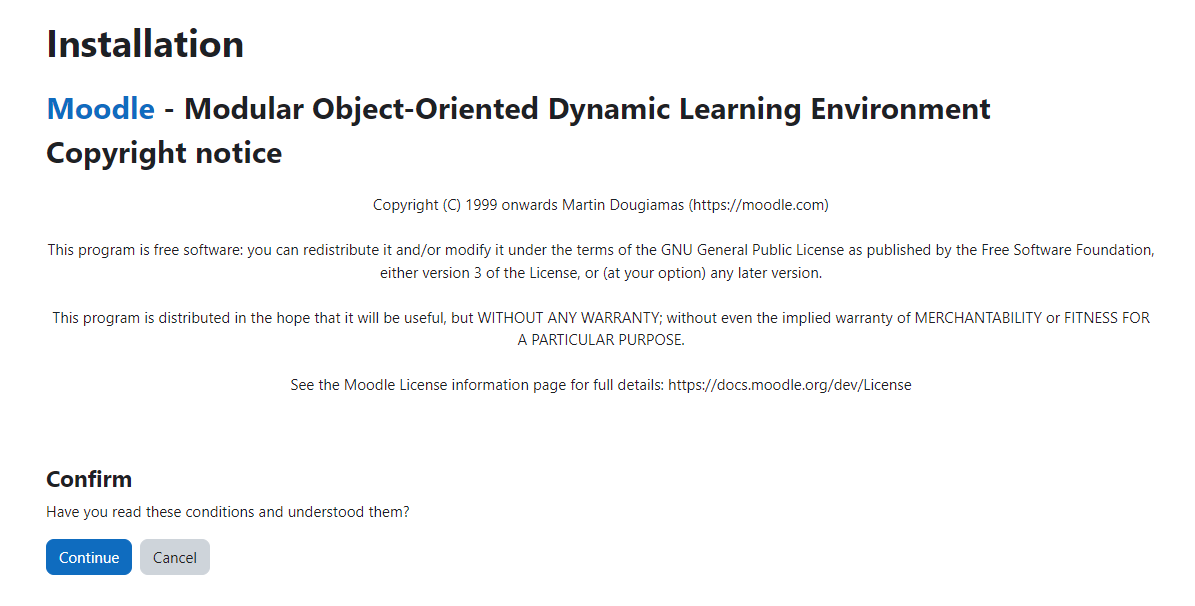
계속하려면 계속 버튼을 누르십시오. 다음으로 설치 프로그램이 시스템 요구 사항을 확인합니다.
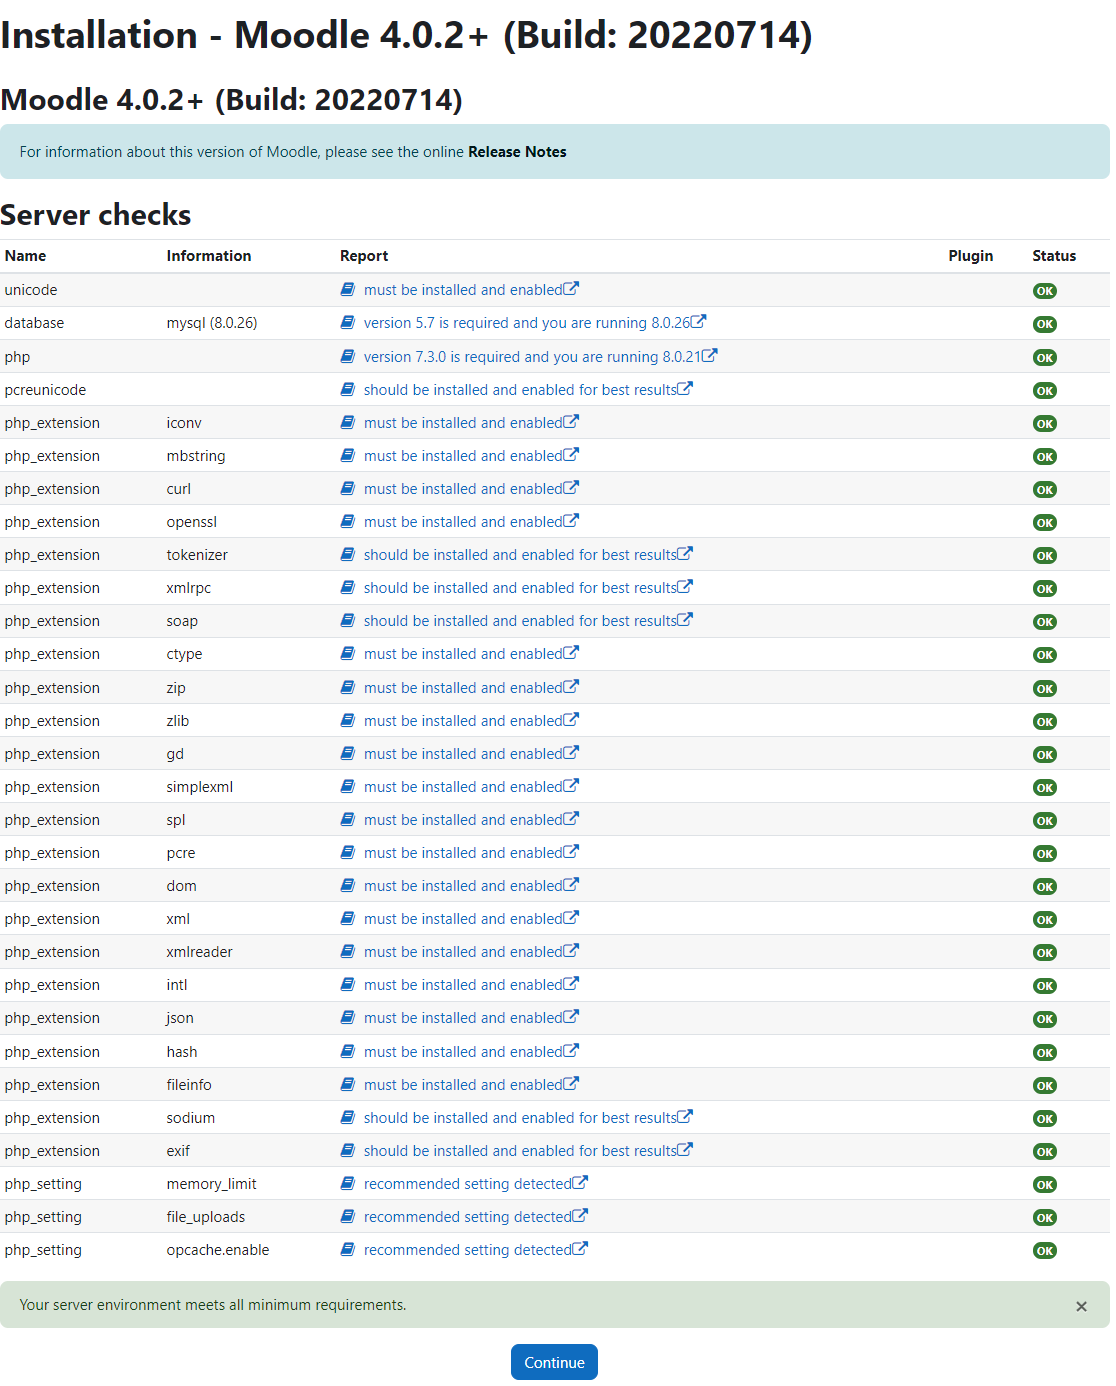
모든 것이 정상이면 아래로 스크롤하여 계속 버튼을 클릭하여 파일 설치 및 데이터베이스 설정을 진행합니다.

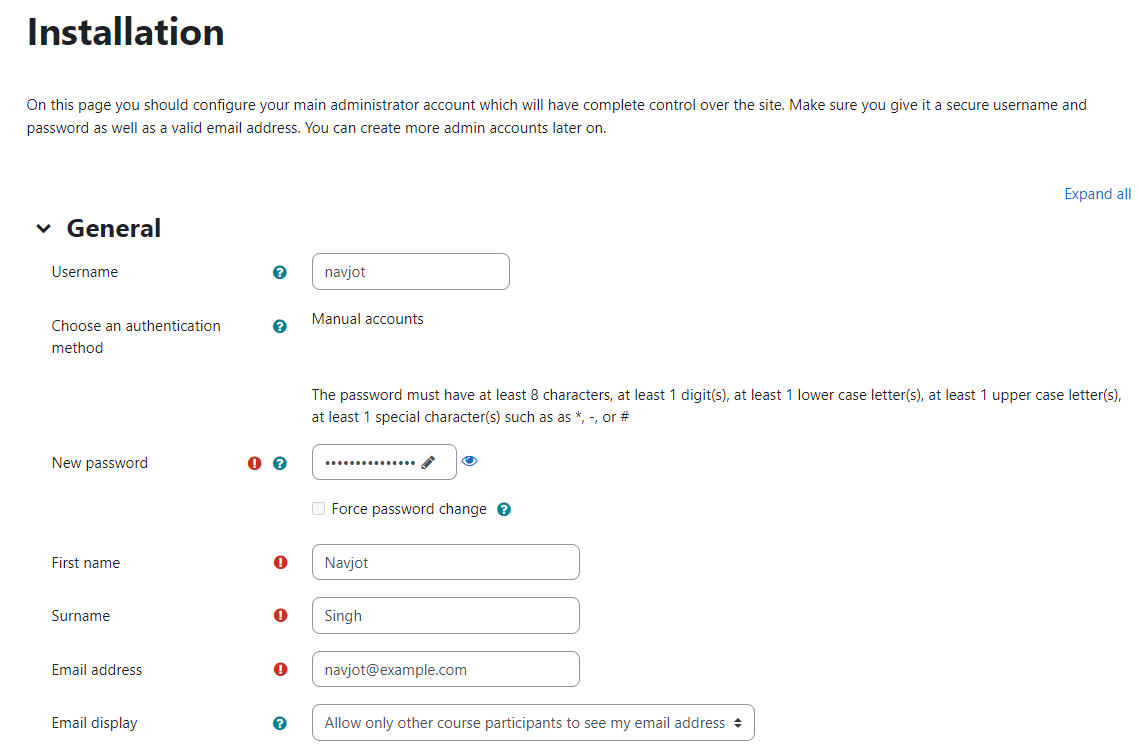
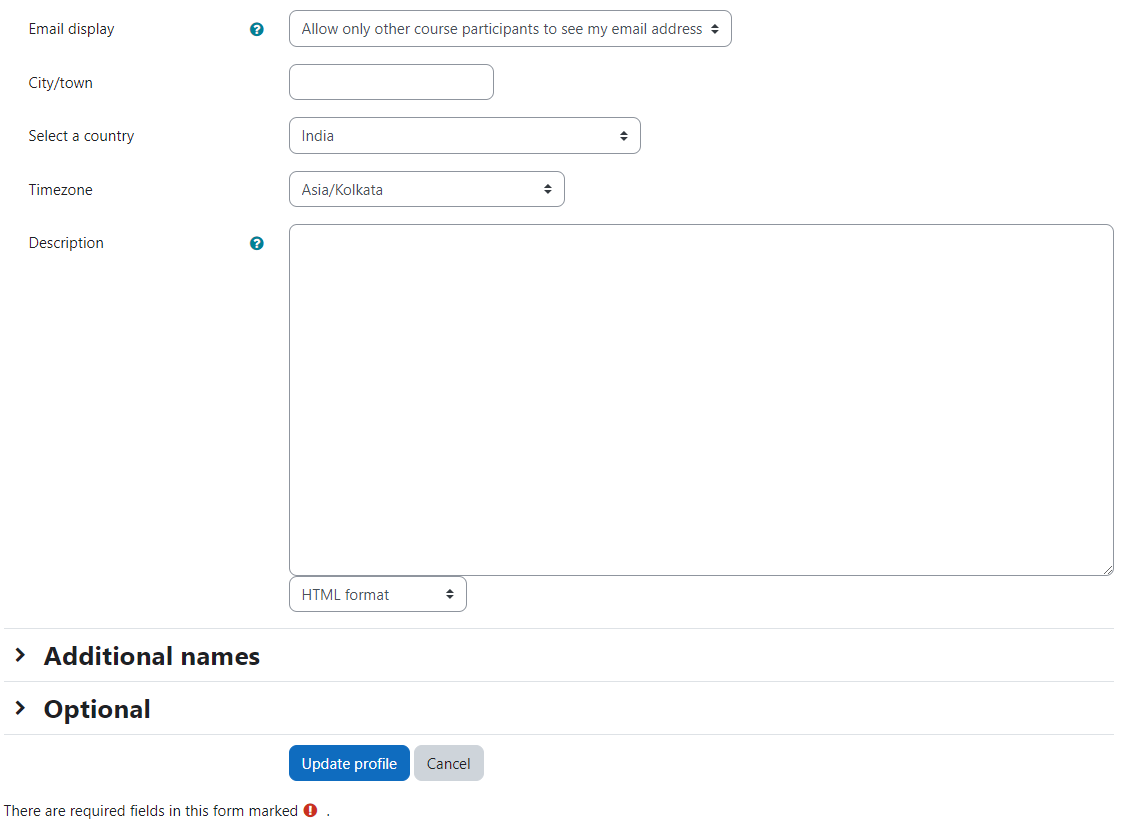
설치가 완료되면 계속 버튼을 클릭합니다. 그런 다음 요청에 따라 계정 세부 정보를 입력하여 관리자 계정을 만듭니다.
완료되면 페이지까지 아래로 스크롤하고 프로필 업데이트를 클릭하여 계속 진행합니다.
다음으로 Moodles 첫 페이지 설정을 구성하라는 메시지가 표시됩니다.
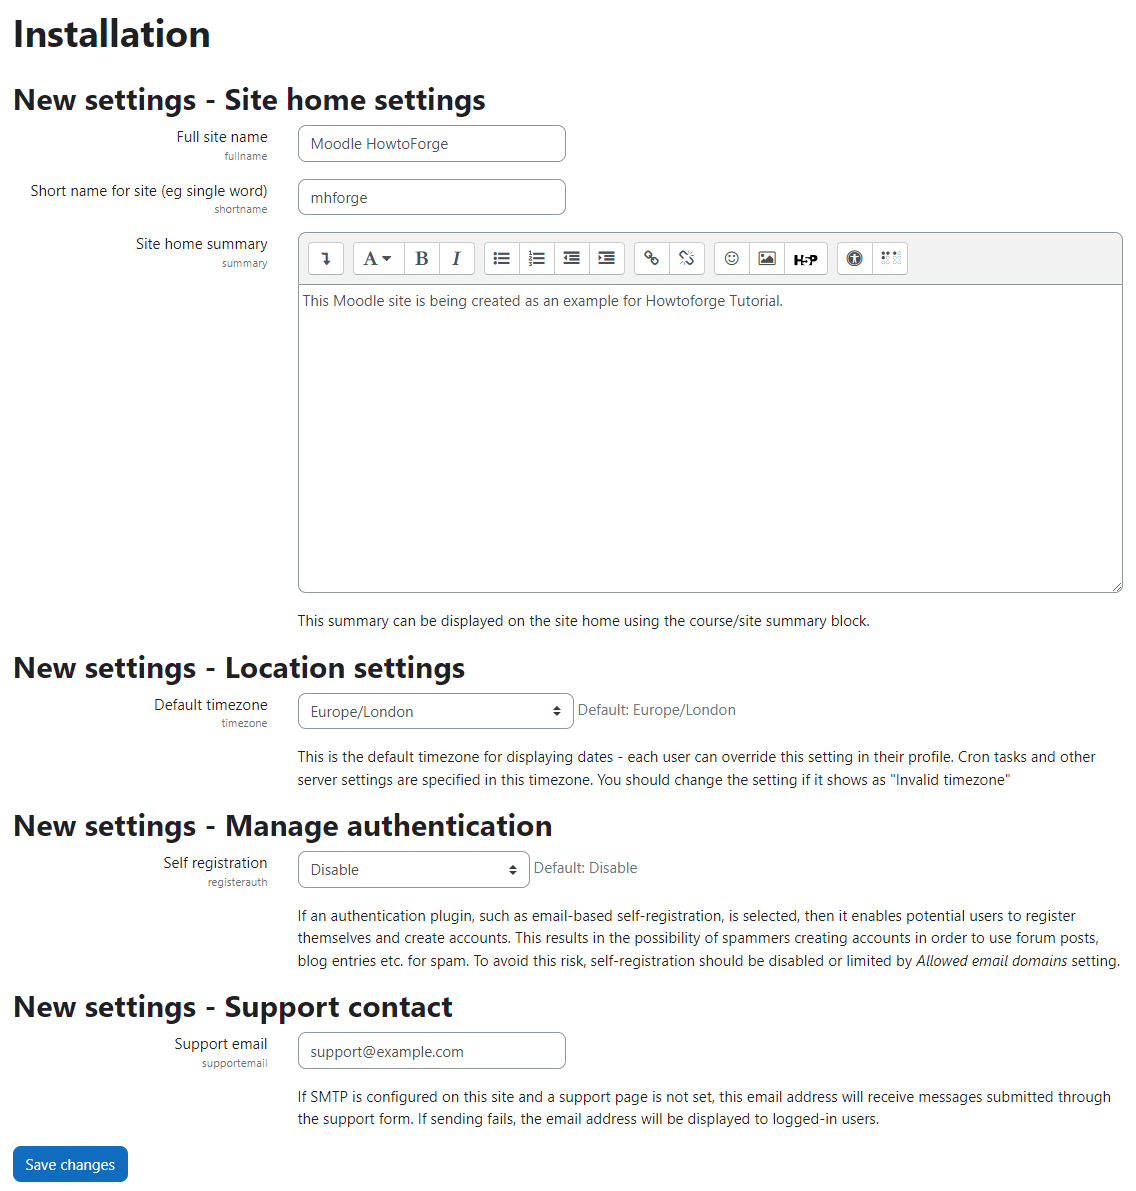
요구 사항에 따라 구성하고 변경 사항 저장을 클릭하여 Moodle 대시보드로 이동합니다. 다음으로 회사에 Moodle 사이트를 등록하지 않으려면 하단의 건너뛰기 링크를 클릭하십시오.

이제 학습 플랫폼을 사용할 수 있습니다.
결론
이것으로 Rocky Linux 8 서버에 Moodle 학습 플랫폼을 설치하는 방법에 대한 자습서를 마칩니다. 질문이 있으시면 아래 의견에 게시하십시오.