Alma Linux 8에 Mattermost를 설치하는 방법
이 페이지에서
- 전제 조건
- MySQL 서버 설치
- Mattermost용 데이터베이스 만들기
- Alma Linux 8에 Mattermost 설치
- Mattermost용 Systemd 서비스 파일 생성
- Mattermost에 대한 역방향 프록시로 Nginx 구성\n
- 방화벽 구성\n
- Mattermost 웹 UI에 액세스
- 결론
Mattermost는 도구와 팀 전체에서 커뮤니케이션, 협업 및 워크플로 오케스트레이션을 위한 안전한 무료 오픈 소스 플랫폼입니다. 조직 및 회사에서 내부 채팅 서비스를 구현하도록 설계된 자체 호스팅 채팅 서비스입니다. 일대일 메시징, 무제한 검색 기록, 파일 공유, 이중 인증, 알림 등 여러 가지 유용한 기능을 제공합니다. Slack에 대한 대체 솔루션을 찾고 있다면 Mattermost가 최선의 선택입니다.
이 튜토리얼에서는 Alma Linux 8에서 Nginx와 함께 Mattermost를 설치하는 방법을 보여줍니다.
전제 조건
- Alma Linux 8을 실행하는 서버.\n
- 서버 IP를 가리키는 유효한 도메인 이름입니다.\n
- 루트 암호는 서버에서 구성됩니다.\n
MySQL 서버 설치
Mattermost는 MySQL을 데이터베이스 백엔드로 사용합니다. 따라서 서버에 MySQL이 설치되어 있어야 합니다. 다음 명령을 실행하여 설치할 수 있습니다.
dnf install mysql-server -y
MySQL 서버가 설치되면 다음 명령을 사용하여 MySQL 서비스를 시작하고 활성화합니다.
systemctl start mysqld
systemctl enable mysqld
이제 다음 스크립트를 실행하여 MySQL 설치를 보호할 수 있습니다.
mysql_secure_installation
아래와 같이 모든 질문에 답하여 MySQL 루트 암호를 설정하고 설치를 보호하십시오.
Press y|Y for Yes, any other key for No: N
Please set the password for root here.
New password:
Re-enter new password:
Remove anonymous users? (Press y|Y for Yes, any other key for No) : Y
Disallow root login remotely? (Press y|Y for Yes, any other key for No) : Y
Remove test database and access to it? (Press y|Y for Yes, any other key for No) : Y
Reload privilege tables now? (Press y|Y for Yes, any other key for No) : Y
Mattermost용 데이터베이스 생성
다음으로 Mattermost에 대한 데이터베이스와 사용자를 생성해야 합니다. 먼저 다음 명령을 사용하여 MySQL에 로그인합니다.
mysql -u root -p
로그인한 후 다음 명령을 사용하여 데이터베이스와 사용자를 생성합니다.
mysql> CREATE DATABASE matterdb;
mysql> CREATE USER 'matteruser'@'localhost' IDENTIFIED BY 'password';
다음으로 Mattermost 데이터베이스에 모든 권한을 부여합니다.
mysql> GRANT ALL PRIVILEGES ON matterdb.* TO ;
그런 다음 권한을 플러시하고 다음 명령을 사용하여 MySQL을 종료합니다.
mysql> FLUSH PRIVILEGES;
mysql> EXIT;
완료되면 다음 단계로 진행할 수 있습니다.
Alma Linux 8에 Mattermost 설치
먼저 다음 명령을 사용하여 Mattermost를 실행할 전용 사용자를 만듭니다.
useradd --system --user-group mattermost
다음으로 다음 명령을 사용하여 최신 버전의 Mattermost를 다운로드합니다.
wget https://releases.mattermost.com/6.0.2/mattermost-6.0.2-linux-amd64.tar.gz
다운로드가 완료되면 다음 명령을 사용하여 다운로드한 파일의 압축을 풉니다.
tar -xf mattermost-6.0.2-linux-amd64.tar.gz
그런 다음 추출된 디렉터리를 /opt로 이동합니다.
mv mattermost /opt
다음으로 Mattermost에 대한 데이터 디렉터리를 만들고 Mattermost의 소유권과 권한을 변경합니다.
mkdir /opt/mattermost/data
chown -R mattermost:mattermost /opt/mattermost
chmod -R g+w /opt/mattermost
다음으로 Mattermost 구성 파일을 편집합니다.
nano /opt/mattermost/config/config.json
아래와 같이 Mattermost 웹사이트 URL을 정의합니다.
"SiteURL": "http://mattermost.example.com",
다음으로 다음 줄을 찾습니다.
    "DriverName": "postgres",
    "DataSource": "postgres://mmuser:/mattermost_test?sslmode=disable&connect_timeout=10",
그리고 다음 줄로 교체했습니다.
    "DriverName": "mysql",
    "DataSource": "matteruser:(localhost:3306)/matterdb?charset=utf8mb4,utf8&readTimeout=30s&writeTimeout=30s",
완료되면 파일을 저장하고 닫습니다.
Mattermost에 대한 Systemd 서비스 파일 생성
다음으로 Mattermost 서비스를 관리하기 위해 systemd 서비스 파일을 생성해야 합니다. 다음 명령을 실행하여 만들 수 있습니다.
nano /etc/systemd/system/mattermost.service
다음 줄을 추가합니다.
[Unit]
Description=Mattermost
After=syslog.target network.target mysqld.service

[Service]
Type=notify
WorkingDirectory=/opt/mattermost
User=mattermost
ExecStart=/opt/mattermost/bin/mattermost
PIDFile=/var/spool/mattermost/pid/master.pid
TimeoutStartSec=3600
LimitNOFILE=49152

[Install]
WantedBy=multi-user.target
파일을 저장하고 닫은 후 다음 명령을 사용하여 systemd 데몬을 다시 로드합니다.
systemctl daemon-reload
다음으로 Mattermost 서비스를 시작하고 시스템 재부팅 시 시작되도록 활성화합니다.
systemctl start mattermost
systemctl enable mattermost
이제 다음 명령을 사용하여 Mattermost 서비스의 상태를 확인할 수 있습니다.
systemctl status mattermost
다음과 같은 결과가 표시됩니다.
? mattermost.service - Mattermost
   Loaded: loaded (/etc/systemd/system/mattermost.service; disabled; vendor preset: disabled)
   Active: active (running) since Sat 2022-01-15 14:12:29 UTC; 7s ago
 Main PID: 15201 (mattermost)
    Tasks: 32 (limit: 11411)
   Memory: 265.2M
   CGroup: /system.slice/mattermost.service
           ??15201 /opt/mattermost/bin/mattermost
           ??15298 plugins/com.mattermost.plugin-channel-export/server/dist/plugin-linux-amd64
           ??15299 plugins/com.mattermost.nps/server/dist/plugin-linux-amd64
           ??15308 plugins/playbooks/server/dist/plugin-linux-amd64
           ??15313 plugins/focalboard/server/dist/plugin-linux-amd64

Jan 15 14:12:26 almalinux8 mattermost[15201]: {"timestamp":"2022-01-15 14:12:26.344 Z","level":"info","msg":"Sent notification of next survey>
Jan 15 14:12:26 almalinux8 mattermost[15201]: {"timestamp":"2022-01-15 14:12:26.402 Z","level":"info","msg":"Post.Message has size restrictio>
Jan 15 14:12:26 almalinux8 mattermost[15201]: {"timestamp":"2022-01-15 14:12:26.499 Z","level":"info","msg":"info [2022-01-15 14:12:26.497 Z]>
Jan 15 14:12:26 almalinux8 mattermost[15201]: {"timestamp":"2022-01-15 14:12:26.537 Z","level":"info","msg":"\n    -- collation of mattermost>
Jan 15 14:12:28 almalinux8 mattermost[15201]: {"timestamp":"2022-01-15 14:12:28.297 Z","level":"info","msg":"debug [2022-01-15 14:12:28.295 Z>
Jan 15 14:12:28 almalinux8 mattermost[15201]: {"timestamp":"2022-01-15 14:12:28.804 Z","level":"info","msg":"info [2022-01-15 14:12:28.803 Z]>
Jan 15 14:12:29 almalinux8 systemd[1]: Started Mattermost.
Jan 15 14:12:29 almalinux8 mattermost[15201]: {"timestamp":"2022-01-15 14:12:29.149 Z","level":"info","msg":"Starting Server...","caller":"ap>
Jan 15 14:12:29 almalinux8 mattermost[15201]: {"timestamp":"2022-01-15 14:12:29.150 Z","level":"info","msg":"Server is listening on [::]:8065>
Jan 15 14:12:29 almalinux8 mattermost[15201]: {"timestamp":"2022-01-15 14:12:29.150 Z","level":"info","msg":"Sending systemd READY notificati>
이 시점에서 Mattermost가 시작되어 포트 8065에서 실행됩니다. 다음 명령으로 확인할 수 있습니다.
ss -antpl | grep 8065
다음과 같은 결과가 표시됩니다.
LISTEN 0 128 *:8065 *:* users:(("mattermost",pid=15201,fd=35))
완료되면 다음 단계로 진행할 수 있습니다.
Nginx를 Mattermost에 대한 역방향 프록시로 구성
Mattermost의 리버스 프록시로 Nginx를 설치하고 구성하는 것이 좋습니다. 이렇게 하려면 서버에 Nginx 서버를 설치해야 합니다. 다음 명령을 실행하여 설치할 수 있습니다.
dnf install nginx -y
Nginx가 설치되면 다음 명령을 사용하여 Nginx 가상 호스트 구성 파일을 만듭니다.
nano /etc/nginx/conf.d/mattermost.conf
다음 줄을 추가합니다.
 server {
        listen       80;
        server_name  mattermost.example.com;

        # Load configuration files for the default server block.
        include /etc/nginx/default.d/*.conf;

        location / {
	proxy_pass http://localhost:8065/;
            index  index.html index.htm;
        }

        error_page 404 /404.html;
            location = /40x.html {
        }

        error_page 500 502 503 504 /50x.html;
            location = /50x.html {
        }
    }
파일을 저장하고 닫은 다음 구성 오류가 있는지 Nginx를 확인합니다.
nginx -t
모든 것이 정상이면 다음과 같은 결과가 표시됩니다.
nginx: the configuration file /etc/nginx/nginx.conf syntax is ok
nginx: configuration file /etc/nginx/nginx.conf test is successful
이제 시스템 재부팅 시 시작되도록 Nginx 서비스를 시작하고 활성화합니다.
systemctl start nginx
systemctl enable nginx
다음 명령을 사용하여 Nginx의 상태를 확인할 수 있습니다.
systemctl status nginx
다음과 같은 결과가 표시됩니다.
? nginx.service - The nginx HTTP and reverse proxy server
   Loaded: loaded (/usr/lib/systemd/system/nginx.service; disabled; vendor preset: disabled)
   Active: active (running) since Sat 2022-01-15 14:14:05 UTC; 7s ago
  Process: 15356 ExecStart=/usr/sbin/nginx (code=exited, status=0/SUCCESS)
  Process: 15354 ExecStartPre=/usr/sbin/nginx -t (code=exited, status=0/SUCCESS)
  Process: 15351 ExecStartPre=/usr/bin/rm -f /run/nginx.pid (code=exited, status=0/SUCCESS)
 Main PID: 15358 (nginx)
    Tasks: 2 (limit: 11411)
   Memory: 3.8M
   CGroup: /system.slice/nginx.service
           ??15358 nginx: master process /usr/sbin/nginx
           ??15359 nginx: worker process

Jan 15 14:14:05 almalinux8 systemd[1]: nginx.service: Succeeded.
Jan 15 14:14:05 almalinux8 systemd[1]: Stopped The nginx HTTP and reverse proxy server.
Jan 15 14:14:05 almalinux8 systemd[1]: Starting The nginx HTTP and reverse proxy server...
Jan 15 14:14:05 almalinux8 nginx[15354]: nginx: the configuration file /etc/nginx/nginx.conf syntax is ok
Jan 15 14:14:05 almalinux8 nginx[15354]: nginx: configuration file /etc/nginx/nginx.conf test is successful
Jan 15 14:14:05 almalinux8 systemd[1]: nginx.service: Failed to parse PID from file /run/nginx.pid: Invalid argument
Jan 15 14:14:05 almalinux8 systemd[1]: Started The nginx HTTP and reverse proxy server.
이 시점에서 Nginx는 Mattermost를 제공하도록 설치 및 구성됩니다. 이제 다음 단계를 진행할 수 있습니다.
방화벽 구성
다음으로 방화벽을 통해 포트 80을 허용해야 합니다. 다음 명령을 실행하여 허용할 수 있습니다.
firewall-cmd --add-service=http --permanent
다음으로 방화벽을 다시 로드하여 변경 사항을 적용합니다.
firewall-cmd --reload
완료되면 다음 단계로 진행할 수 있습니다.
Mattermost 웹 UI에 액세스
이제 웹 브라우저를 열고 URL http://mattermost.example.com을 사용하여 Mattermost 웹 인터페이스에 액세스합니다. 다음 화면으로 리디렉션됩니다.
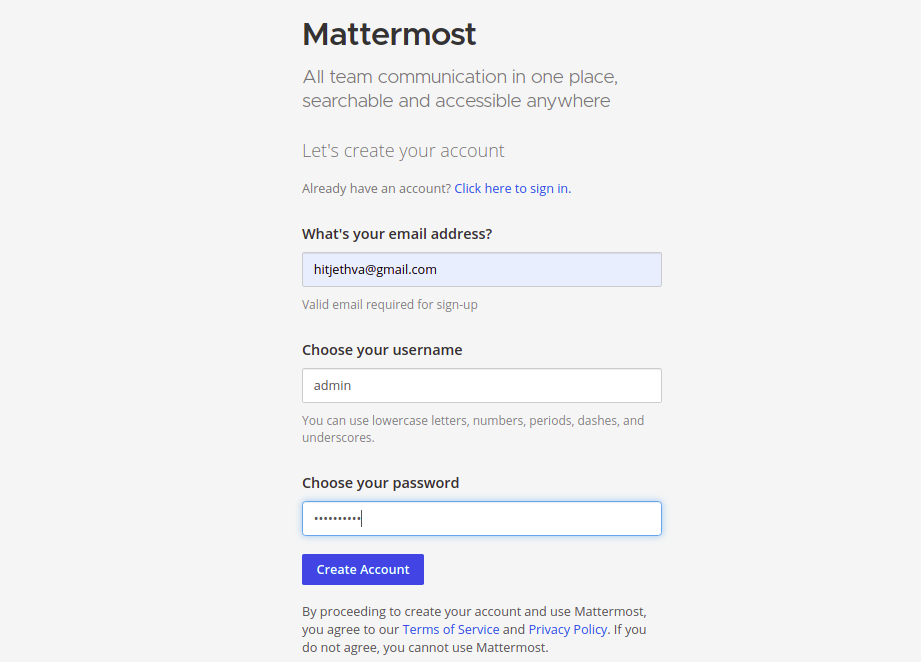
이메일 주소, 관리자 사용자 이름, 비밀번호를 제공하고 계정 만들기 버튼을 클릭합니다. 다음 화면이 표시됩니다.
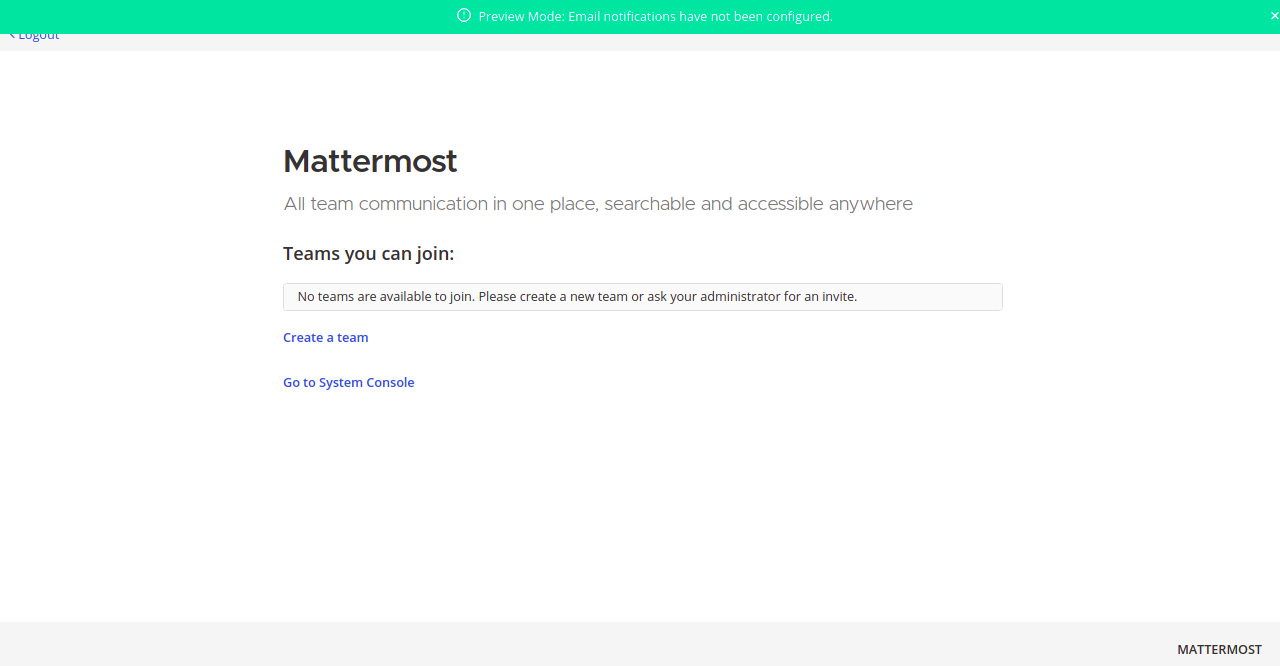
팀 만들기를 클릭합니다. 다음 화면이 표시됩니다.
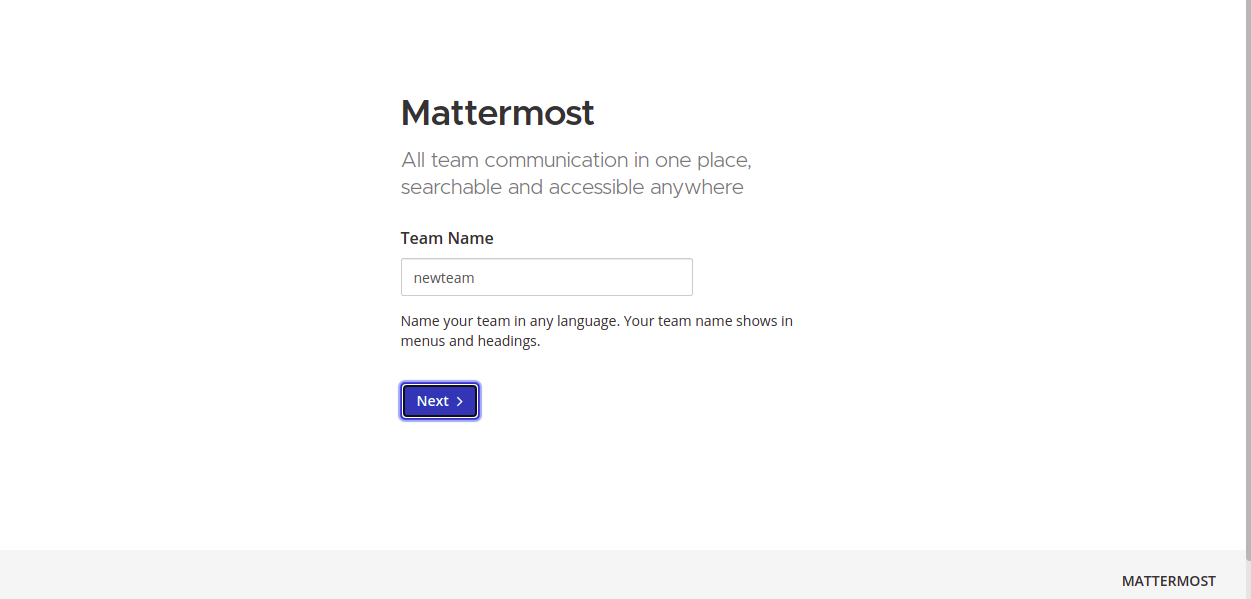
팀 이름을 입력하고 다음 버튼을 클릭합니다. 다음 화면이 표시됩니다.
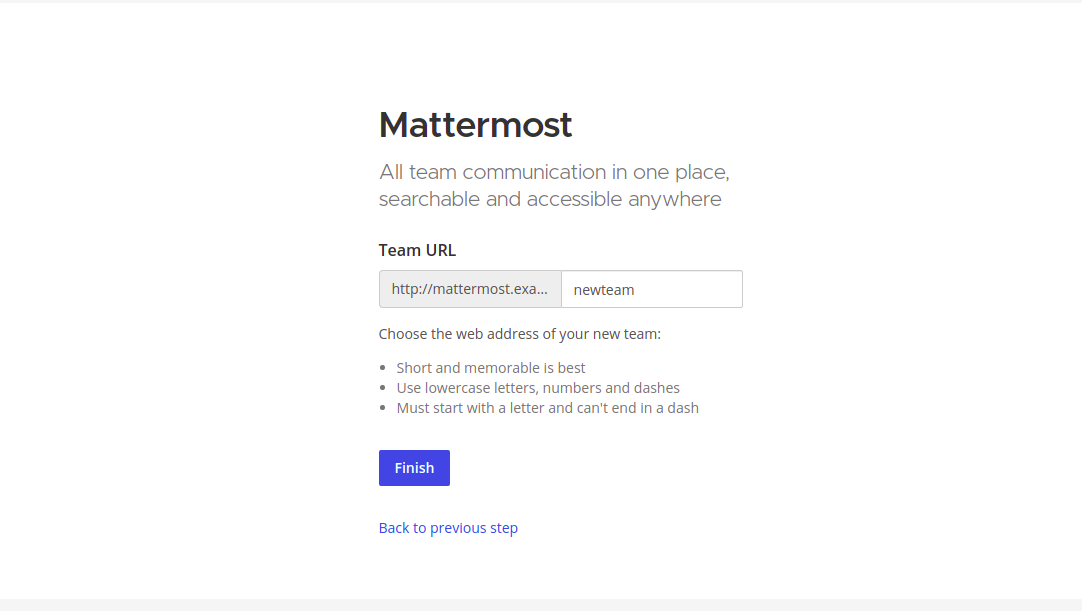
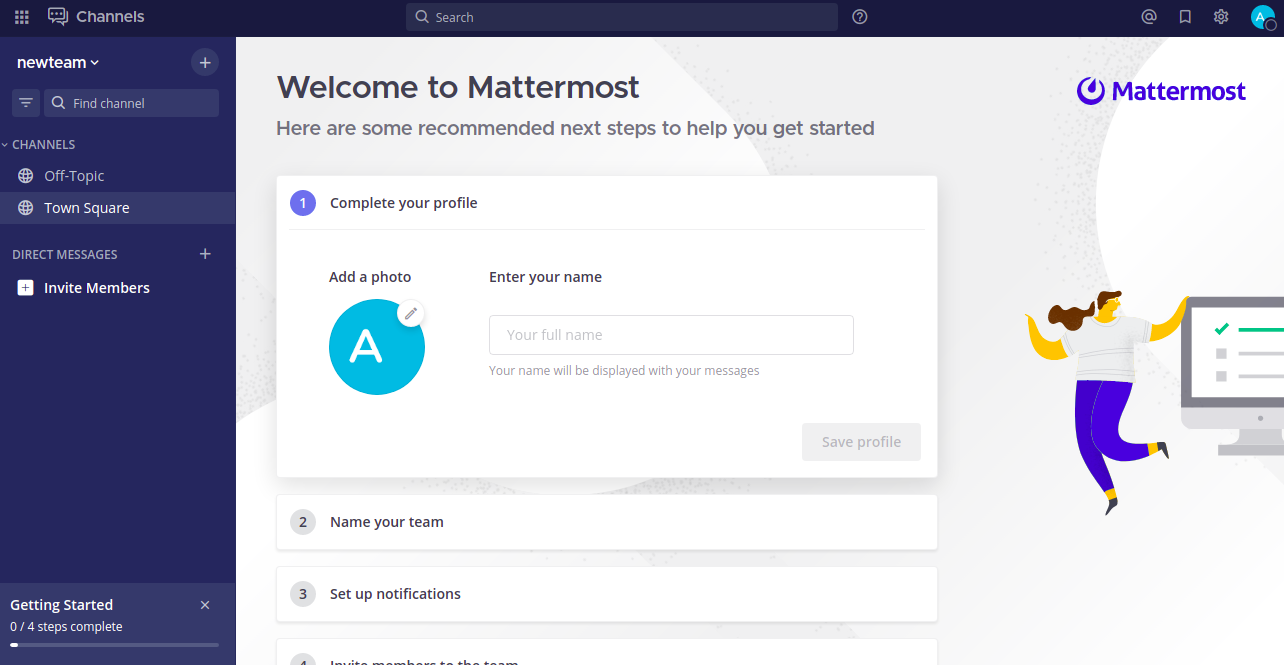
Mattermost 팀 URL을 제공하고 마침 버튼을 클릭합니다. 다음 화면에 Mattermost 대시보드가 표시됩니다.
결론
위 가이드에서는 Alma Linux 8에서 Nginx로 Mattermost 채팅 서비스를 설치하는 방법을 배웠습니다. 이제 조직에서 Mattermost를 구현하고 내부 채팅으로 사용할 수 있습니다. 궁금한 점이 있으면 언제든지 문의해 주세요.