Debian 11에 LibreNMS 모니터링 도구를 설치하는 방법
이 페이지에서
- 전제 조건
- MariaDB 데이터베이스 설치 및 구성
- Nginx, PHP 및 필수 종속성 설치\n
- LibreNMS 설치 및 구성
- LibreNMS용 Nginx 구성
- LibreNMS 웹 설치 마법사 액세스
- 결론
LibreNMS는 PHP로 작성된 무료 오픈 소스 웹 기반 자동 검색 네트워크 모니터링 도구입니다. MySQL 또는 MariaDB를 데이터베이스 백엔드로 사용하고 SNMP를 사용하여 원격 클라이언트를 검색합니다. Linux, Cisco, Juniper, FreeBSD, HP, Windows 등을 포함한 광범위한 네트워크 장치를 지원합니다. Radius, Active Directory, LDAP, MySQL 등을 포함한 여러 인증 방법을 지원합니다. 간단하고 사용자 친화적이며 누구나 쉽게 이해하고 사용할 수 있습니다.
이 튜토리얼에서는 Debian 11에서 Nginx와 함께 LibreNMS를 설치하는 방법을 설명합니다.
전제 조건
- Debian 11을 실행하는 서버.\n
- 서버 IP를 가리키는 유효한 도메인 이름입니다.\n
- 서버에 루트 암호가 구성되어 있습니다.\n
MariaDB 데이터베이스 설치 및 구성
먼저 서버에 MariaDB 데이터베이스 서버를 설치해야 합니다. 다음 명령을 사용하여 설치할 수 있습니다.
apt-get install mariadb-server -y
설치가 완료되면 다음 스크립트를 실행하여 MariaDB 설치를 보호하고 루트 비밀번호를 설정하십시오.
mysql_secure_installation
아래와 같이 모든 질문에 답하십시오.
Enter current password for root (enter for none):
Switch to unix_socket authentication [Y/n] n
Change the root password? [Y/n] Y
New password:
Re-enter new password:
Remove anonymous users? [Y/n] Y
Disallow root login remotely? [Y/n] Y
Remove test database and access to it? [Y/n]
Reload privilege tables now? [Y/n] Y
MariaDB가 보호되면 MariaDB 구성 파일을 편집하고 일부 설정을 조정합니다.
nano /etc/mysql/mariadb.conf.d/50-server.cnf
[mysqld] 섹션 안에 다음 줄을 추가합니다.
innodb_file_per_table=1
lower_case_table_names=0
파일을 저장하고 닫은 다음 MariaDB를 다시 시작하여 변경 사항을 적용합니다.
systemctl restart mariadb
그런 다음 다음 명령을 사용하여 MariaDB에 로그인합니다.
mysql -u root -p
로그인하면 LibreNMS용 데이터베이스와 사용자를 생성합니다.
MariaDB [(none)]> CREATE DATABASE librenms CHARACTER SET utf8mb4 COLLATE utf8mb4_unicode_ci;
MariaDB [(none)]> CREATE USER 'librenms'@'localhost' IDENTIFIED BY 'securepassword';
다음으로 아래 명령을 사용하여 LibreNMS 데이터베이스에 대한 모든 권한을 부여합니다.
MariaDB [(none)]> GRANT ALL PRIVILEGES ON librenms.* TO 'librenms'@'localhost';
마지막으로 다음 명령을 사용하여 권한을 플러시하고 MariaDB 셸을 종료합니다.
MariaDB [(none)]> FLUSH PRIVILEGES;
MariaDB [(none)]> EXIT;
완료되면 다음 단계로 진행할 수 있습니다.
Nginx, PHP 및 필수 종속성 설치
다음으로 Nginx 웹 서버, PHP 및 LibreNMS에 필요한 기타 종속성을 설치해야 합니다. 다음 명령을 실행하여 모두 설치할 수 있습니다.
apt-get install nginx-full nmap php-cli php-curl php-fpm php-gd php-json php-mbstring php-mysql php-snmp php-xml php-zip python3-dotenv python3-pip python3-pymysql python3-redis python3-setuptools python3-systemd rrdtool snmp snmpd whois acl curl composer fping git graphviz imagemagick mtr-tiny
모든 패키지가 설치되면 php.ini 파일을 편집하고 시간대를 설정합니다.
nano /etc/php/7.4/fpm/php.ini
다음 줄을 변경합니다.
date.timezone = UTC
완료되면 파일을 저장하고 닫습니다.
LibreNMS 설치 및 구성
먼저 다음 명령을 사용하여 LibreNMS 전용 사용자를 만듭니다.
useradd librenms -d /opt/librenms -M -r -s /bin/bash
다음으로 다음 명령을 사용하여 LibreNMS 사용자를 www-data 그룹에 추가합니다.
usermod -a -G librenms www-data
다음으로 GitHub 리포지토리에서 최신 버전의 LibreNMS를 /opt 디렉터리로 다운로드합니다.
git clone https://github.com/librenms/librenms.git /opt/librenms
다음으로 LibreNMS 디렉토리의 소유권과 권한을 설정합니다.
chown -R librenms:librenms /opt/librenms
chmod 775 /opt/librenms setfacl -d -m g::rwx /opt/librenms/rrd /opt/librenms/logs /opt/librenms/bootstrap/cache/ /opt/librenms/storage/
setfacl -R -m g::rwx /opt/librenms/rrd /opt/librenms/logs /opt/librenms/bootstrap/cache/ /opt/librenms/storage/
다음으로 다음 명령을 사용하여 사용자를 LibreNMS로 변경합니다.
su - librenms
다음으로 다음 명령을 사용하여 PHP 작성기를 설치합니다.
cd /opt/librenms
./scripts/composer_wrapper.php install --no-dev
Composer 및 기타 PHP 종속성이 설치되면 다음 출력이 표시됩니다.
> @php artisan optimize
Configuration cache cleared!
Configuration cached successfully!
Route cache cleared!
Routes cached successfully!
Files cached successfully!
> @php artisan config:clear
Configuration cache cleared!
> scripts/dynamic_check_requirements.py || pip3 install --user -r requirements.txt || :
Requirement already satisfied: PyMySQL!=1.0.0 in /usr/lib/python3/dist-packages (from -r requirements.txt (line 1)) (0.9.3)
Requirement already satisfied: python-dotenv in /usr/lib/python3/dist-packages (from -r requirements.txt (line 2)) (0.15.0)
Requirement already satisfied: redis>=3.0 in /usr/lib/python3/dist-packages (from -r requirements.txt (line 3)) (3.5.3)
Requirement already satisfied: setuptools in /usr/lib/python3/dist-packages (from -r requirements.txt (line 4)) (52.0.0)
Collecting psutil>=5.6.0
  Downloading psutil-5.8.0-cp39-cp39-manylinux2010_x86_64.whl (293 kB)
Collecting command_runner>=1.3.0
  Downloading command_runner-1.3.0-py3-none-any.whl (17 kB)
Installing collected packages: psutil, command-runner
Successfully installed command-runner-1.3.0 psutil-5.8.0
다음으로 아래 명령을 사용하여 LibreNMS 사용자를 종료합니다.
exit
다음으로 PHP-FPM에 대한 별도의 구성 파일을 생성해야 합니다. 다음 명령으로 만들 수 있습니다.
cp /etc/php/7.4/fpm/pool.d/www.conf /etc/php/7.4/fpm/pool.d/librenms.conf
다음으로 선호하는 편집기로 librenms.conf 구성 파일을 편집합니다.
nano /etc/php/7.4/fpm/pool.d/librenms.conf
[www-data]를 [librenms]로 변경하고 청취 소켓도 업데이트합니다.
user = librenms
group = librenms
listen = /run/php-fpm-librenms.sock
파일을 저장하고 닫은 다음 PHP-FPM 서비스를 다시 시작하여 구성 변경 사항을 적용합니다.
systemctl restart php7.4-fpm
완료되면 다음 단계로 진행할 수 있습니다.
LibreNMS용 Nginx 구성
다음으로 LibreNMS용 Nginx 가상 호스트 구성 파일을 생성해야 합니다. 다음 명령으로 만들 수 있습니다.
nano /etc/nginx/conf.d/librenms.conf
다음 줄을 추가합니다.
server {
  listen 80;
  server_name libre.yourdomain.com;
  root /opt/librenms/html;
  index index.php;

  charset utf-8;
  gzip on;
  gzip_types text/css application/javascript text/javascript application/x-javascript image/svg+xml text/plain text/xsd text/xsl text/xml image/x-icon;
  location / {
   try_files $uri $uri/ /index.php?$query_string;
  }
  location ~ [^/]\.php(/|$) {
   fastcgi_pass unix:/run/php-fpm-librenms.sock;
   fastcgi_split_path_info ^(.+\.php)(/.+)$;
   include fastcgi.conf;
  }
  location ~ /\.(?!well-known).* {
   deny all;
  }
}
파일을 저장하고 닫은 후 다음 명령을 사용하여 구문 오류가 있는지 Nginx를 확인합니다.
nginx -t
모든 것이 정상이면 다음과 같은 결과가 표시됩니다.
nginx: the configuration file /etc/nginx/nginx.conf syntax is ok
nginx: configuration file /etc/nginx/nginx.conf test is successful
마지막으로 Nginx를 다시 시작하여 변경 사항을 적용합니다.
systemctl restart nginx php7.4-fpm
다음 명령을 사용하여 Nginx 상태를 확인할 수도 있습니다.
systemctl status nginx
다음 출력이 표시되어야 합니다.
? nginx.service - A high performance web server and a reverse proxy server
     Loaded: loaded (/lib/systemd/system/nginx.service; enabled; vendor preset: enabled)
     Active: active (running) since Fri 2021-12-03 14:39:18 UTC; 18s ago
       Docs: man:nginx(8)
    Process: 39888 ExecStartPre=/usr/sbin/nginx -t -q -g daemon on; master_process on; (code=exited, status=0/SUCCESS)
    Process: 39892 ExecStart=/usr/sbin/nginx -g daemon on; master_process on; (code=exited, status=0/SUCCESS)
   Main PID: 39893 (nginx)
      Tasks: 2 (limit: 2341)
     Memory: 2.7M
        CPU: 42ms
     CGroup: /system.slice/nginx.service
             ??39893 nginx: master process /usr/sbin/nginx -g daemon on; master_process on;
             ??39894 nginx: worker process

Dec 03 14:39:18 debian11 systemd[1]: Starting A high performance web server and a reverse proxy server...
Dec 03 14:39:18 debian11 systemd[1]: nginx.service: Failed to parse PID from file /run/nginx.pid: Invalid argument
Dec 03 14:39:18 debian11 systemd[1]: Started A high performance web server and a reverse proxy server.
그런 다음 cron 작업 구성 파일을 복사하여 새로 추가된 장치에 대한 자동 검색 및 폴링을 활성화합니다.
cp /opt/librenms/librenms.nonroot.cron /etc/cron.d/librenms
그런 다음 logrotate 구성 파일을 복사하여 이전 로그를 회전합니다.
cp /opt/librenms/misc/librenms.logrotate /etc/logrotate.d/librenms
완료되면 다음 단계로 진행할 수 있습니다.
LibreNMS 웹 설치 마법사에 액세스
이 시점에서 LibreNMS는 Nginx와 함께 설치되고 구성됩니다. 이제 URL http://libre.yourdomain.com을 사용하여 LibreNMS 웹 기반 설정에 액세스할 수 있습니다. 사전 설치 확인 페이지가 표시되어야 합니다.

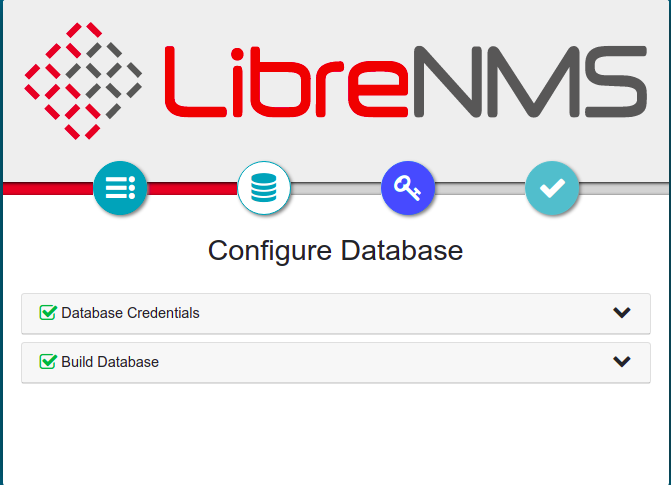
모든 검사가 성공적으로 수행되었는지 확인한 다음 데이터베이스 아이콘을 클릭하십시오. 데이터베이스 구성 페이지가 표시되어야 합니다.

데이터베이스 정보를 제공하고 자격 증명 확인을 클릭합니다. 다음 페이지가 표시됩니다.
이제 열쇠 아이콘을 클릭하여 관리 사용자를 설정합니다.
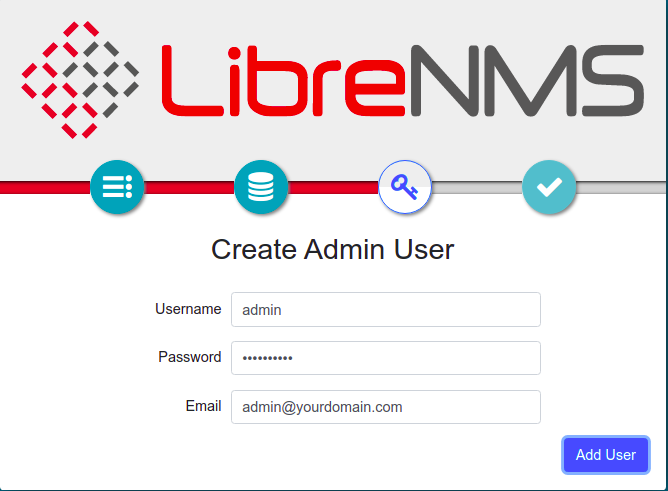
관리자 사용자 이름과 암호를 입력한 다음 사용자 추가 버튼을 클릭합니다. 사용자가 생성되면 다음 페이지가 표시됩니다.
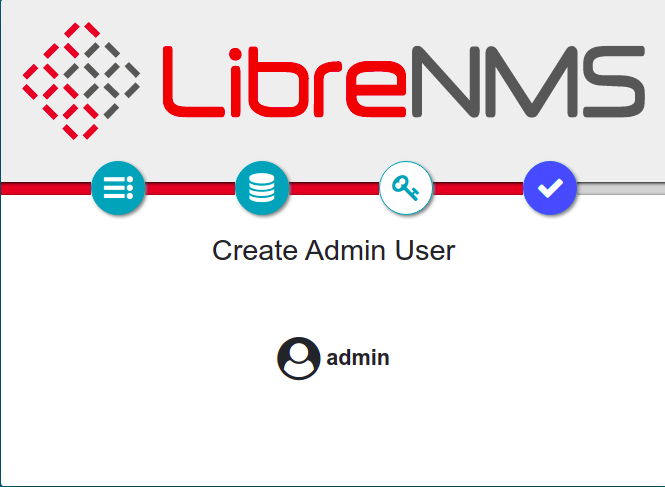
예 아이콘 버튼을 클릭합니다. 다음 페이지가 표시됩니다.
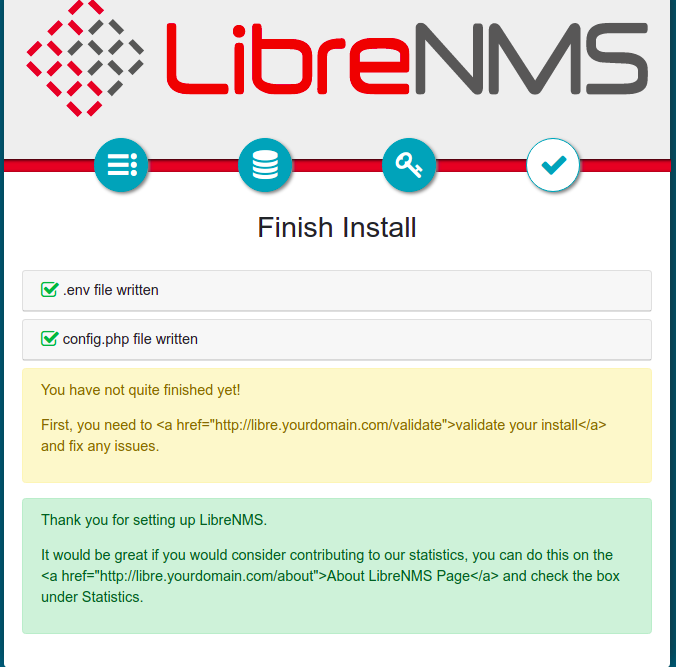
이제 웹 브라우저에서 다른 탭을 열고 URL https://libre.yourdomain.com/validate를 입력하여 설치를 확인합니다. 다음 페이지가 표시됩니다.

관리자 사용자 이름, 암호를 제공하고 로그인 버튼을 클릭합니다. 다음 페이지가 표시됩니다.

결론
축하합니다! Debian 11에서 Nginx와 함께 LibreNMS를 성공적으로 설치했습니다. 이제 원격 장치를 LibreNMS에 추가하고 중앙 위치에서 모니터링을 시작할 수 있습니다. 궁금한 점이 있으면 언제든지 문의해 주세요.