Rocky Linux 8에 GoAccess 웹 로그 분석기를 설치하는 방법
이 페이지에서
- 전제 조건
- 1단계 - GoAccess용 종속성 설치
- 2단계 - GoAccess 다운로드 및 설치
- 3단계 - GeoIP 데이터베이스 다운로드
- 4단계 - GoAccess 구성
- 5단계 - GoAccess 실행\n
- 6단계 - 권한이 없는 상태로 GoAccess 실행\n
- 7단계 - HTML 보고서 생성
- 결론
GoAccess는 Apache, Nginx, Amazon S3, Elastic Load Balancing, CloudFront, Caddy 등 다양한 형식의 로그 파일을 읽고 분석할 수 있는 오픈 소스 경량 로그 분석기입니다. C 언어로 작성되었으며 다음을 위해 ncurses 라이브러리를 사용합니다. 명령줄에서 액세스할 수 있는 대시보드 인터페이스입니다.
다른 사람과 공유할 수 있는 HTML, JSON 및 CSV 형식으로 보고서를 생성할 수 있습니다. 공개 링크를 통해 표시할 수 있는 실시간 HTML 보고서를 생성할 수도 있습니다.
이 자습서에서는 Rocky Linux 기반 서버에 GoAccess Analyzer를 설치하고 Nginx 로그를 읽고 실시간 보고서를 제공하도록 구성하는 방법을 배웁니다.
전제 조건
-
A server running Rocky Linux 8.
-
A non-root user having sudo privileges.
-
Nginx running on the server to access logs.
-
Make sure everything is updated.
$ sudo dnf update
1단계 - GoAccess용 종속성 설치
최신 버전의 GoAccess v1.5.2는 기본 리포지토리에서 사용할 수 없습니다. 최신 버전의 GoAccess를 설치하기 위해 소스에서 빌드합니다. 첫 번째 단계는 GoAccess 패키지를 구축하는 데 필요한 종속성을 다운로드하는 것입니다.
$ sudo dnf install ncurses-devel libmaxminddb-devel openssl-devel
$ sudo dnf groupinstall 'Development Tools'
2단계 - GoAccess 다운로드 및 설치
최신 버전의 GoAccess 아카이브를 다운로드하십시오. 공식 다운로드 페이지에서 최신 버전의 GoAccess를 찾을 수 있습니다.
$ wget https://tar.goaccess.io/goaccess-1.5.2.tar.gz
아카이브에서 파일을 추출합니다.
$ tar -xzvf goaccess-1.5.2.tar.gz
패키지를 구성하고 설치합니다.
$ cd goaccess-1.5.2
$ autoreconf -fi
$ sudo ./configure --enable-utf8 --enable-geoip=mmdb --with-openssl
$ sudo make
$ sudo make install
GoAccess가 실행 중인지 확인합니다.
$  goaccess --version
GoAccess - 1.5.2.
For more details visit: https://goaccess.io/
Copyright (C) 2009-2020 by Gerardo Orellana

Build configure arguments:
  --enable-utf8
  --enable-geoip=mmdb
  --with-openssl
3단계 - GeoIP 데이터베이스 다운로드
Maxmind에서 GeoIP 데이터베이스를 다운로드할 수 있습니다. Maxmind에서 다운로드하려면 계정을 만들고 무료 라이센스 키를 생성해야 합니다. DB-IP에서 직접 다운로드할 수 있습니다.
위 소스 중 하나에서 국가 zip 파일을 다운로드합니다. 다운로드가 완료되면 압축을 풀고 서버의 .mmdb 파일을 /home/와 같은 사용자 지정 폴더에 업로드합니다.
4단계 - GoAccess 구성
GoAccess는 구성 파일을 /usr/local/etc/goaccess/goaccess.conf에 저장합니다. 다음 명령을 사용하여 시스템에서 파일의 위치를 확인할 수 있습니다.
$ goaccess --dcf
/usr/local/etc/goaccess/goaccess.conf
편집할 파일을 엽니다.
$ sudo nano /usr/local/etc/goaccess/goaccess.conf
대부분의 옵션은 주석 처리됩니다. 명령줄을 통해 이러한 옵션을 사용하거나 여기 파일에서 설정할 수 있습니다. 옵션을 활성화하려면 앞에 있는 # 문자를 제거하십시오.
먼저 time-format 옵션을 활성화합니다. 튜토리얼에서 Nginx 파일을 구문 분석할 것이므로 Apache/Nginx 로그용 옵션을 활성화하십시오.
# The following time format works with any of the
# Apache/NGINX's log formats below.
#
time-format %H:%M:%S
다음으로 Nginx date-format 옵션을 활성화합니다.
# The following date format works with any of the
# Apache/NGINX's log formats below.
#
date-format %d/%b/%Y
다음으로 log-format 옵션을 활성화합니다. 이 가이드에서는 Nginx가 일반적으로 사용하는 결합로그 형식을 사용합니다.
log-format COMBINED
로그 파일에 가상 호스트 필드가 포함된 경우 대신 다음 옵션을 활성화하십시오.
log-format VCOMBINED
로그 형식에 대해 더 많은 제어를 원한다고 가정합니다. 이 경우 액세스하는 로그에 따라 대신 다음 줄을 활성화하고 필요에 따라 매개변수를 추가하거나 제거할 수 있습니다.
log-format %v:%^ %h %^[%d:%t %^] "%r" %s %b "%R" "%u"
GeoIP 모듈을 활성화하려면 GeoIP 데이터베이스 경로를 입력하여 다음 옵션을 활성화하십시오.
# For GeoIP2 Country database:
# Download the GeoLite2-Country.mmdb.gz
# gunzip GeoLite2-Country.mmdb.gz
#
geoip-database /home/geoip/dbip-country-lite-2021-10.mmdb
완료되면 Ctrl + X를 누르고 프롬프트가 표시되면 Y를 입력하여 파일을 저장합니다.
5단계 - GoAccess 실행
일반적으로 GoAccess를 실행하려면 다음 명령을 사용해야 합니다.
$ sudo /usr/local/bin/goaccess /var/log/nginx/access.log
일반 사용자는 로그 파일을 열 수 없기 때문에 sudo를 사용해야 합니다. 또한 sudo 명령은 /usr/local/bin 디렉토리의 응용 프로그램을 인식하지 못하기 때문에 sudo 명령과 함께 실행 파일의 전체 경로를 사용해야 합니다. 그러나 심볼릭 링크를 생성하여 제한을 피할 수 있습니다.
그렇게 하려면 다음 명령을 실행하십시오.
$ sudo ln -s /usr/local/bin/goaccess /usr/bin/goaccess
이제 GoAccess를 직접 실행할 수 있습니다.
$ sudo goaccess /var/log/nginx/access.log
Nginx 로그 파일은 들어오는 모든 HTTP 트래픽을 기록합니다. 서버가 오랫동안 실행된 경우 압축된 .gz 형식의 이전 로그와 함께 여러 액세스 로그가 표시됩니다. 이전 로그 파일은 로그 회전의 결과로 생성됩니다.
명령을 실행하면 다음 대시보드가 표시됩니다.
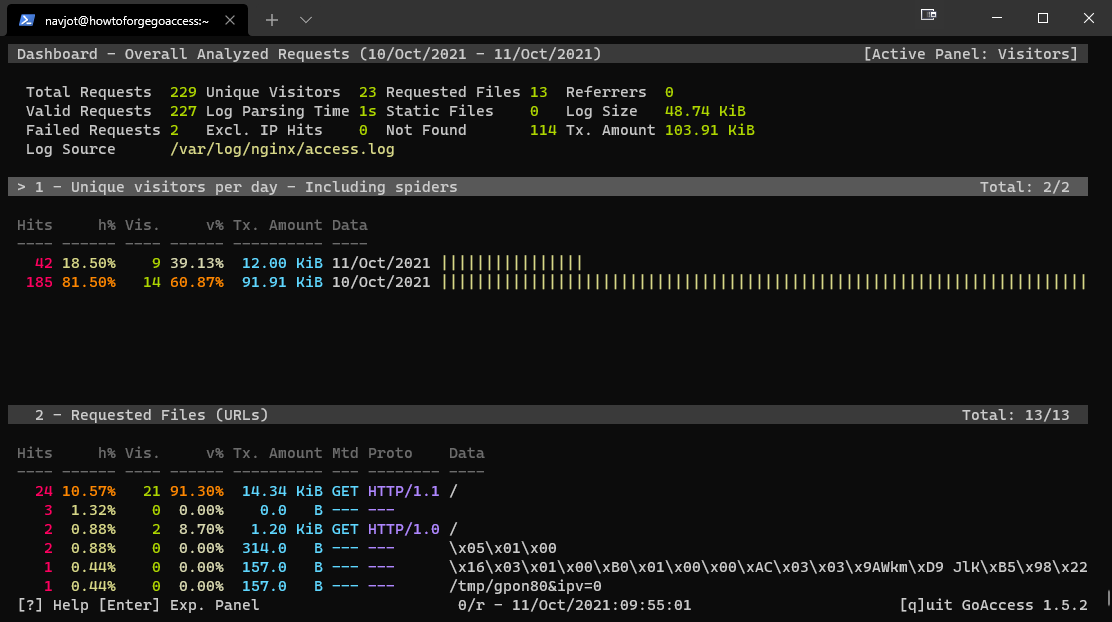
GoAccess는 대시보드를 탐색할 수 있는 몇 가지 키보드 단축키를 제공합니다.
TAB은 사용 가능한 모듈에서 앞으로 이동하고SHIFT+TAB은 뒤로 이동합니다.\nF5를 눌러 대시보드를 새로 고칩니다.g는 대시보드 화면 상단으로 이동하고G는 하단으로 이동합니다.\no또는ENTER를 눌러 선택한 모듈을 확장합니다.\nj및k활성 모듈 내에서 위아래로 스크롤합니다.\ns활성 모듈에 대한 정렬 옵션을 표시합니다.\n/는 모든 모듈에서 검색하고n은 다음 일치 항목으로 이동합니다.\n0-9및SHIFT+0은 각각의 번호가 매겨진 모듈을 빠르게 활성화합니다.\n?빠른 도움말 대화 상자를 봅니다.\nq프로그램을 종료합니다.\n
모든 패널을 간략하게 살펴보겠습니다.
-
Unique visitors per day - This panel is self-explanatory. It lists unique visitors, hits and cumulative bandwidth for each date. It also includes web crawlers and spiders by default.
-
Requested Files (URLs) - This panel provides the statistics concerning the most requested non-static files on your server.
-
Static Requests - It is similar to the above panel except that it handles static files like images, CSS, JavaScript, etc.
-
Not Found URLs (404s) - This panel logs all the requests to files and paths not found on your server.
-
Visitor Hostnames and IPs - This panel gives more info about the visitors to your site. You can press
oto expand the panel to get detailed information such as country of origin, city, and reverse DNS. -
Operating Systems - This panel displays different Operating systems used by the visitors.
-
Browsers - This panel shows the various browsers used by the visitors.
-
Time Distribution - This panel will give an hourly report for the number of hits, unique visitors, and bandwidth consumed.
-
Virtual Hosts - This panel displays the virtual hosts parsed from the log file. It will only show up if you use the
VCOMBINEDlog format in the configuration file above or if%vis part of the log-format configuration. -
Referrer URLs - This lists the URLs that refer visitors to your server. This panel is disabled by default. To enable it, comment out the following line in the configuration file by adding
#in front of it.#ignore-panel REFERRERS
-
Referring Sites - This panel displays the IP addresses of the referring hosts.
-
Keyphrases - This panel displays the keywords used on Google Search, Google cache or Google Translate that lead to your site. This panel is also disabled by default. Enable it by commenting out the following line in the configuration file.
#ignore-panel KEYPHRASES
-
HTTP Status Codes - This panel shows the statistics for HTTP status codes returned by your server when it responds to a request.
-
Remote User (HTTP Authentication) - This panel shows the user ID of the person accessing a document on your server, protected by HTTP authentication. This panel only works if
%eis part of the log-format configuration. -
Cache status - This panel determines if a request is being cached and served from it. This panel only works if
%cis part of the log-format configuration. -
Geo Location - This panel provides a list of geographical locations of the visitors accessing your site. It will show up only if you have downloaded and added its location in the configuration file.
6단계 - 권한이 없는 상태로 GoAccess 실행
좋은 보안 관행으로서 루트로 작동하는 코드가 적을수록 좋습니다. 루트 없이 GoAccess를 실행하려면 로그 파일을 읽을 수 있는 권한이 필요합니다.
서버 로그 파일은 일반적으로 adm 그룹의 일부입니다. 다음 명령을 사용하여 확인할 수 있습니다.
$ ls -l /var/log/nginx
total 68
-rw-r----- 1 nginx adm 30547 Oct 10 12:47 access.log
-rw-r----- 1 nginx adm 35063 Oct 10 12:47 error.log
보시다시피 로그 파일을 열기 위해 루트 사용자일 필요는 없습니다. adm 그룹에 속한 모든 사용자는 파일을 열 수 있습니다.
루트 없이 GoAccess를 실행하는 가장 쉬운 방법은 현재 로그인한 사용자를 adm 그룹에 추가하는 것입니다. 이렇게 하면 sudo 없이 해당 사용자로 GoAccess를 실행할 수 있습니다.
다음 명령을 실행하여 현재 사용자를 adm 그룹에 추가합니다.
$ sudo usermod -aG adm $USER
이제 로그아웃했다가 다시 로그인하여 변경 사항을 적용하십시오. 또는 변경 사항을 적용하기 위해 로그아웃할 필요 없이 다음 명령을 실행할 수 있습니다.
$ su $USER
sudo 없이 GoAccess를 직접 실행할 수 있어야 합니다.
$ goaccess /var/log/nginx/access.log
7단계 - HTML 보고서 생성
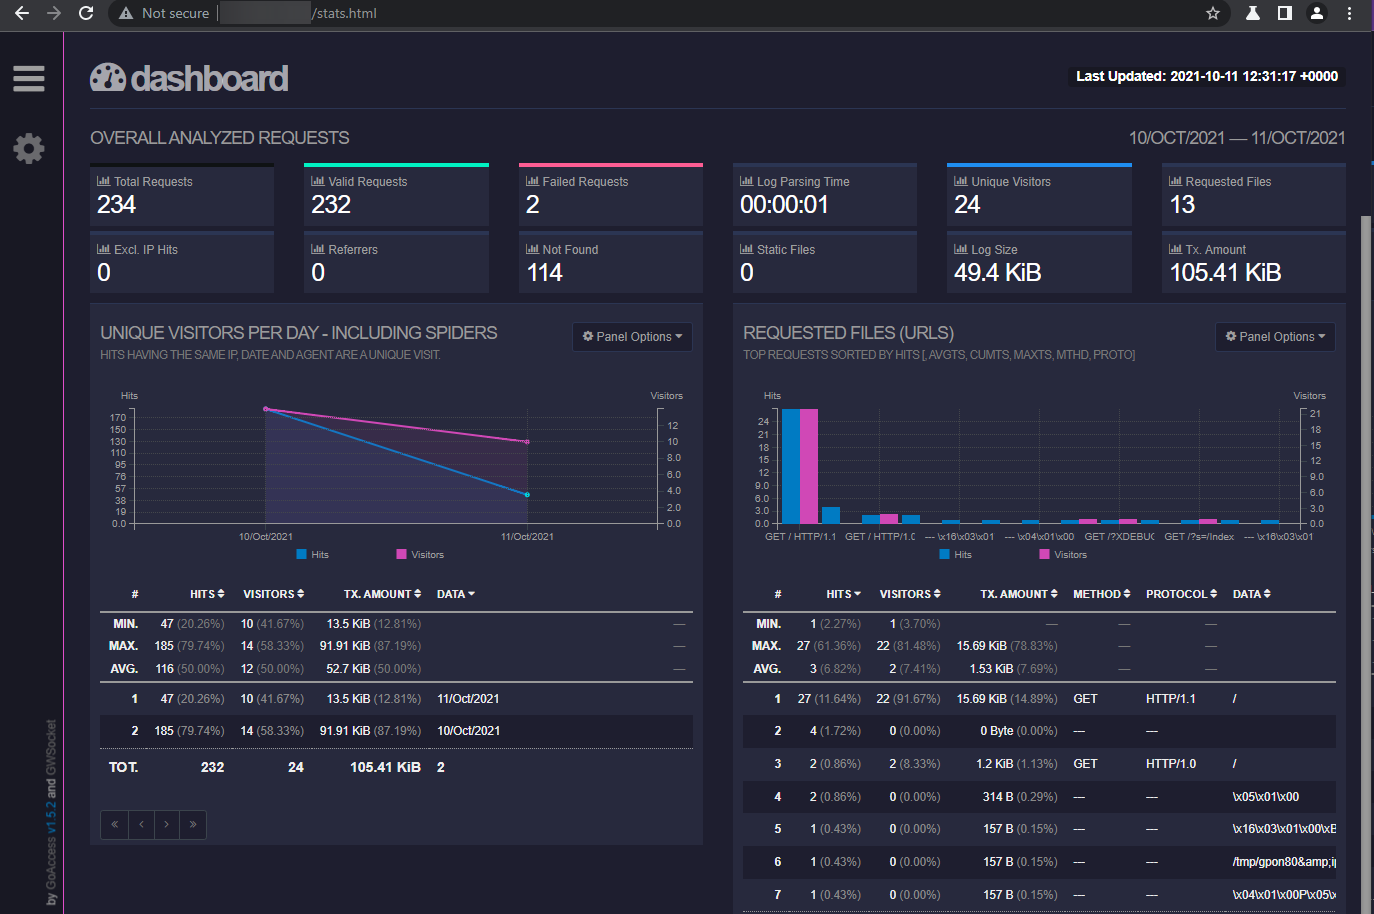
GoAccess를 사용하여 온라인으로 제공할 수 있는 HTML 보고서를 생성할 수 있습니다. 다음 명령을 사용하여 HTML 보고서를 생성하십시오.
$ goaccess /var/log/nginx/access.log -o stats.html
자신을 위해 로컬 PC에 파일을 다운로드하거나 공개적으로 제공할 웹 사이트 폴더를 다운로드할 수 있습니다.
GoAccess를 사용하여 실시간 HTML 보고서를 생성할 수도 있습니다. 하지만 먼저 GoAccess Websocket이 실행되도록 7890 포트를 열어야 합니다. 다음 명령을 사용하여 포트를 엽니다.
$ sudo firewall-cmd --permanent --add-port=7890/tcp
변경 사항을 적용하려면 방화벽을 다시 로드하십시오.
$ sudo firewall-cmd --reload
이제 다음 명령을 실행하여 실시간 HTML 보고서를 생성하십시오.
$ goaccess /var/log/nginx/access.log -o /usr/share/nginx/html/livereport.html --real-time-html
그러면 지정된 위치에서 실시간 보고서가 생성됩니다. 위의 명령은 연결을 수신하는 WebSocket으로 전경에서 GoAccess를 계속 실행합니다.
위의 명령을 실행할 때 약간의 주의 사항이 있습니다. 위 명령은 GoAccess에 /usr/share/nginx/html 디렉터리에 대한 사용자 권한이 있을 때 작동합니다. 현재 로그인한 사용자로 GoAccess를 실행하고 있으므로 해당 사용자에게 /usr/share/html 디렉토리에 대한 권한을 부여해야 합니다. 어떤 이유로든 기다릴 수 없다면 sudo를 사용하여 GoAccess를 실행해야 합니다.
$ sudo goaccess /var/log/nginx/access.log -o /usr/share/nginx/html/livereport.html --real-time-html
백그라운드에서 GoAccess를 실행하려면 다음 명령을 사용하여 대신 데몬으로 실행할 수 있습니다.
$ goaccess /var/log/nginx/access.log -o /usr/share/nginx/html/livereport.html --real-time-html --daemonize
Daemonized GoAccess: 78315
GoAccess Daemon을 중지하려면 다음 명령을 사용하여 프로세스를 종료하십시오.
$ sudo kill -9 78315
여기서는 이전 명령에서 얻은 프로세스 ID를 사용하고 있습니다. 프로세스 ID가 기억나지 않으면 다음 명령을 사용하여 프로세스를 종료할 수도 있습니다.
$ sudo kill -9 `pidof goaccess`
명령에 역따옴표(")를 사용하고 있음에 유의하십시오. 일반 따옴표를 사용하면 명령이 실패합니다.
결론
이것으로 Rocky Linux 8 서버에서 GoAccess Log Analyzer를 설치하고 실행하는 방법에 대한 자습서를 마칩니다. 질문이 있으시면 아래 의견에 게시하십시오.