CentOS 7에 Ghost(CMS) 블로그 게시 플랫폼을 설치하는 방법
Ghost는 무료 오픈 소스이며 Nodejs로 작성된 간단하면서도 강력한 블로그 또는 온라인 출판 소프트웨어입니다. 온라인 출판물을 쉽게 구축하고 실행할 수 있도록 설계된 최신 출판 도구 모음입니다.
고스트 기능:
- 빠르고 확장 가능하며 효율적입니다.
- 마크다운 기반 편집 환경을 제공합니다.
- 데스크톱 앱과 함께 제공됩니다.
- 아름다운 핸들바 템플릿이 함께 제공됩니다.
- 간편한 컨텐츠 관리를 지원합니다.
- 작성자, 편집자, 관리자의 다양한 역할을 지원합니다.
- 콘텐츠를 미리 예약할 수 있습니다.
- 가속화된 모바일 페이지를 지원합니다.
- 검색 엔진 최적화를 완벽하게 지원합니다.
- 상세하게 구조화된 데이터를 제공합니다.
- RSS, 이메일, Slack을 통한 구독을 지원합니다.
- 간단한 사이트 편집 등이 가능합니다.
요구사항:
- 1GB 메모리를 갖춘 CentOS 7 서버 최소 설치
- 고정 IP 주소를 사용하는 CentOS 7 시스템
- Node v6 LTS – CentOS 7에 최신 Node.js 및 NPM 설치
- Nginx가 설치된 CentOS 7 서버
중요: Ghost를 직접 설치하기 전에 우수한 VPS 호스팅이 필요하므로 BlueHost를 적극 권장합니다.
이 문서에서는 CentOS 7 시스템에 오픈 소스 Ghost(콘텐츠 관리 시스템) 블로그 플랫폼을 설치하는 방법을 설명합니다.
1단계: CentOS 7에 Nodejs 설치
1. CentOS의 소프트웨어 저장소에서는 Nodejs를 사용할 수 없으므로 먼저 해당 저장소를 추가한 후 다음과 같이 설치하십시오.
curl --silent --location https://rpm.nodesource.com/setup_6.x | bash -
yum -y install nodejs npm
dnf -y install nodejs npm   [On Fedora 22+ versions]
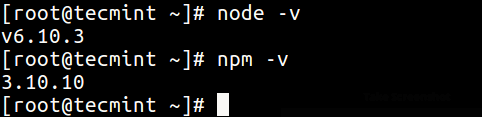
2. nodejs가 설치되면 명령을 사용하여 권장 버전의 Nodejs 및 npm이 설치되어 있는지 확인할 수 있습니다.
node -v
npm -v
2단계: CentOs 7에 Ghost 설치
3. 이제 권장 설치 위치인 /var/www/ghost에 응용 프로그램 파일을 저장할 Ghost 루트 디렉토리를 생성하십시오.
mkdir -p /var/www/ghost
4. 그런 다음 Ghost의 GitHub 저장소에서 최신 버전의 Ghost를 다운로드하고 위에서 생성한 디렉토리에 아카이브 파일의 압축을 풉니다.
curl -L https://ghost.org/zip/ghost-latest.zip -o ghost.zip
unzip -uo ghost.zip -d  /var/www/ghost
5. 이제 새 ghost 디렉토리로 이동하고 다음 명령을 사용하여 Ghost(프로덕션 종속성만 해당)를 설치합니다. 두 번째 명령이 완료되면 시스템에 Ghost가 설치되어야 합니다.
cd /var/www/ghost
npm install --production
3단계: 기본 Ghost 블로그 시작 및 액세스
6. Ghost를 시작하려면 /var/www/ghost 디렉토리에서 다음 명령을 실행하십시오.
npm start --production

7. 기본적으로 Ghost는 2368 포트에서 실행되어야 하므로 방화벽에서 포트를 열어 액세스를 허용하세요.
firewall-cmd --zone=public --permanent --add-port=2368/tcp
firewall-cmd --reload
8. 이제 웹 브라우저를 열고 아래 URL 중 하나로 이동하십시오.
http://SERVER_IP:2368
OR
http://localhost:2368
참고: Ghost를 처음 실행하면 config.js 파일이 Ghost의 루트 디렉터리에 생성됩니다. 이를 사용하여 고스트에 대한 환경 수준 구성을 설정할 수 있습니다. 사이트 URL, 데이터베이스, 메일 설정 등과 같은 옵션을 구성할 수 있는 곳입니다.
4단계: Ghost용 Nginx 설치 및 구성
표시된 대로 EPEL 저장소를 사용하여 설치되지 않은 경우 Nginx 웹 서버를 설치하고 시작합니다.
yum install epel-release
yum install nginx
systemctl start nginx
방화벽을 실행 중인 경우 다음 명령을 사용하여 HTTP 및 HTTPS 트래픽에 대한 액세스를 활성화합니다.
firewall-cmd --permanent --zone=public --add-service=http
firewall-cmd --permanent --zone=public --add-service=https
firewall-cmd --reload
다음 단계는 사용자가 URL 끝에 포트 :2368를 추가하지 않고도 Ghost 블로그에 액세스할 수 있도록 Nginx가 80 포트에서 Ghost 블로그를 서버하도록 구성하는 것입니다.
먼저 터미널에서 CTRL+C 키를 눌러 실행 중인 Ghost 인스턴스를 중지하세요.
이제 /etc/nginx/sites-available/ghost 아래에 새 파일을 생성하여 Nginx를 구성합니다.
vi /etc/nginx/sites-available/ghost
다음 구성을 추가하고 강조 표시된 다음 줄을 your_domain_or_ip_address로 변경했는지 확인하세요.
server {
    listen 80;
    server_name your_domain_or_ip_address;
    location / {
    proxy_set_header HOST $host;
    proxy_set_header X-Forwarded-Proto $scheme;
    proxy_set_header X-Real-IP $remote_addr;
    proxy_set_header X-Forwarded-For $proxy_add_x_forwarded_for;
        proxy_pass         http://127.0.0.1:2368;
    }
}
파일을 저장하고 /etc/nginx/sites-enabled 디렉토리 아래에 심볼릭 링크를 생성하여 이 구성을 활성화합니다.
ln -s /etc/nginx/sites-available/ghost /etc/nginx/sites-enabled/ghost
이제 /etc/nginx.conf 파일을 엽니다. sites-enabled 디렉토리에 구성 파일을 포함하고 표시된 대로 기본 사이트를 비활성화합니다.
vi /etc/nginx/nginx.conf
이제 sites-enabled 디렉터리에 구성 파일을 포함하려면 http 블록 안에 다음 줄을 추가하세요.
http {
...
    # Load modular configuration files from the /etc/nginx/conf.d directory.
    # See http://nginx.org/en/docs/ngx_core_module.html#include
    # for more information.
    include /etc/nginx/conf.d/*.conf;
    include /etc/nginx/sites-enabled/*;
그런 다음 http 블록 내부에 있는 기본 서버 블록을 완전히 주석 처리합니다.
...

    # Load modular configuration files from the /etc/nginx/conf.d directory.
    # See http://nginx.org/en/docs/ngx_core_module.html#include
    # for more information.
    include /etc/nginx/conf.d/*.conf;
    include /etc/nginx/sites-enabled/*;


   server {
      listen       80 default_server;
      listen       [::]:80 default_server;
      server_name  _;
      root         /usr/share/nginx/html;
#
      # Load configuration files for the default server block.
      include /etc/nginx/default.d/*.conf;
#
      location / {
      }
#
      error_page 404 /404.html;
          location = /40x.html {
      }
#
      error_page 500 502 503 504 /50x.html;
          location = /50x.html {
      }
...
...
마지막으로 nginx 웹 서버를 저장하고 다시 시작하십시오.
systemctl restart nginx
다시 한 번 http://your_domain_or_ip_address를 방문하면 Ghost 블로그가 표시됩니다.
자세한 내용은 고스트 홈페이지(https://ghost.org/)를 참조하세요.
이 기사에서는 CentOS 7에서 Ghost를 설치하고 구성하는 방법을 설명했습니다. 아래 의견 양식을 사용하여 가이드에 대한 질문이나 생각을 보내주십시오.
마지막으로 다음 게시물에서는 Debian과 Ubuntu에서 Ghost를 설정하는 방법을 보여 드리겠습니다. 그때까지 linux-console.net에 연결을 유지하세요.