FreeFileSync - Ubuntu에서 파일 비교 및 동기화
FreeFileSync는 Linux, Windows 및 Mac OS에서 파일과 폴더를 동기화하는 데 도움이 되는 무료 오픈 소스 크로스 플랫폼 폴더 비교 및 동기화 소프트웨어입니다.
이식성이 뛰어나고 시스템에 로컬로 설치할 수도 있으며 기능이 풍부하고 매력적인 그래픽 인터페이스를 갖는 동시에 백업 작업을 설정하고 실행하는 데 시간을 절약할 수 있도록 고안되었습니다.
FreeFileSync 기능
다음은 주요 기능입니다.
- 네트워크 공유와 로컬 디스크를 동기화할 수 있습니다.
- MTP 장치(Android, iPhone, 태블릿, 디지털 카메라)를 동기화할 수 있습니다.
- SFTP(SSH 파일 전송 프로토콜)를 통해 동기화할 수도 있습니다.
- 이동되고 이름이 변경된 파일과 폴더를 식별할 수 있습니다.
- 디렉토리 트리와 함께 디스크 공간 사용량을 표시합니다.
- 잠긴 파일 복사를 지원합니다(Volume Shadow Copy Service).
- 충돌을 식별하고 삭제를 전파합니다.
- 콘텐츠별 파일 비교를 지원합니다.
- 심볼릭 링크를 처리하도록 구성할 수 있습니다.
- 일괄 작업으로 동기화 자동화를 지원합니다.
- 여러 폴더 쌍을 처리할 수 있습니다.
- 심층적이고 자세한 오류 보고를 지원합니다.
- 압축, 암호화, 스파스 등의 NTFS 확장 특성 복사를 지원합니다.
- 또한 NTFS 보안 권한 및 NTFS 대체 데이터 스트림 복사를 지원합니다.
- 260자가 넘는 긴 파일 경로를 지원합니다.
- 오류 방지 파일 복사를 지원하여 데이터 손상을 방지합니다.
- %UserProfile%과 같은 환경 변수를 확장할 수 있습니다.
- 볼륨 이름(USB 스틱)으로 가변 드라이브 문자에 액세스할 수 있도록 지원합니다.
- 삭제/업데이트된 파일의 버전 관리를 지원합니다.
- 최적의 동기화 순서를 통해 디스크 공간 문제를 방지합니다.
- 전체 유니코드를 지원합니다.
- 고도로 최적화된 런타임 성능을 제공합니다.
- 파일을 포함하고 제외하는 필터와 그 이상을 지원합니다.
Ubuntu Linux에 FreeFileSync를 설치하는 방법
Ubuntu 14.04 및 Ubuntu 15.10에서만 사용할 수 있는 공식 FreeFileSync PPA를 추가한 다음 시스템 저장소 목록을 업데이트하고 다음과 같이 설치합니다. :
-------------- On Ubuntu 14.04 and 15.10 --------------
sudo apt-add-repository ppa:freefilesync/ffs
sudo apt-get update
sudo apt-get install freefilesync
Ubuntu 16.04 이상 버전에서는 FreeFileSync 다운로드 페이지로 이동하여 Ubuntu 및 Debian Linux에 적합한 패키지 파일을 가져옵니다.
그런 다음 다운로드 폴더로 이동하여 다음과 같이 FreeFileSync_*.tar.gz를 /opt 디렉터리에 추출합니다.
cd Downloads/
sudo tar xvf FreeFileSync_*.tar.gz -C /opt/
cd /opt/
ls
sudo unzip FreeFileSync/Resources.zip -d /opt/FreeFileSync/Resources/
이제 Gnome 패널을 사용하여 애플리케이션 실행 프로그램(.desktop 파일)을 생성하겠습니다. 시스템에 있는 .desktop 파일의 예를 보려면 /usr/share/applications 디렉터리의 내용을 나열하세요.
ls /usr/share/applications
Gnome 패널이 설치되어 있지 않은 경우 아래 명령을 입력하여 설치하세요.
sudo apt-get install --no-install-recommends gnome-panel
그런 다음 아래 명령을 실행하여 애플리케이션 실행 프로그램을 만듭니다.
sudo gnome-desktop-item-edit /usr/share/applications/ --create-new
그리고 아래 값을 정의합니다.
Type: 	   Application
Name: 	   FreeFileSync
Command:   /opt/FreeFileSync/FreeFileSync
Comment:   Folder Comparison and Synchronization
런처 아이콘을 추가하려면 스프링 아이콘을 클릭하여 선택하세요: /opt/FreeFileSync/Resources/FreeFileSync.png.
위의 사항을 모두 설정한 후 확인을 클릭하여 만듭니다.

데스크탑 런처를 생성하지 않으려면 디렉터리 자체에서 FreeFileSync를 시작할 수 있습니다.
./FreeFileSync
Ubuntu에서 FreeFileSync를 사용하는 방법
Ubuntu에서는 Unity Dash에서 FreeFileSync를 검색하고, Linux Mint에서는 시스템 메뉴에서 검색하세요. > FreeFileSync 아이콘을 클릭하여 엽니다.

FreeFileSync를 사용하여 두 폴더 비교
아래 예에서는 다음을 사용합니다.
Source Folder:	/home/aaronkilik/bin
Destination Folder:	/media/aaronkilik/J_CPRA_X86F/scripts
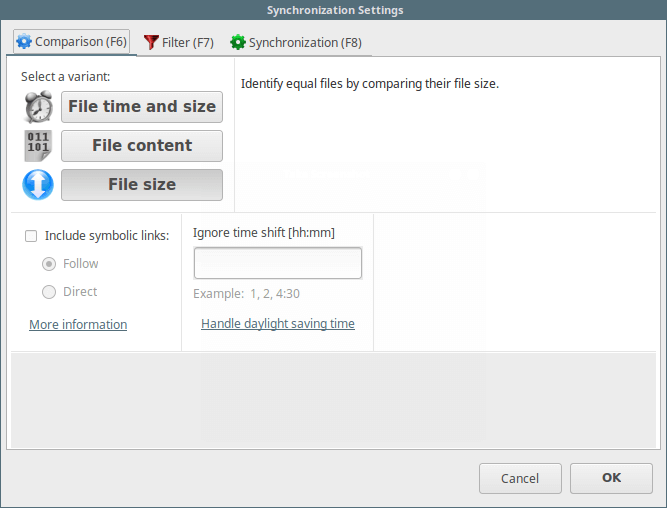
두 폴더의 파일 시간과 크기를 비교하려면(기본 설정) 비교 버튼을 클릭하기만 하면 됩니다.

F6을 눌러 두 폴더(아래 인터페이스의 파일 시간 및 크기, 콘텐츠 또는 파일 크기)에서 기본적으로 비교할 항목을 변경합니다. 선택한 각 옵션의 의미도 포함되어 있습니다.
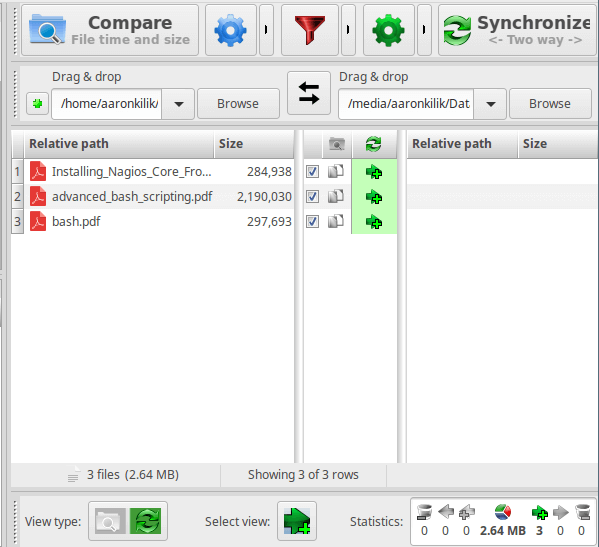
FreeFileSync를 사용하여 두 폴더 동기화
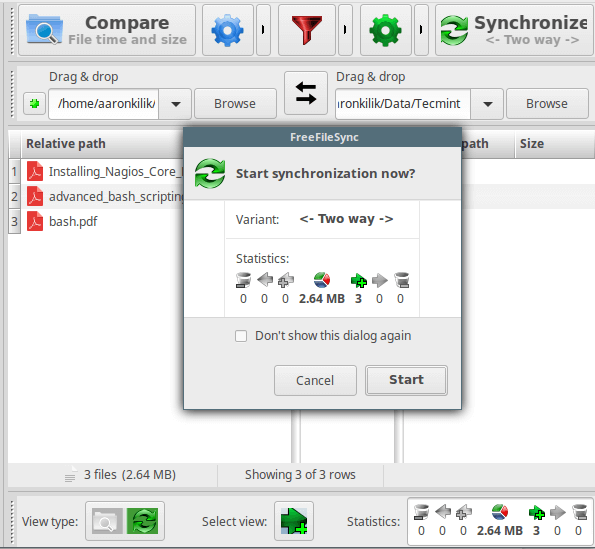
두 폴더를 비교하여 시작한 다음 동기화 버튼을 클릭하여 동기화 프로세스를 시작할 수 있습니다. 이후에 나타나는 대화 상자에서 시작을 클릭하세요.
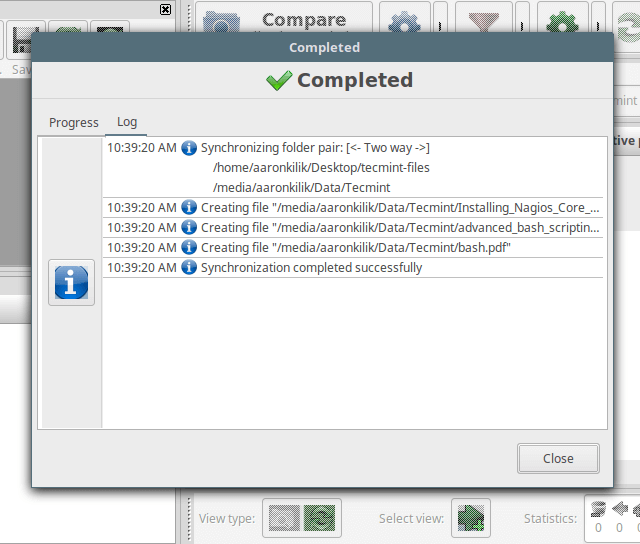
Source Folder: /home/aaronkilik/Desktop/tecmint-files
Destination Folder: /media/aaronkilik/Data/Tecmint
기본 동기화 옵션을 설정하려면 다음 인터페이스에서 양방향, 미러, 업데이트 또는 사용자 정의를 수행합니다. F8을 누르세요. 여기에는 각 옵션의 의미가 포함되어 있습니다.

자세한 내용은 FreeFileSync 홈페이지(http://www.freefilesync.org/)를 참조하세요.
그게 다야! 이 기사에서는 Ubuntu에 FreeFileSync를 설치하는 방법과 Linux Mint, Kubuntu 등과 같은 파생 제품을 설명했습니다. 아래 피드백 섹션을 통해 의견을 남겨주세요.