SSL로 Nginx를 보호하는 방법과 FreeBSD에서 암호화하자
이 가이드에서는 Let's Encrypt Certificate에서 제공하는 TLS/SSL 인증서를 사용하여 FreeBSD에서 Nginx 웹 서버를 보호하는 방법에 대해 설명합니다. 권위. 또한 만료 날짜 이전에 Lets' Encrypt 인증서를 자동으로 갱신하는 방법도 보여 드리겠습니다.
Transport Layer Security의 약어인 TLS는 HTTP 프로토콜에서 실행되고 인증서와 키를 사용하여 패킷과 데이터를 캡슐화하는 프로토콜입니다. 서버와 클라이언트 사이(이 경우에는 Nginx 웹 서버와 클라이언트 브라우저 사이에 교환되는 데이터를 암호화하여 연결을 보호합니다. 따라서 트래픽을 가로챌 수 있는 제3자가 암호를 해독할 수 없습니다.) 전송.
추가 읽기: FreeBSD에 Apache용 Let’s Encrypt 설치
FreeBSD에서 무료 Let's Encrypt 인증서를 얻는 과정은 공식 Let's Encrypt 클라이언트에 사용되는 certboot 클라이언트 유틸리티를 설치하여 크게 단순화할 수 있습니다. 인증서 생성 및 다운로드용.
요구사항
- FreeBSD에 FBEMP(Nginx, MariaDB 및 PHP) 스택 설치
1단계: Nginx TLS/SSL 구성
1. 기본적으로 TLS/SSL 서버 구성은 FreeBSD에서 활성화되지 않습니다. TLS 서버 차단 명령문 Nginx 기본 구성 파일에 주석이 추가되어 있습니다.
Nginx에서 TLS 서버를 활성화하려면 nginx.conf 구성 파일을 열고 의 시작을 정의하는 줄을 검색하세요. SSL 서버를 열고 아래 샘플과 같이 전체 블록을 업데이트합니다.
nano /usr/local/etc/nginx/nginx.conf
Nginx HTTPS 블록 발췌:
server {
       listen 443 ssl  default_server;
       server_name  www.yourdomain.com;

	access_log /var/log/nginx/access.log;
	error_log /var/log/nginx/error.log;
	error_page   500 502 503 504  /50x.html;

	location = /50x.html {
            root   /usr/local/www/nginx-dist;
        }

	location / {
	    root   /usr/local/www/nginx;
       	    index  index.html index.htm;
	    try_files $uri $uri/ /index.php?$args;
				}

	ssl_certificate "/usr/local/etc/letsencrypt/live/www.yourdomain.com/cert.pem";
	ssl_certificate_key "/usr/local/etc/letsencrypt/live/www.yourdomain.com/privkey.pem";
	ssl_protocols TLSv1 TLSv1.1 TLSv1.2;
	ssl_dhparam /usr/local/etc/nginx/dhparam.pem;
	ssl_session_cache shared:SSL:1m;
	ssl_session_timeout 10m;
	ssl_ciphers HIGH:!aNULL:!MD5;
	ssl_prefer_server_ciphers  on;

	# Use gzip compression
gzip on;
gzip_disable "msie6";
gzip_vary on;
gzip_proxied any;
gzip_comp_level 5;
gzip_buffers 16 8k;
gzip_http_version 1.0;

	# Set a variable to work around the lack of nested conditionals

	set $cache_uri $request_uri;

	location ~ /.well-known {
	allow all;
		}


        location ~ \.php$ {
        root	/usr/local/www/nginx;
        fastcgi_pass   127.0.0.1:9000;
        fastcgi_index  index.php;
        #fastcgi_param  SCRIPT_FILENAME /scripts$fastcgi_script_name;
        fastcgi_param SCRIPT_FILENAME $request_filename;
		include        fastcgi_params;
        }
    }
위의 블록에는 SSL 블록 외에도 PHP 코드를 PHP-FPM<에 전달하는 데 사용되는 gzip 압축 및 FastCGI 프로세스 관리자를 활성화하기 위한 몇 가지 명령문도 포함되어 있습니다. 동적 웹 애플리케이션을 실행하기 위한 게이트웨이입니다.
위 코드를 Nginx 기본 구성 파일에 추가한 후 도메인에 대한 Let's Encrypt 인증서를 설치하고 얻기 전에 데몬을 다시 시작하거나 설정을 적용하지 마세요.
2단계: FreeBSD에 Certbot 클라이언트 설치
2. FreeBSD에 Let's Encrypt certbot 클라이언트 유틸리티를 설치하는 과정에는 py-certbot의 소스 코드를 다운로드하고 로컬에서 컴파일하는 과정이 포함됩니다. 아래 명령.
cd /usr/ports/security/py-certbot
make install clean
3. py-certbot 유틸리티를 컴파일하는 것은 일반 바이너리 패키지를 설치하는 것에 비해 시간이 많이 걸립니다. 이 시간 동안 일련의 종속성을 FreeBSD에서 로컬로 컴파일하여 다운로드해야 합니다.
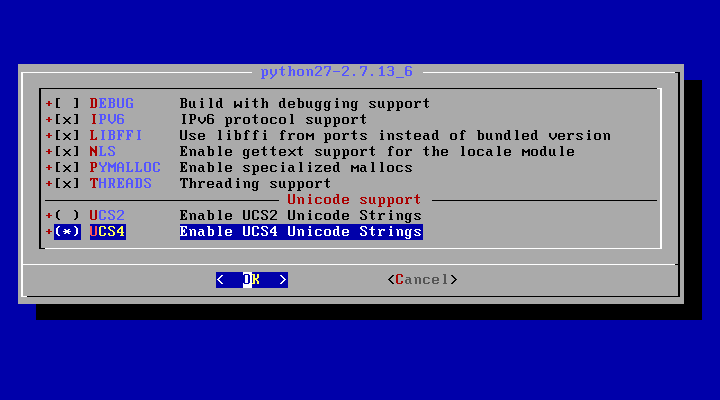
또한, 각 종속성에 대해 컴파일 타임에 어떤 패키지를 사용할지 선택하라는 일련의 프롬프트가 화면에 나타납니다. 첫 번째 화면에서 아래 이미지에 표시된 대로 python27 종속성을 컴파일하기 위해 [space] 키를 눌러 다음 도구를 선택합니다.
- IPV6
- 리브피
- NLS
- 피말록
- 스레드
- 유니코드 지원을 위한 UCS4
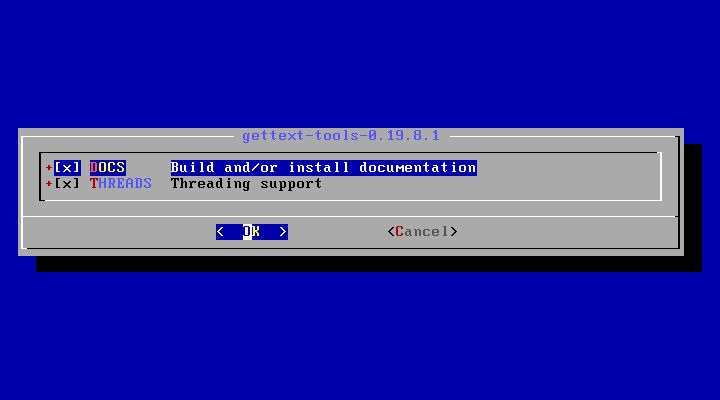
4. 다음으로 gettext-tools 종속성에 대해 DOCS 및 THREADS를 선택하고 확인을 누릅니다. > 아래 이미지와 같이 계속 진행합니다.
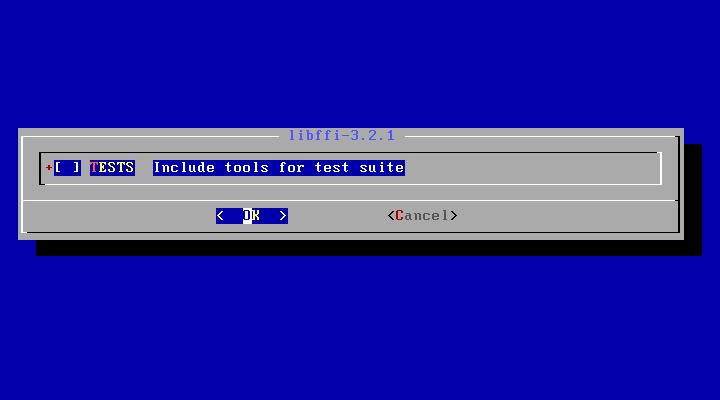
5. 다음 화면에서 libffi-3.2.1에 대해 TESTS 옵션을 비활성화한 상태로 두고 확인을 눌러 이동합니다. 더 나아가.
6. 다음으로 space를 눌러 py27-enum34 종속성에 대해 DOCS를 선택하면 이에 대한 문서가 설치됩니다. 도구를 선택하고 아래 스크린샷과 같이 확인을 눌러 계속 진행하세요.

7. 마지막으로 [space] 키를 눌러 py27-openssl 종속성에 대한 예제 샘플을 설치하도록 선택하고 확인을 누릅니다. > py-certbot 클라이언트의 컴파일 및 설치 프로세스를 완료합니다.

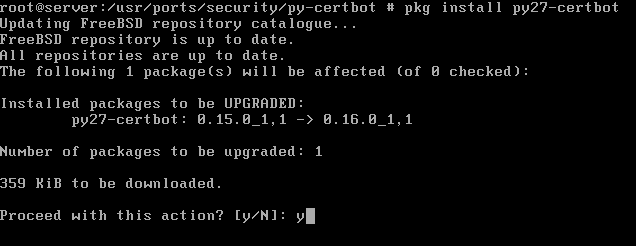
8. py-certbot 유틸리티 컴파일 및 설치 프로세스가 완료된 후 아래 명령을 실행하여 아래 그림과 같이 패키지의 최신 버전으로 도구를 업그레이드합니다. 아래 스크린샷.
pkg install py27-certbot
9. 무료 Let's Encrypt 인증서를 얻는 동안 발생할 수 있는 일부 문제를 방지하기 위해 가장 일반적인 오류는 "pkg_resources.DistributionNotFound "입니다. , py27-salt 및 py27-acme라는 두 가지 종속성이 시스템에 있는지 확인하세요.
pkg install py27-salt
pkg install py27-acme
3단계: FreeBSD에 Nginx용 Let's Encrypt 인증서 설치
10. 도메인에 대한 Let's Encrypt 독립 실행형 인증서를 얻으려면 다음 명령을 실행하고 -d 플래그.
certbot certonly --standalone -d yourdomain.com -d www.yourdomain.com
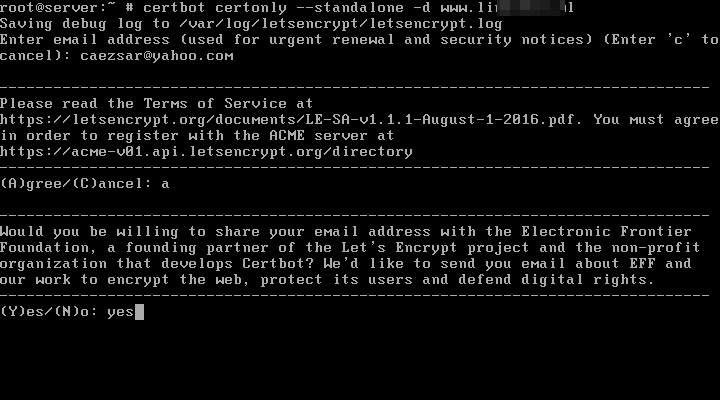
11. 인증서를 생성하는 동안 이메일 주소를 입력하고 Let's Encrypt 서비스 약관에 동의하라는 메시지가 표시됩니다. 키보드에서 a를 입력하여 동의하고 계속 진행하면 이메일 주소를 Let's Encrypt 파트너와 공유할 것인지 묻는 메시지도 표시됩니다.
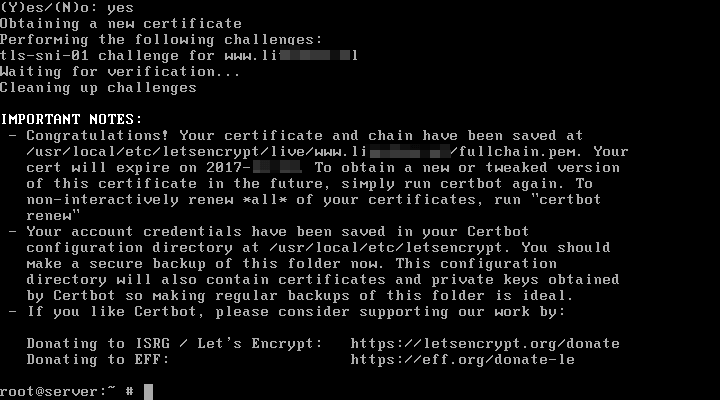
이메일 주소를 공유하고 싶지 않은 경우 프롬프트에 no 단어를 입력하고 [enter] 키를 눌러 계속하세요. 도메인에 대한 인증서를 성공적으로 획득한 후에는 인증서가 시스템에 저장되어 있는 위치와 만료 시기를 알려주는 몇 가지 중요한 메모를 받게 됩니다.
12. 도메인에 대한 Nginx 서버의 webroot 디렉토리를 추가하여 "webroot" 플러그인을 사용하여 Let's Encrypt 인증서를 얻으려는 경우 , --webroot 및 -w 플래그와 함께 다음 명령을 실행합니다. 기본적으로 Nginx 웹루트 경로를 변경하지 않은 경우 /usr/local/www/nginx/ 시스템 경로에 있어야 합니다.
certbot certonly --webroot -w /usr/local/www/nginx/ -d yourdomain.com -d www.yourdomain.com
인증서를 얻기 위한 --strandalone 절차와 마찬가지로 --webroot 절차에서도 인증서 갱신 및 보안 공지를 위한 이메일 주소를 제공하라는 메시지가 표시됩니다. a는 Let's Encrypt 이용 약관에 동의하고 no 또는 yes는 아래 샘플에 설명된 대로 이메일 주소 Let's Encrypt 파트너를 공유할지 여부를 나타냅니다.
certbot 클라이언트는 가짜 이메일 주소를 감지할 수 있으며 실제 이메일 주소를 제공할 때까지 인증서 생성을 계속할 수 없습니다.
Cerbot 샘플:
Saving debug log to /var/log/letsencrypt/letsencrypt.log
Enter email address (used for urgent renewal and security notices) (Enter 'c' to
cancel):[email   #A fake email address will be detected
There seem to be problems with that address. Enter email address (used for
urgent renewal and security notices)  If you really want to skip this, you can
run the client with --register-unsafely-without-email but make sure you then
backup your account key from /etc/letsencrypt/accounts   (Enter 'c' to cancel):[email

-------------------------------------------------------------------------------
Please read the Terms of Service at
https://letsencrypt.org/documents/LE-SA-v1.1.1-August-1-2016.pdf. You must agree
in order to register with the ACME server at
https://acme-v01.api.letsencrypt.org/directory
-------------------------------------------------------------------------------
(A)gree/(C)ancel: a ------------------------------------------------------------------------------- Would you be willing to share your email address with the Electronic Frontier Foundation, a founding partner of the Let's Encrypt project and the non-profit organization that develops Certbot? We'd like to send you email about EFF and our work to encrypt the web, protect its users and defend digital rights. ------------------------------------------------------------------------------- (Y)es/(N)o: n Obtaining a new certificate Performing the following challenges: http-01 challenge for www.domain.com Using the webroot path /usr/local/www/nginx/ for all unmatched domains. Waiting for verification... Cleaning up challenges IMPORTANT NOTES: - Congratulations! Your certificate and chain have been saved at /usr/local/etc/letsencrypt/live/www.yourdomain.com/fullchain.pem. Your cert will expire on 2017-12-28. To obtain a new or tweaked version of this certificate in the future, simply run certbot again. To non-interactively renew *all* of your certificates, run "certbot renew" - Your account credentials have been saved in your Certbot configuration directory at /usr/local/etc/letsencrypt. You should make a secure backup of this folder now. This configuration directory will also contain certificates and private keys obtained by Certbot so making regular backups of this folder is ideal. - If you like Certbot, please consider supporting our work by: Donating to ISRG / Let's Encrypt: https://letsencrypt.org/donate Donating to EFF: https://eff.org/donate-le
4단계: Nginx TLS 인증서 업데이트
13. FreeBSD에서 획득한 Let’s Encrypt 인증서 및 키의 위치는 /usr/local/etc/letsencrypt/live/www.yourdomain.com/ 시스템 경로입니다. 다음 예에 설명된 것처럼 Let’s Encrypt 인증서의 구성 요소인 체인 파일, 전체 체인 파일, 개인 키 및 인증서 파일을 표시하려면 ls 명령을 실행하세요.
ls /usr/local/etc/letsencrypt/live/www.yourdomain.com/

14. Nginx 웹 서버에 도메인의 Let's Encrypt 인증서를 설치하려면 Nginx 기본 구성 파일 또는 Nginx TLS 서버용 구성 파일(별도 파일인 경우)을 열고 아래 줄을 수정합니다. 아래 그림과 같이 Let's Encrypt 발급 인증서의 경로를 반영합니다.
nano /usr/local/etc/nginx/nginx.conf
이 샘플과 같이 보이도록 다음 줄을 업데이트합니다.
ssl_certificate "/usr/local/etc/letsencrypt/live/www.yourdomain.com/cert.pem";
	ssl_certificate_key "/usr/local/etc/letsencrypt/live/www.yourdomain.com/privkey.pem";
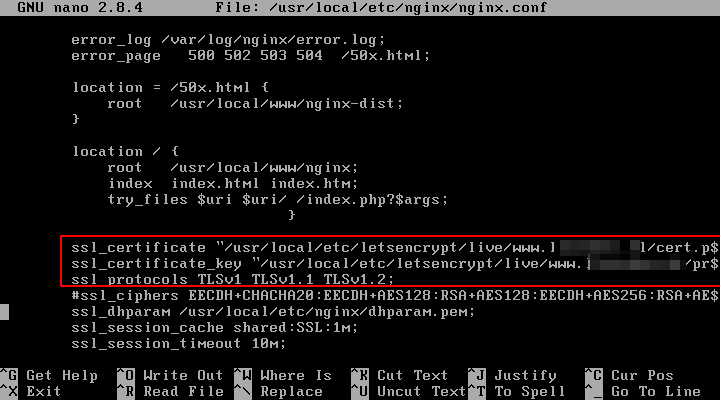
15. 또한 ssl_dhparam 행이 Nginx SSL 구성에 있는 경우 새로운 2048 비트를 생성해야 합니다. Diffie–Hellman 키를 다음 명령으로 사용하세요.
openssl dhparam –out /usr/local/etc/nginx/dhparam.pem 2048
16. 마지막으로 Nginx TLS 구성을 활성화하려면 먼저 Nginx 전역 구성에서 가능한 구문 오류가 있는지 확인한 후 다음 명령을 실행하여 Nginx 서비스를 다시 시작하여 SSL 구성을 적용하십시오.
nginx -t
service nginx restart
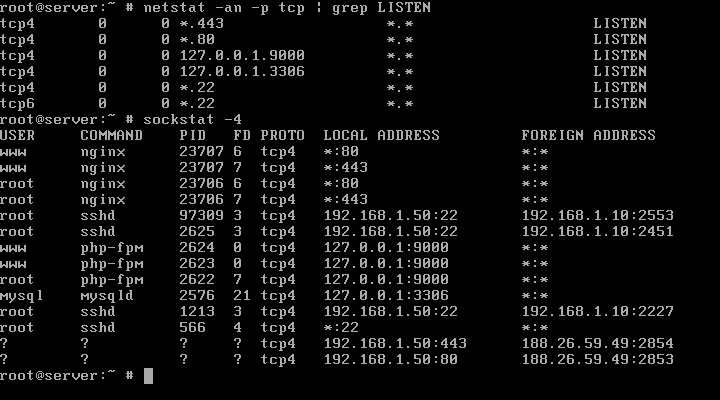
17. 청취 상태에서 시스템에 열려 있는 모든 네트워크 소켓을 나열할 수 있는 다음 명령을 실행하여 Nginx 데몬이 443 포트에 바인딩되어 있는지 확인합니다.
netstat -an -p tcp| grep LISTEN
sockstat -4
18. 브라우저를 열고 다음 주소를 입력하여 HTTPS 프로토콜을 통해 도메인 주소를 방문하여 Let's Encrypt 인증서가 예상대로 작동하는지 확인할 수도 있습니다. 유효한 인증 기관에서 생성된 인증서를 사용하고 있으므로 브라우저에 오류가 표시되지 않습니다.
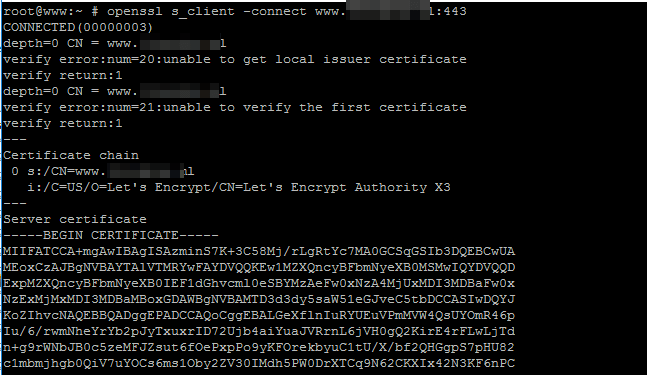
https://www.yourdomain.com
19. Openssl 유틸리티는 다음 옵션과 함께 명령을 실행하여 Let's Encrypt CA에서 얻은 인증서에 대한 정보를 찾는 데도 도움이 될 수 있습니다.
openssl s_client -connect www.yourdomain.com:443
Nginx가 포트 80에서 도메인에 대해 수신된 모든 http to https 요청을 HTTPS로 지정하도록 하려면 Nginx 구성 파일을 열고 포트 80에 대한 서버 지시문을 찾으세요. 아래 예와 같이 server_name 문 뒤에 아래 줄을 추가합니다.
rewrite ^(.*) https://www.yourdomain.com$1 permanent;

20. Let's Encrypt 기관에서 발급한 인증서가 만료되기 전에 자동 갱신을 설정하려면 다음 명령을 실행하여 하루에 한 번 실행되도록 크론 작업을 예약하면 됩니다.
crontab -e
인증서를 갱신하는 Cron 작업입니다.
0 0 * * * certbot renew >> /var/log/letsencrypt.log
그게 다야! Nginx는 이제 Let’s Encrypt 무료 인증서를 사용하여 방문자에게 보안 웹 애플리케이션을 제공할 수 있습니다.